Fun Alert!
Looking for a fun date with your hunny? Or a fun outing with friends? Or have you ever wanted to scuba dive? Check out today’s Groupon (SLC area) and pick up a CHEAP (I’m talking $10 each, babeeee) adventure! Click here for your ticket to an underwater adventure! Hurry, only available today, Thursday!
Scrap My Scraps Challenge 3 Information – SLOTS ARE FULL! YAY!
Hey friends! It’s 11:15 pm on Wednesday night as I type this. Yesterday I promised to have the details for you today…. and tonight as I was just getting ready to crash out and the muscle relaxer kicking in so the twitching in my knee wouldn’t keep me up all night and going over the events of the day, remembered….. shot up out of bed and hobbled down here to the studio to clank out some info. This round of Scrap My Scraps is going to be a little different AGAIN 🙂 I like being different, that’s just how I roll, and being slightly round-ish I roll along nicely. So, dear friends, here’s the scoop. I have room for 5 {UPDATE @ 11:33 PM Thurs – WE ARE FULL} players this round. I promised someone last round that they could play the next round and have already mailed them their envelope 🙂 Besides, it has an awfully long way to go for its journey and needed a little head start. Please only ask to play if you are going to follow through. Scrap My Scraps Round 3 Details: You will receive an envelope with several images and sentiments stamped onto white cardstock and a list of printed guidelines. You may use ANY papers and embellishments from any company, but you must use the images in the envelope. Everyone will receive exactly the same images and sentiments. Your mission is to create a piece of artwork using ALL of these guidelines: 1) Use at least TWO of the images (MUST use the large image included) 2) Use at least ONE sentiment. 3) Incorporate stitching of some sort. 4) Incorporate additional decorative fibers (non paper). 5) Use 1-2 pieces of METAL. 6) Make it POP.. use some dimensional adhesives (pop dots, tabs, foam tape, etc). 7) Have FUUUUN!!!! Deadline: Photographs of your project (emailed) are due to me by: Friday, June 25th That’s it… pretty easy peasy… I am excited to see what everyone does with the scraps 🙂 Shoot me an email with your name and mailing address and I will pop these out in the mail to the players. Sleepy Smiles!!
Skipping Stones Design Sketch Tuesday: SSD027 Home of the Brave
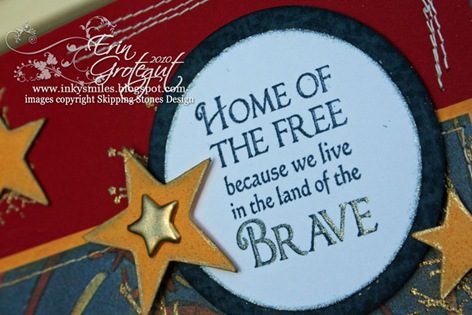
Hey friends! I need to apologize for being away so long. No drama, just life, and when life gets busy around my place my blog is the very last thing on my mind and very first thing to get pushed to the back of the line. Brent took the last 5 days off of work and we’ve just been hanging out and enjoying having “nothing” to do. We have gotten some house projects done, took care of the car and settled with insurance, bought a couple of new toys and discovered a new hobby. I did completely space giving details on June’s Scrap My Scraps Challenge. I will post about that tomorrow. I PROMISE 🙂 Moving along… We’re starting with another month of sketches with Skipping Stones Design this week. June’s sketch artist is Teri Anderson. You may have seen her sketches in Papercraft’s “Go To Sketches”. Here’s Teri’s first sketch for the month of June: I hope you all have had a marvelous Memorial Weekend and Memorial Day!! I love the summer months and all the patriotic celebrations. We have MUCH to celebrate living in America and MUCH to be grateful for. As an Army Brat I get particularly verklempt and carry a huge smile in my heart at each special holiday. Yesterday, Memorial Day, we celebrated and honored those men and women who currently serve, have served, and have given their lives for the freedoms we treasure. In addition to many friends, both my grandfather and father served our country and I am eternally grateful for them. This is my card for our first sketch. It is simple (relatively quick to create), to the point and honors those who have served. I used SSD’s Home of the Brave stamp set that was released last month. I love the fireworks and they screamed at me to use embossing powder. Each star (cut with my new toy) is popped up with a pop dot and I blinged out the edges with a clear gel glitter pen and distressed the fronts with a chalk ink pad. I did some random stitching at the top right corner and outlined the Provo Craft patterned paper with a straight stitch. I needed a gold brad for the center star, but only had silver so I heated it up with my heat gun and dipped it in the embossing powder. Worked like a charm 🙂 Thanks for popping by! See you later this week! ~Inky Smiles! Supplies: Stamps – Skipping Stones Design Home of the Brave Inks – CTMH, Colorbok, Versamark, Sakura Clear Glitter Pen Papers – misc CTMH & Provo Craft (super ancient patriotic pad Misc –CTMH gold ep, heat gun, my new toy, thread, Bernie, AC pop dots & tabs
Skipping Stones Sketch Tuesday & Blog Hop : SSD025 – Holy Carp!
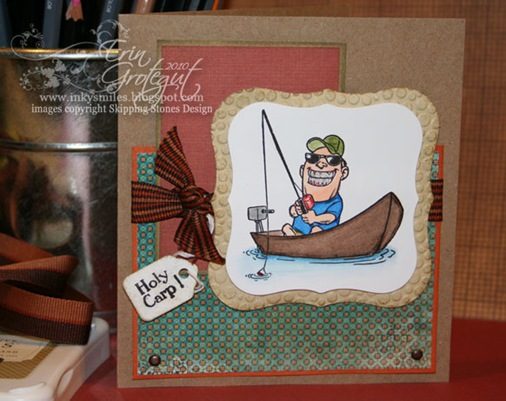
Welcome to Skipping Stones Design’s Blog Design Team Blog Hop!! I’m so glad to “see” you here today! Today we are celebrating the release of two new stamp sets, Holy Carp and Home of the Brave. If you just happened upon my blog today, you’ll want to go back to the beginning at Skipping Stones Design. You should have arrived from Jen del Muro’s blog. Combined with the blog hop today, it’s also Skipping Stones Sketch Tuesday which means the Design Team is showcasing another great creation from Jen del Muro. We’d love for you to play along with the sketch. Just remember to use the keywords SSD025 if you are uploading to any online galleries or link your card at the Skipping Stones Blog. We LOVE having guest designers so come on and participate… you never know when you might be asked to play… Today we have a SUPER DUPER FUN sketch from Jen del Muro. I’ve been excited to play with this sketch since we got the sketches last month. I just needed the “right” stamp set and boy did I get the right set with this month’s releases! When I opened my envelope of treasures I was so stoked to find the Holy Carp set. Now if you will please excuse the potty humor… Who could resist playing with and blogging about a stamp set called Holy Carp right after a toilet paper technique tutorial?” LOLOLOL… Ok… ‘nuff with that. Just keep stamping, just keep stamping… Here’s today’s fabulous sketch. I pretty much followed the rules today and stuck to the sketch… EXCEPT… I had to jiggle the sketch so that the “star” scooted over to the other side of the card cuz it just wasn’t cooperating with the image and embellishments I was using. (But I think you’ll still like the card… keep reading…) Here’s my card: I just HAD to move the “star” accent over to the side because it kept interfering with that really cool boat and I would have had to make a GINORMOUS card to make it fit over there… as it is this card is 5 x 5.5” Here’s the inside: So anyway… this set was so fun to play with… I have just the person in mind to receive it a little later this summer… My dad is turning 60 and he’s loved fishing for many years.. I think he’ll get a kick out of the card. 🙂 Here are a couple detail shots: This card needed some bling and sparkle, but since it’s for someone of the dude variety I had to keep the sparkly bling in check… HOWEVER, that being said, I couldn’t resist blinging up that big ol’ cheeser… It sparkles nicely in “real life”… TIP: Hey – did you know if your die cut for matting an image is a little too big and you don’t have an “in between size” you can zip it through your Cuttlebug and the embossing will slightly “shrink” up your mat… voila! Now it fits mo bettah! Creative Supplies: Stamps – Skipping Stones Design’s Holy Carp Inks – CTMH Black & Desert Sand Papers – Misc from my scrap stash, Kraft CS, Gina K White CS Miscellaneous – Cuttlebug and folder, Spellbinders dies, misc brads (inked with brown Stazon), misc ribbon, jewelry tag, AC Foam Tabs, watercolor pencils (SU & CTMH), odorless mineral spirits & paper stick, Sakura clear glitter pen, ATG adhesive. Your next stop is the awesome Kandi Phillips… go on… swim on over and leave her some love! Inky Smiles! PS… Coming up later this week here at Inky Smiles I will be posting about a new round of Scrap My Scraps for June for 6 players! Stay tuned! Blog Hop Order (just in case): Skipping Stones Design http://skippingstonesdesign.com Jen del Muro http://iheart2stamp.com Erin Grotegut http://www.inkysmiles.blogspot.com Kandi Phillips http://kraftykandikrafts.blogspot.com Deb Felts http://withastampandasong.blogspot.com Peggy Russell http://beautifulgreetings.blogspot.com Michelle Giraud http://twisted-chick.blogspot.com Jennifer Ingle http://justjingle.blogspot.com Amanda Sewell http://www.inkspirations.blogspot.com Angela Thomas http://sparkleandbling.blogspot.com
BLOG HOP POSTPONED
My apologies to those of you who have received an email and are looking for today’s post. I just received an email from Skipping Stones Design and today’s Blog Hop has been postponed until tomorrow, Wednesday, May 19th. I just pulled my post and rescheduled it for tomorrow. Please come back to play with us! Inky Smiles!
Tutorial: Toilet Paper Molding Technique
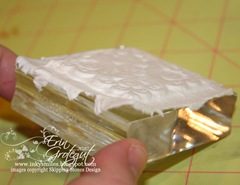
Toilet paper is always fun to talk about on a blog. Some of you may remember blending paper towels and sheets of paper in a blender with some water to make “homemade paper” art projects in the 3rd grade. I remember doing that and having so much fun creating molds and shapes with my paper pulp… but man, it sure was messy! Today I want to share with you a technique that can accomplish the same end result with a lot less pulpy mess. Toilet paper molding or casting is a fun technique that you can use to create interesting textures and designs for your art projects. This technique has been around for a while, but I thought I’d show you in my own words and pictures. Here is a card I created a while back (but have not shared yet) using this technique. Here are the supplies you will need: The scissors are if you need to cut the toilet paper and the tweezers are for those who may have a hard time gripping the paper or for holding it when you use the heat tool. Basic Tools: Toilet paper (quilted is fine.. it will “un”quilt when it is wet) Water Glimmer Mist (Optional for added shimmery-ness, mine is homemade) Deeply etched pattern stamp on a block Heat tool Ok let’s get started! I’m using a square stamp from Skipping Stones Design’s Rustic Tiles stamp set. This stamp is stained with white StazOn ink. Step 1: Tear or cut off 5-8 sheets/squares of toilet paper (TP). I am using 5 because this TP is on the thicker side. If I was using the super thin Scottissue that is only 1 ply, I’d use probably 8+ squares. It really varies on the stamp you’re using. Don’t worry if it’s quilted TP, the quilts will go away when you wet it. Lay the stamp face up on your work surface and cover with the TP. Step 2 Spritz generously with water until the TP is thoroughly soaked. Some people run their TP under a faucet and wet it, but I’m too lazy to go wandering so the water spritzer works… and I don’t have to worry about my TP getting too soaked and tearing, and then dripping as I walk over wood floors back to my desk. (Bling Tip: Depending on which side will be your “up side or visible side” you may wish to spritz with the Glimmer mist first.) Spritz and make an initial “SMOOSH” with your flat hand on the wet TP to start the process of forming the shaped image. You may need to spritz more to get the TP to smooosh down into the design of the stamp. Continue pressing the TP into the stamp image with your fingers. Step 3 Place your flat hand on top of the TP and stamp, then carefully tug and pull to tear away excess TP from the edges. Be very careful because the TP is still very wet and you can stretch out your TP mold still at this point. Step 4 Pull some more TP off the roll and bunch up into a “wad”. Don’t make it a flat ball, you want it all lumpy bumpy… lumpy bumpy is good…it helps press the wet TP down into the grooves of the image. Start at one corner of your stamp and smooosh that wad of TP down into the wet TP on the stamp. Work your way around the stamp removing water from the TP. You may need to adjust your crumpled wad in your hand if it gets too wet. Repeat this step until you get most of the water out of the TP on the stamp. Your TP should look almost dry like this: Here’s what it looks like after I spritzed some homemade glimmer mist on the top of this image. My glimmer mist has alcohol in it so it dries rather quickly. Step 5 Heat up your heat gun. I always like to heat mine up for about 20 –30 seconds before applying the hot air to a project. This way I get hot, hot air. Hold your heat gun about 8 or more inches from your TP covered stamp and heat until dry. I rotate it around and dry all the edges. You will be able to tell if it’s really dry or not just by watching the white get brighter and more solid looking. Carefully flick up a corner of your molded TP piece and carefully peel UP and away from the stamp. If the center “sags” and does not pop up right away, it’s not dry enough. Keep blasting it with the heat gun. Below is an image of the dry sparkly side of this finished piece Here are the images of the reverse side of this TP art. I’ve adjusted the shadowing in the pics so that you can see the details in the TP molds. For the card in this example I used two stamps placed side by side on a larger acrylic block to create a rectangle focal point and backdrop for the silk flower buds on the card. Voila! There you have it, friends… Toilet Paper art for grown ups. 🙂 Inky Smiles & Happy TP’ing!
Skipping Stones Design Sketch Tuesday: SSD024 Rustic Tiles
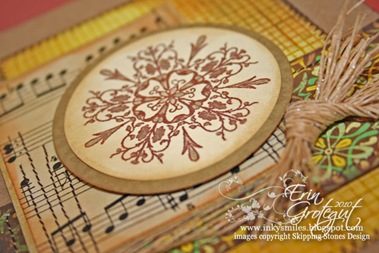
Hey friends! I’m back this week. Yay… or something. LOL! Anyway.. it’s been a seriously insane week. It’s 12:41 am on Tuesday and I’m hurrying to get this post scheduled so I can hit the sack and be ready for work in a few hours. Long story short: we’re still working with the insurance on settling about the car. We did, however, purchase a smokin’ hot car tonight in Salt Lake City from the dealership Brent’s bro is a mechanic at. (Details forthcoming.) We also patched up nicks and stuff on walls and corners AND then gutted the laundry room yesterday and got it pretty much dejunked… there’s just some fine tuning for me to do to the stuff we’re storing in there. I combined and condensed loads of boxes and purged so much junk we were hanging on to.. YAY! SooooOOO… one step closer to sell the house in the near future which means less time having Brent on the road and more time with him home with me and Sadie. 🙂 SO today’s sketch was super fun! I wish I had had the energy (both mental and physical) last week to tackle the last sketch, but…. maybe I will later.. I pretty much stuck to today’s sketch for ease and speed of construction. Here’s today’s sketch from the awesome Jen del Muro from I Heart To Stamp: And here’s my little contribution this week: I used a variety of scraps (mostly Basic Grey’s Origins) from my scrap bin that sits on my desk. The sheet music came from the February monthly kit from Treasured Memories Scrapbooking. I looooove the sheet music paper and because Erin Gudge (the other Erin G and owner of TM) is so cool, she sent me a couple extra sheets! I heart her! 🙂 🙂 The focal image is stamped with a stamp from Skipping Stones Design’s Rustic Tiles stamp set. I’m really loving this set and have another fun card to share with you later this week and a fun technique tutorial to follow. I colored parts of the image with a clear glitter Sakura gel pen for added *pop* and it’s all tied up with a bit of raffia-ish ribbon. Here’s a close up: And I did the inside this time, too. I think the inside of this one might actually make a cool outside of a card, too. Well, my friends, that’s it for today. I hope you all have a mahvelous day! See you later this week! Inky Smiles!
Happy WOMEN ROCK Day
Happy WOMEN ROCK day to all my friends, whether you’re a mom or not. Happy WOMEN ROCK day to moms who’s hearts ache for lost and wayward little ones, to women who long to have children but that blessing is denied, to those missing their mothers or other influential women in their lives, to those who may not have had the best experience with their mothers and are sad today. And Happy Mother’s Day to my wonderful mother, Karen, my mother in law, Rosalind, and my grandmothers! Happy WOMEN ROCK day!
Randomness From My Week & a Fun Anita Renfroe Video
Hey Friends! It’s been a CrAzY week this week. I worked a couple of days extra and finally ALMOST got caught up at work. YAY! Did some spring cleaning @ the house and finally straightened up and cleaned up my pantry. Went to the cardiologist and had a good visit… I don’t have to go back unless I start having the same issues that I had going on last year again. Dr said that my heart sounded good and my bp was super low (it wasn’t high until I started having issues last year, but that happens when you’re really sick.) He said I can go back to normal activities (once I get the ok from the ortho on my injured knee). I’m so happy about that! Thursday I tended a wee one (adorable 9 month old) and his sister for several hours for a friend and thoroughly enjoyed it. We played, did homework, and goofed around in general. Bought a GORGEOUS chair at a liquidation place on the way home from work one night… I’ve been looking for one to put in my front room for a while now but those chairs are all in excess of $350-$400… More than I would want to spend right now. Anyway… found one listed in the classifieds (for around $100) and went to look at it. It was GORGEOUS, but wouldn’t fit in the car… but they had one still in the box, so we took that one home. When we got home we realized we should have taken all the protective plastic off and checked a little more thoroughly. One of the fancy legs was broken 🙁 WAAAAH. Thank goodness I have an amazing husband who has a woodshop and loooootz of mad skillz. Woot woot! Brent and I are considering moving closer to his work and we’ve been out checking out neighborhoods where we think we’d like to move and getting odds and ends finished up here around the house. (Some of you will remember the construction following the Great Poo Flood in 2008… ay yi yi…) We’re getting MAJOR reconstruction on the one and only highway that connects us to Brent’s work for the next 2 years and are looking at one way commutes in excess of 2 hours. Currently his “normal” commute is 40+ mins each way. So far I’ve only been excited about one place and it’s likely the most expensive place that we’ve looked at and requires a new build in a brand spanking new neighborhood. On one hand it’s exciting to build a new home to get exactly (within reason) what you want, but then on the other hand it’s scary moving somewhere where there aren’t really many neighbors (yet) and you don’t know what’s going in around you. Ay yi yi….. This process is more stressful than I thought it would be. The kicker of the week.. bleh.. the kicker of the week was that Brent was in a “fun” little incidente (Italian for accident) yesterday on his way to lunch. He was going straight through a green light and and older couple turned right in front of him… in the words of Batman… POW, CRUNCH, SNAP, KaBOOOOOOOOOOOOOOOOOOOOOOOOOM! (The KaBOOM was the airbag blowing up on Brent.) Thankfully Brent is “ok” with just some bruising, joint and muscle pain, and a nasty chemical burn from the airbag. He was only going about 25 mph, probably slow enough for his guardian angel to keep up. The other couple is probably fine, but they had to cut the wife out of the car because their doors were smashed. She was taken to the hospital in an ambulance. I hope they are ok. A positive thing from this was that a nice couple saw the accident and stopped to make sure Brent was ok and gave them their phone number in case he needed a witness. (Which is now necessary because the officer was not able to determine who was at fault. HUH? The normal traffic rule is that when you’re turning on a green light -not arrow- ONCOMING traffic has the right away, right? ARRRRGH!) Thank goodness for the kindness of strangers!! We spoke with the insurance adjuster this morning and our car is likely totaled. I am SO incredibly discouraged about that. We LOVE our little Malibu. It was only 2 years old and was in EXCELLENT condition and got MAHVELOUS gas mileage (which helps cuz we live over 30 miles from B’s work). We got an incredible deal on the car (we did major shopping and haggling with the dealer) and the same car is going for $5 – 6K more right now. (We don’t like having car payments… we usually have them for a year or two and pay the car off.) I’m really not happy about having to shop for a new car again. 🙁 I guess the reason for me telling you all of this schtuff is that if my posting becomes somewhat more erratic, you now know why. Stay tuned, stick with me.. .I won’t be wonky forever.. ok, maybe I might, but I will try my best to keep things interesting here on the blog. After all this craziness I found this fun link on YouTube and couldn’t resist sharing. I <3 Anita Renfroe. She always puts a laugh in my heart. Here's one for you… Enjoy & wrINKly Smiles! [youtube https://www.youtube.com/watch?v=XaruNs_7okY&hl=en_US&fs=1&rel=0&color1=0xcc2550&color2=0xe87a9f&border=1]
Tutorial: Popped Metal or Metal Popping
I had so much fun making my last SSD card and figured I should share with you how I did my background for my “masculine” card. I think I will call this technique “Popped Metal” or “Metal Popping”. I was going to try to use a “Chalk Popping” technique on the card but realized I needed to think up something else when I peeked at my chalks and saw that I only had pastel colors… so I pulled open my “messy embellishments” drawer and my eyes were immediately drawn to my metallic pastes. VOILA! IDEA!!! BLING BLING! This is amazingly easy (basically TWO steps) but gives a really cool result… so here we go… You will need: * Versamark Ink Pad * Metallic Rub On Paste (mine came from Gina K Designs) * Detailed stamp ( I’m using Rustic Tiles from Skipping Stones Design) * Sponge * Colored Cardstock & Scrap paper (to protect workspace) Step One: Ink up your image with a clean Versamark pad (you don’t want to use one that is stained with colored ink because it may transfer to your artwork – ick!) Begin stamping your image. I like to start off the page so the design runs off the page. Stagger the images on each row so you don’t have “running seams”. Cover the entire piece of cardstock with the Versamark stamped image. Be careful not to “smudge” the images with your fingers while stamping… what you smudge will show up in Step 2. Here you can see the CS covered in Versamark images: Step 2: Gently rub your sponge in the Metallic Rub On Paste. Don’t glop it on because it will come off too thick on your artwork and make a royal metallic mess. This requires a LIGHT touch, so if you have lead foot fingers like me and just want to SMOOSH that ink in stop now and take a breath. LOL! Start at one corner or end. Using just a teeeeny weeeeeny bit of pressure… just enough to transfer the Metallic Rub On Paste to the paper…. rub the sponge over the Versamarked images in a circular motion. You will start to see the images POP out in metallic splendor. If you have gaps between your images be careful not to rub the paste down in the gaps or you will get a “grid” look. But if that’s the look you’re going for, then hey, go for it 🙂 Continue rubbing the Metallic Rub On Paste on the Versmarked images, “reinking” the sponge as needed, until all the Versamark has been popped out. Finish at opposite end/side of where you started. I love how this looks… you can go back and darken areas for a more distressed look or for shadowing for the images you might be layering up for the final product and ink the edges darker with the Metallic Rub On Paste. Here’s how I used this background piece: Thanks for playing today! Inky Smiles!