Windows Live Writer – Basic Tutorial
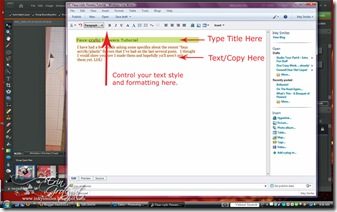
I {heart} Windows Live Writer. It makes my blogging life MO BETTAH. Jeanne Tomshack introduced it to me a while back and I have not used the online blogger interface to blog since. I had so many trouble with Blogger eating my photos and not publishing when it was supposed to, etc…. Blogger was also very cumbersome to compose posts in. Now, don’t get me wrong. I still use Blogger to host my blog and still have to log in to my Blogger dashboard to make the overall layout changes, etc., but I make the actual posts in Windows Live Writer (WLW). I thought I’d show you a very basic photo tutorial on using it. So here we go. WLW is a WYSIWYG program… “what you see is what you get”. There’s no guessing about how your text is going to appear or whether or not your photos are going to line up properly in your post. You can type up posts ahead of time if you’re going on vacation or won’t be near a computer but still want to share on your blog. WLV’s scheduling feature works GREAT! The first thing you need to do is download Windows Live Writer HERE. You will need a Windows Live account (also can be a hotmail user account or MSN account… all the same company). Windows Live Writer is FREE. {Hallelujah!} Once you’ve downloaded WLW it will prompt you to set up your user account info and password for your blog. Don’t worry, it only uses it to access your blog to upload and publish your posts. Here are some photos for using WLW. I printed my screen while publishing a recent post. Click on the photos to view larger. They should open in a separate window. Getting Started Inserting Photos Linking Text Inserting a Photo Album Scheduling a Publish Date {{edited: I just realized I’d abbreviated WLV instead of WLW…. I must have been thinking . Windows Live Vriter…. ooops!!! ROFL! It’s been corrected…}}
Faux-crylic Flowers Tutorial
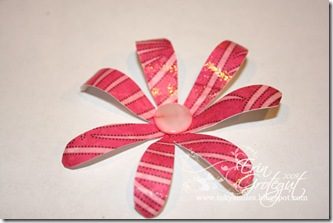
I have had a few emails asking some specifics about the recent “faux acrylic/plastic” flowers that I’ve had on the last several posts. I thought I would show you how I made them and hopefully ya’ll aren’t sick of them yet. LOL! This is a really easy process and you don’t need anything special… I think most crafters have a heat gun and embossing powder… and I KNOW you all have stamps! 🙂 This is also a great project for using up those odds n ends paper scraps or papers you thought you loved but now can’t seem to figure out what to use them on…. Supplies Needed: * Embossing Powder * Versamark Ink * Heat Gun * Scissors *Chunky Floral Image – CTMH Rustic Flowers * Something like a pencil to roll your petals on * Patterned Paper – Basic Grey Step 1: * Load up stamp with versamark ink. Stamp firmly and evenly onto paper. Step 2: * Sprinkle generously with clear embossing powder, tap off excess. Step 3: * Heat with heat gun and melt all powder. Step 4: * Cut out shape around embossed image. Step 5: * Curl edges around a pencil or other small round object. Step 6: * Scrunch the center and press petals forward. ENJOY & EMBELLISH!! Inky Smiles! View Full Album
Brilliante!!

Hey, so I scheduled this post before I left… let’s hope the other two actually work, too! LOL! A while back, Tresa Black gave me an award for my blog…. and I failed to follow through on passing it along… so I think now’s a perfect time, eh? So without further adieu…. I nominate the following folks… for various reasons…. because they are BRILLIANTE in my books! Stop by their blogs, check out their brilliant works of art and give them a shout! Kathi Carlson Barbara W. Michelle Durheim Karyn Campbell Stacey Flores Sparkle Smith Rachelle Funk Stacey aka “Stace” The official rules are to tag 7 people and then they tag 7 people. Some folks don’t like to play the tagging game, but I think it’s fun sometimes… so if you’d like to play along, go ahead and nominate more ppl on your blogs! Have a happy day! Inky Smiles! Erin
What’s This – A Bouquet of Flowers!

I joined Curves almost a month ago. I finally decided that I needed to something about all this extra hamburger I’ve been packing around for years. PCOS and all the many years of infertility drugs have done a number on me… UGH! Went by Curves to “check it out”…. did you know they make you stand on a SCALE and MEASURE you during an assessment before you even sign up??? MY LANDS! The nice little old lady had me kick off my shoes and stand on the scale…. which was followed by a string of obscenities a few naughty undermybreath words and a swift kick to the scale after which I departed the scale, put my shoes back on and handed over my money. So anyway…. the first day was pure hell. I worked a little too hard and my fibromyalgia flare up points (my forearms) went BERZERK and I laid in bed in pain all night hugging a hot rice bag. The next day I got up and hauled my aching carcass back to Curves and worked out again. So much better the 2nd day and so far, so good. I feel great, haven’t lost any pounds yet, but my shirts are feeling a little looser and my body feels stronger. (Now to work on strengthening my lower back for walking endurance and less pain.) So what does this have to do with the pretty little teaser I showed you earlier? Well, I will tell you…. Curves is big on “causes”… especially cancer. The American Cancer Society’s Relay For Life is coming up in June and you can buy a plain little white sack for $5, decorate it, then hang it on their wall until the Relay For Life. During the RFL, they fill the sacks with sand and a little candle, then line them up along the course and light the candles. I have many relatives who have had cancer… but I thought I’d honor my paternal grandmother this time and make a luminary for her. Here’s what I came up with. It was so much fun to dream up and make!! I quilled the butterfly out of hand cut cardstock. The flowers are made using BG Urban Prairie paper and CTMH Rustic Flowers Stamp Set and heat embossed & popped up with foam squares.. I hand cut each one and curled the edges. The leaves are hand cut and inked. It originally did not have leaves, but I think I like it better with… 🙂 Supplies: Basic Grey Urban Prairie paper pack CTMH Rustic Flowers Clear Detail Embossing Powder + Versamark SEI Buttons Rhinestones & Stars Martha Stewart Lattice Border Punch & Bubble/Dot Punch (??) Nestabilities Large Oval and Scalloped Oval Timber Brown StazOn White Gel Pen Textured White Archiver’s Cardstock Archivers Smooth Cardstock Aileen’s glue (for quilling) American Crafts Foam Dots {As always, you can click for a larger view.} It was really difficult to get a good photo today. Here are some better close up shots. And the back:
What is this?

Teaser….! Can you guess what this is? LOL! I just wanted to share a sneak peek and show ya that I have actually been crafting this week! My studio is an absolute pigsty right now… I’ve got to run some errands, but I will be back later to show you what this is! Inky Smiles! Erin
Studio Tour: Part 5 – It All Fits Together In This Small Space {full reveal}

So now we’ve made it through the details of how I organize and function in this space… here’s the full reveal of my creative space. I know, I know… how long have I been promising it?? {I hereby pinky swear to never promise anything on a time schedule ever again…. } This is a wonky, odd shaped, small space that I share with the family office at the bottom of the stairs in the corner of the basement. {Ok, mostly I’ve taken over..} Here’s the “official tour”. Thank you for your patience. I hope you like it as much as I do and I hope it inspires you in some way to do something fun with your creative space, no matter what wonky size or shape you’ve got. {You can click on the photos for a larger view. They should open up in a new window.} {Edited: All of the details – pattern # for curtains, paint color, etc., are listed in the posts linked under “My Studio” on the left side of this blog.} Peeking down the stairs from the first level. All the crazy colors in my house meet in this small little space… Thankfully the tin box of silk flowers breaks it up and blends all the colors together and makes it work! {Yah, I know there’s no carpet on the landing… LOL! When Brent got laid off in Jan we put the remodel finish on hold. Now that he is full time employed again we are gearing up to choose carpet for the stairs after we get back from visiting my folks.} When you hit the bottom of the stairs and look left, I have some fun clipboards hanging on the angled wall with pics of my favorite people to keep me company. Looking straight ahead from the stair landing is the office workstation. {I must have been jamming to tunes on winamp.. it’s up on the monitor. Today’s blogging tunes are a variety of hits from Ace of Base and the Beatles… Winamp is playing in alphabetical order this afternoon… hehe!} And we’ll go around the room from here… And that view again from the hallway into the studio…. And back around… here you can see the antique window and what I did with it. Originally I had wanted to do a “wall of E’s” all cutely decorated and altered, but as the studio re-do progressed there wasn’t a wall that really worked for just “E’s”. I thought the window was a fun place to rest some of the previously altered E’s. I’ve got to work on some more.. just gotta find some cool looking letters. A bird’s eye view of the whole space. It’s hard to get an accurate photo of the place because of the wonky size/shape. This is my space. I love it. I am so very grateful for a sweet husband who helped me customize it and agreed to the fru fru and fun colors in the open space. It took a long time to pull it all together. {Life happens that way sometimes… and the cleaning and purging and organizing was a bear!!} But it came together and it fits my creating style and it works for mE. Thanks for coming along on this tour with me! Inky Smiles & Happy Crafting!
Studio Tour: Part 4 – Bookshelf and Desk Organization

I’m so sorry for the delay in posting. I got rather busy with work, the business, getting the yard in shape, the garden ready for planting (and some planting done), and life in general. I wanted to show you how I organize my stuff that’s “out in the open” in my bookshelf and in my desk. I have plans drawn up for a really cool big, red bookshelf to replace the small brown Sauder one that’s currently in the space. I “kinda” ran out of money for the red bookshelf during our remodel because I chose a more expensive faucet set for the tub/shower/sink in the master bath AND ended up putting in a granite counter top… so, I guess I didn’t really “run out” of cash, I “reallocated it” … lol! Anyway… some time this summer when we find some time, Brent and I will build the big red bookshelf! Until then, this is what I have in the space and it is working fabulously for me. BOOKSHELF ORGANIZATION: The current bookshelf sits at the end of my desk. Here’s a view of it from down the hall that goes to the rest of the basement. My closet is on the left. You’ll see the first photo again in the next post when I put it all together for the full view. 🙂 {Click on photos for large views”} The bookshelf is a GREAT example of how I like to have things visible/open/out in the open but contained and everything has a home. I have gobs of ribbon because I “*think* I might be addicted…. It’s stored in 3 places: extra weird ribbons and fibers in the closet, scrap pieces and tiny spool in a jar (coming next post), and spooled ribbon in the RibbonStak from Stamper Storage. I have not decided on a color to paint it yet, because it depends on the red bookshelf making it in the room… so it sits in here naked… next to the lovely white Magpie storage from Quickutz. I flipped the silver boxes upside down and use it to contain a variety of items such as: mini metal alpha charms (for jewelry, crazy ladies, and papercrafting), a large grommet setter, extra shuttles and blades for paper cutters, metal rimmed tags, etc. There’s a jar of beads, an old soda bottle that holds my red buttons and some red silk flowers that I snip off to use on cards and a metal bucket with odds n ends blingy things like sticky rhinestones, etc. Movin’ on down the bookshelf…. to my “cutting station”. Some folks have a dedicated table/space to cut with their Cricut/Wishblade/Silhouette, etc…. I haven’t decided what I want for an electronic cutter yet {well sorta leaning towards the freedom of a Silhouette} so I just cut and emboss everything with my Cuttlebug and a little elbow grease. The Cuttlebug fits neatly between two baskets {recycled from the family/media room} which hold my various cutting and embossing dies {Nesties, Sizzix, and Cuttlebug} and odds & ends stamps. I was having a hard time keeping track of what CB embossing folders I had… could never remember their names, so I looked them up online and wrote my name and the name of the folder on each folder with Sharpie. Works great now! I keep the Nesties banded together by shape. I store my CTMH square packaged stamps in an AWESOME set of drawers that Brent built for me for Christmas. Again, no color decided yet and I’m searching for the perfect drawer pull handles for the fronts. These are amazing little drawers… I think the super packed middle drawer holds 23 sets of stamps. That’s a lot in one little space! I’m out of space for these stamps already and thankfully there are pieces for a second set of drawers cut out in the workshop. There are several white photo boxes on the next shelf down that hold a variety of extra goodies. I like being able to pull out a box and set it on my desk while I’m working, then toss all the goodies back in the box and put it neatly on the shelf. Closed and contained! I store my embossing powders, adhesives, etc in them. {It’s funny, glue sticks are awful for scrapbooking and I really don’t like them, yet I have a zillion of them… lol!} Bottom shelf – My paper is all neatly stored in Cropper Hopper vertical boxes. I sort most by color and by brand in individual 12×12 file folders. Patterned papers are stored together by general theme; polka dots, stripes, vintage, wedding, red patterned, pink patterned, etc. I keep my CTMH kits/packs in the plastic bags they came in. It helps me keep track of what goes with what. 🙂 {I need to do some purging of the paper collection… there’s paper in that collection that I will probably never use!} DESK/WORK SPACE ORGANIZATION & SET UP: I ABSOLUTELY LOVE my humongous desk and work station. Brent and I built it several years ago to fit this wonky space. It has a bunch of drawers and cubbies for all kinds of great organization. The far end is used for computing and Stamper Storage business work, but the end closest to the closet and bookshelf is my fun creative space. The InkStak is a custom build by my sweet husband, Brent. Regular InkStaks can be customized at Stamper Storage, but this one is super special. Brent custom built the trim on this sweet baby and picked out “just the right pink” paint. {I tell you, I am the most handicapped paint color chooser on the planet.} This InkStak holds 90 inkpads and 60 + markers {or 10 more inkpads to total 100 inkpads, which is likely going to be happening soon and the markers will find a new home!} I love my InkStak, the inkpads slide out easily and stack nice and neatly. Currently mine are sorted by color and brand with StazOn,
Studio Tour: Part 3 – Organization “The Closet” – Post #300

{Forgive me if my typing is a little wonky.. I just got back from the eye dr and my eyes are still numb… I will try to catch all my spelling errors and typos…. lol!} I have this rather big closet at one end of my studio. It’s a 4x4x8’ space that Brent built shelves in several years ago. For the longest time it was just a “holding place” cram packed with schtuff. I couldn’t find anything in the closet. I just had piles of schtuff in there in various boxes and baskets and binders. EVERYTHING was out of the closet after our little sewer back up and had been tossed willy nilly into various other boxes and containers for storage during the clean up and subsequent remodel. When I finally unburied and pulled out the “various other boxes” and looked at all the schtuff, I decided it was time to pare down. Nothing was going back into the closet if it didn’t have a home. {Clean Sweep, baby!} I repurposed and reused most of my old containers in the closet and added a few new window front boxes from Ikea. I was able to clean out a LOT of junk and move my new Bernina sewing machine and basket of sewing notions into my closet and up off the floor. {Eventually I will sort through my two bins fabric and pare down so it can also be stored in the closet.} Looking into the closet: Top half of closet. The very top shelf is where I keep my archived family and business files. Second shelf – idea books, misc. scrapbooks, TJ newsletter binder, old magazines {I did pare down a bit, but can’t chuck those yet… working on it.. hopefully by the end of the summer I can get thru them and pull out the ideas I’d like to keep and chuck the rest.} I also have a split shelf on the right side… I store my extra baggies, misc glues and adhesives like Mod Podge and Xyron that don’t fit with my other adhesive stash here. Below that is envelope storage and misc craft supplies like mini notebooks and post it notes. The third shelf holds my favorite card sample ideas, misc projects, CTMH Solos alphas, misc envelopes for RAKS, a box of misc ribbons and fibers that don’t fit in my RibbonStak, and a basket of misc camera supplies {my old film SLR and lenses, etc.} Bottom half of closet. Bins on the floor hold misc items. Left bin holds “items to scrap about/put in albums”. Right bin holds misc items to sell/give away/etc. Top shelf {actually shelf #4} keeps my Paper Sticker Binders. One binder holds image stickers and embellishments and the other binder holds Alpha/Number/Word Art stickers and Journaling tags from when I actually PAPER scrapped.. {I prefer digi scrapping now and use these items for misc craft projects and cards.} Next to the PSBs are how I store my bulk 12×12 and 8×11 cardstocks. The accordian folder holds my scraps which are sorted by color. Next to that are 3 window front boxes from Ikea. {I LOVE THESE BOXES!} The top white box holds Altered Ego/Alterable Items such as tins, mini boxes, mini albums, etc. The bottom white box holds Chipboard, Chipboard letters, etc. The pink box on the right holds my open Owires for the Bind It All. {The unopened boxes are kept in the “store” room upstairs.} I keep my BIA machines on top of the Owire box. The bottom {5th} shelf is my sewing and painting shelf {for now}. I keep a box of patterns, a basket of misc sewing notions and scrap fabric, my sewing machine, and two boxes of acrylic paints. The paper trimmers have found a new home sitting on top of the acrylic paints. What you can’t see very well in the pics is that just below shelf #3, in front of the BIA box is a paper towel holder that I’ve screwed onto the wall. This comes in handy for messes and is tucked neatly out of the way. My reinkers are stored in a very shallow shelf that Brent built from scraps in the workshop. {It’s the prototype of a new Stamper Storage project.} There is a hook in the wall next to the paper towel holder that I hang my craft apron on. The back of the door is also the perfect place to put a removable Scotch/3M hook to hang my Fiskars rotary cutting mat and acrylic ruler. {I had them tucked behind my desk previously and they were getting warped.} So that’s my closet in a nutshell…. It works for me! There’s no fru fru or expensive stuff going on in the closet, in fact I didn’t even paint the MDF shelves or put the baseboard trim back in it. It’s tidy, it’s organized, and most importantly everything is ACCESSIBLE. Next up: Part 4 – Organization – Bookshelf and Desk Organization… {papers, misc blingy things, my “cutting station”, etc.} {edited} PS… Did I mention this is my 300th post???!! Hot diggity dog!
Studio Tour: Part 2 – Organization I “Works For Me!”

I graduated the Inspiration Phase: I learned what inspired me and I began to gather up my inspiration ideas and was ready to put it all together and organize it. So when I sat down to tackle this huge task I decided that my old organization methods weren’t really working and that not everything was going to make it back to my creative space. And thus the many moons of sorting and purging began. {Have you ever seen Clean Sweep?} I now have a big laundry basket in the bottom of my closet that holds a bunch of items that are going to be finding new homes. Some items will be donated, some sold, and new in package items will be gifted! The day finally came where I was ready to get organized. {Keep in mind that the last 1/2 of last year & first part of this year was spent remodeling our house after the sewer back up in the basement. We repaired the damage in the basement and replaced every square inch of flooring on the main floor, plus added a master bathroom remodel to the mix. I did not feel much like blogging, scrapping, crafting, or organizing.} Somewhere along the line, Alisha Trussell pointed me in the direction of a VERY COOL BOOK, “The Organized and Inspired Scrapbooker” by Wendy Smedley {See link in left sidebar.} There’s a super cool “workbook” that comes with the book choc full of quizzes and questions to help you learn about your style of scrapbooking and organizing. THIS WORKED FOR ME. I’m freakishly logical about how I think out these types of things and love to make lists and write out my ideas. Here is what I discovered: 1.) I wanted to figure out a better way to store, organize, and make better use of the products that I already owned so that things did not get lost in space. 2.) Clean and Tidy – like a “store”. I like things lined up neatly and want to be able to “shop” for products from my stash. Everything has a “home” to return to when I’m finished with it. 3.) I don’t want to have to sort through stacks and folders and piles to find a product that I want to use. I want things to be easily accessible, yet also able to be put away and tidied up easily when I need my space to resemble some type of an orderly office. 4.) Current categories that work for me: *Color – embellishments and papers. *Topic – some papers and stickers *Activity – embossing, adhesives, machines, stamping, cutting… *Projects – current and past *Chronological – Photos 5.) Storage Solutions that work for me are things that are generally closed and visible or open and partially visible. Some items I like to see out in the open, but they must be contained. 6.) I need to be able to tidy up quickly before changing projects. I can’t create in chaos (hence my lack of recent creation posts!). I get overwhelmed by mess. 7.) Matching containers is nice… however, realistically it’s not always financially feasible, so eclectic and fun was going to work for me. You never know what you might find that inspires you or fits your space! ************************************************************ In the next couple of parts I will show you how I organize. I do not want my studio tour to be about “look at all my schtuff… I got loads of schtuff”, rather “here’s how I organize and here’s my fun space”. Do you know what I mean? My goal for my studio makeover was to pare down, clean up, and create a well organized, happy and bright space for myself. I think that for ME this works. Maybe it might just inspire you. Next Up: Part 3 – Organization II – The Closet (It will be posted today, cuz I’m working on it right now… 🙂 )
Studio Tour: Part One – Inspiration

I am FINALLY getting around to sharing the revamp of my studio. It’s been a long time in the making. We’ve had countless interruptions… and let’s face it.. in the big scheme of things the studio has been the last thing on my mind (but always on my mind) to finish, share, etc. I’m finally buckling down and editing a zillion pics and writing it up. I will share the Studio Tour in several pieces… we’ll tackle this elephant one bite at a time. 🙂 This is my humble space. It’s a wonky space in the basement that wouldn’t work for anything else. Studio Tour: Part One -Inspiration (Edited: This is probably a recap for some, but some background for newcomers…) It all started out simply and innocently…. or so I thought. I found this fabulous piece of paper at an LSS here in town and immediately fell in love with the color scheme and whimsical theme. But it grew into a monster….. because I started to really think about my space and what I wanted it to be for me. How it would work with everything. How I could make it pretty and functional. How could I do it on a budget? My tastes have changed completely since the day I first put together my first “studio” in this space. For the longest time I thought that the decor had to “match” the rest of my house decor – Americana Country elegance style… (a term made up by me cuz I’ve never seen anything like my decor and I love it!) mostly because my office space is an open walk through area from the bottom of the stairs to the rest of the basement… I did decide that the colors where the walls meet had to at least go “ok” with each other… lol! The rest, I decided, was free game and that I needed my creative place to be a well organized, colorful, and bright space in order for me to create. I finally decided that I was not afraid of color… or girlie, blingy things. 🙂 Thankfully Brent is very flexible with what I do to the house as long as it’s not too “out there”. So I started gathering ideas… I saw some cool multi fabric curtains in a CK magazine … and started gathering fabrics and color swatches… Then I remembered I had some old windows up in the rafters of my garage that a girlfriend gave me a couple of years ago. So off to the carwash with some anti microbial cleaner and a pocketful of quarters. After about 30 minutes of scrubbing and washing in the freezing cold outdoors I ended up with a sparkly clean “new” window. I did not paint it or touch up the paint. Once it was dry and cleaned I took an electric sander (thank you Stamper Storage workshop) to it to soften up the edges and clean up the ragged layers of paint. A few projects later and I had the base for my studio… we painted two of the walls 2 coats of Asparagus (card 410-D4) by Behr (Brent chose the color… ) and the trim in bright white. I made the curtains and some matching chair covers (aka chair bling). Though I’d still like to incorporate a cool blingy chandelier someday, but maybe in the next house… I also had other some fun things (a kitchen witch turned Scrap Hag, Matryoschka Dolls, Polish Crystal, Silk Flowers, etc) that I’d collected around the world and misc items that were given to me by friends and loved ones that I somehow had to include and all of these inspirations helped me to figure out what I wanted to do with this crazy odd space that I have. I included these items because of their funki/wonkiness, colors, girliness, and sentimental value… Next time… organization… How to decide what works for you and what works for ME! Inky smiles & see you soon!