SSD Sketch SS01 – My Card, Better Late Than Never

This is my take on the Skipping Stones Design Sketch SS01. I had a lot of fun with this sketch.. it made me think a little and then it was screaming “CHRISTMAS ORNAMENTS” at me so I couldn’t resist. Afterall, it IS that time of year again. Here’s the Christmas Swirls stamp set: I wanted to do something a little out of my box and decided to try a somewhat monochromatic look with metallic shimmer cardstock. I have such a hard time pushing myself to use metallics so I just buckled down and did it anyway. (Metallics are hard to photograph, even without a flash, so bear with me on the pics.) I used the star and ball ornament images from SSD’s Christmas Swirls set and embossed them with gold embossing powder. The stamps are intricately detailed so make sure you wipe your paper with an antistatic powder and use super fine embossing powder. I stamped Peace in gold ink. The cream oval was embossed with my Cuttlebug & Oval Nestabilities and the ornaments and star were hand cut . The bottom ornament and the oval piece and star are all popped out with American Crafts foam squares. After I had it all laid out and nearly all adhered to the card base I decided that it needed a little extra something….. so, being the “crazy jewelry lady” that I have been lately I pulled out my beading supplies and created a little ornament jewelry to add a little more bling to the card. I used some inexpensive pearl beads and two tiny little 2mm clear Swarovski crystals for extra sparkle and dangle. Supplies: Stamps – Skipping Stones Design’s Christmas Swirls Papers – DCWV Metallic & Luxury, Gina K base cs, misc cream cs Inks –Versamark & Colorbox Tools, etc – SU antistatic wiper thingy, misc jewelry tools, misc craft wire, Cuttlebug, Nestabilities Oval Dies, Ribbon, ATG adhesive, heat gun, CTMH Gold embossing powder. Don’t forget to come participate in the sketch and take a chance to win some Skipping Stones Design stamps! See you at SSD! Inky Smiles!
Crocheted Jewelry

In my efforts to get back into crafting again (now that I am feeling better and HUMAN) I have decided to take a few classes here and there as I find interesting ones at the local craft stores. Last night I went to Roberts craft for a fun jewelry class. We learned to make necklaces by crocheting wire and interweaving beads. It was so much fun! And… it was relatively easy. If you can crochet a single stitch chain from here to eternity you can crochet a necklace. 🙂 My husband’s aunt and cousin were there with me and it was loads of fun seeing how different everyone’s necklaces turned out. Tammy (aunt) did a necklace for one of her coworkers using a mix of smokey beads. It turned out gorgeous and I picked up the bead collection this evening to make one for someone for Christmas. Raette used a variety of “sea themed” beads and made a really fun big and chunky necklace. She works at a place called “Pirate Island” so it is perfect for her! I chose a variety of shades and shapes of blue beads, silver findings, Swarovski crystals and silver 26 gauge wire. I don’t like how the 26 guage wire was a little difficult to work with, but loved the 26 gauge sterling silver wire that Tammy used, so I picked some of that up tonight, too. Here’s my necklace: I am down in my guest bathroom trying to snap a photo of the necklace while it’s on my neck. Not an easy task. Brent is still at work (it’s 7:30pm) and not around to help… and I’m too lazy to find my tripod. (Please ignore the fact that I have no eyes on… I think I rubbed them off during my INSANE day today at work. LOL!) Zoomed in on a better mirror picture. That one bead on the right is a pain in the bootay. I had to twist the wire to get it to lay back properly after this photo. The full necklace. I extended the chain so that it would fit better on my and lay where I wanted it to lay on my neck. A close up of the bead and wire work. This morning before I went to work I made a quick little ring to go with the necklace. I need to redo it because I twisted a couple of the end wires too much and they snapped at work and kept stabbing me in the finger while I typed. OUCH! The basic idea of the necklace is making 3 strands of beaded, crocheted wire and then braiding them together. If you can * braid hair * crochet a single chain from here to eternity * choose 45-50 misc beads (I worked in extra beads) You can create one of these! SO get to it! Last night I Googled “crocheted necklaces” and found a GREAT video showing exactly how to make these. So, rather than re-do a whole tutorial, here’s a video courtesy of Auntie’s Beads for you: <img src="https://www.mycreativeescape.com/wp-content/uploads/video69906493e0cb5B35D.jpg?imgmax=800" style="border-style: none;" galleryimg="no" onload="var downlevelDiv = document.getElementById('d867f509-7445-4de7-a9c1-dd985b797522'); downlevelDiv.innerHTML = " http://www.youtube.com/v/QZMh1YqX8GE&hl=en_US&fs=1&&hl=en“;” alt=”” /> Inky Smiles! PS… and I met someone SUPER COOL at the Robert’s store during my class…
A New To Me Craft… Stained Glass
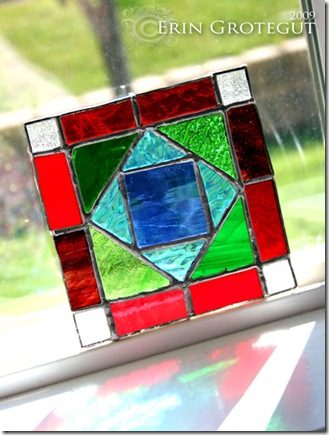
Before Brent left to go out campaigning (door to door visiting) this morning he told me “You HAVE to put some crafty stuff back up on your blog again. People don’t want to read about how busy you are again.” LOL! Ok, darling, dear…. While we were in Massachusetts we bounced around from house to house (on the 2nd part of our trip) so we’d be able to see and visit with more family members. One of our nights (the last night) was spent at my cousin Nichole’s house. I never knew Nichole was so crafty and artistic until last year when we received a wedding invitation from her for her wedding in beautiful Jamaica. This is the box that showed up in my mailbox… intriguing!!!! And then I opened it up! Wowza! What a FABULOUS way to invite people to your wedding! There is even REAL sand and little tiny shells inside the bottle. (I have it here in my studio because it’s a cool little gem to look at.) I wish we would have been able to go to the wedding! So anyway, back to the new to me crafting.… on our last night there we (we being my youngest brother, Jake, his wife Jacoby, and myself) got a wild hair and decided that we wanted to try our hands at Stained Glass making. Now, Niki and her mom both do stained glass as a hobby. My aunt Sue should probably do it to sell because she does a FANTASTIC job. Her artwork is simply GORGEOUS. (She gave me a fabulous piece that she made of a crane in a marsh, but my mom had to take it home in their truck because it was too big to haul home safely on an airplane. I can’t wait to go home in Nov and pick it up. I will share pics then!) I have been fascinated with stained glass for as long as I can remember. I can remember standing in churches and museums and castles in Europe (I lived in Germany from ‘86-‘94) and staring in awe and amazement at the phenomenal stained glass windows and artwork. It was about 10 pm when we all decided to try our hand at stained glass, and it took a while to pick out suitable patterns to create as beginners. Jacoby made the cutest little frog family that she free hand drew and created her own pattern for and Jake made an Iowa State emblem. Making stained glass is a lot easier than I thought it would be but on the other hand it is a lot more time consuming and than I thought it would be, too. Here are the basic steps: 1) Choose a pattern. The more small pieces it has, the bigger pain in the butt it is and the longer it takes. We altered my pattern and combined smaller pieces into larger pieces. (Thank you Nichole for steering me clear of the intricate details that I love. LOL!) 2) Enlarge your pattern, number your pieces, and cut out with special stained glass scissors that have a little channel to allow space in the pattern for the soldering stuff. 3) Choose you glass colors and textures. Holy moly! She had TONS to choose from… so many choices. Worse than making cards and choosing the color scheme because not only were there varieties of color, there were varieties of textures, too! Ay yi yi! 4) Trace your pattern pieces onto the glass with a sharpie marker and number. 5) Cut out your glass pieces with a special glass cutting tool, then use another special tool to snap the score line in the glass. (This part kept freaking me out because I was afraid I’d break the glass wrong.) 6) Lay out your pieces and double check and see how you like your colors/textures, etc. Re cut anything you don’t like. 7) Grind your pieces down to the traced line on a grinding machine. Make sure you take the “smooth glossy edge” off the edges of the glass. This was the most tedious part of the whole night. This is where you realize that you only want a few pieces of glass instead of a crazy intricate design…. 8) Wash each piece with hot soapy water and check the edges to make sure there are no smooth surfaces. Make sure to rinse off all the soap residue. 9) Wrap each edge with a special copper tape. This gives the flux and the solder something to stick to. 10) Paint each edge with liquid flux and then use a solder in iron to go around each edge and heat up the flux and put a bit of solder on the edges. This is the step where Erin burns her fat little fingers. OUCH! 11) Lay out your pieces on a clean, cork board thingy covered table and line up for fit using a square (if you need to make your art square). 12) Using your soldering iron and a roll of solder, create your “lead” lines and sauder the whole darn thing together. This part is fun, but it was near midnight when mine was getting finished up so we sorta rushed a little and the lines aren’t as pretty as I would like… I think I can clean them up a bit with a soldering iron here at home 🙂 When you’re happy with your lines and are finished, wash up your stained glass artwork with soap and water, then polish with regular car wax and use a very fine steel wool to polish up the solder lines and VOILA! You have made your first stained glass! Mine has a lot of imperfections and some pieces got cut funny, but for Stained Glass at Midnight for my first time I think it turned out kind of neat. All that is left to do is for me to sauder two little hangers on it and then hang it in my
Getting Back In The Saddle / Swing of Things / Craft Room Again

Hey friends! Just a quick note to let you know that I have not died or dropped off the planet. We just got back this morning (3:30 am) from a fabulous 11 day east coast vacation to see the foliage changing in upper New Hampshire, Vermont, playing in the Boston area, visiting my extended family in western Massachusetts and celebrating my grandfather’s 80th birthday. It was SO MUCH FUN and I am SO STINKING tired. COMPLETELY filled a 2 gig camera card and started on a 1 gig… Gotta make some time to organize and edit photos this week! 🙂 I did get to meet a really neat lady on the plane. She was sitting behind me talking to a darling little old lady who was seated next to her… I was trying to get comfortable with a pinched nerve in my hip (and teeeeeny tiny seat) and caught the word “scrapbooking” and “work from home”in their conversation and after a little while I couldn’t stand wondering what company she was talking about, so I was nosey and turned around to talk to her. lol! Turns out she’s is Brandy Murry from ScrapGirls.com!! How awesome is that! She was on her way to the Scrap Girls convention in Salt Lake City. I thought that was pretty neat and I am totally digging her products! Also, I did make a plethora of cards and crafty things to take along on our trip. I will share them later this week.. in the meantime it’s back to work and all the fun cleaning up, unpacking, and laundry that comes when you return from a very long trip. Here’s a little bitty I made for one of my aunts. Inky Smiles 🙂 Erin
To Infinity & Beyond….

Sorry, couldn’t resist. The Infinity Board I saw this online at Gina K’s Stamp TV site. Click anywhere on this line for instrux. {Edited for Clarification} This Infinity Board is a homemade “Infinity Board” (cased from REAL Infinity Board) . You can use this as a “backdrop” for photos of cards and other smaller projects. It’s great for photographing small items for your blog or etsy and ebay type stores. You will still need some good lighting for your photographs. The IB provides a back ground of “white infinity”. The curved paper prevents sharp corners or creases in your photograph (unless you accidentally crease your paper like I did and need to put a new one on). I had to make one. So today I ran out to WMart to find the parts to make it. I couldn’t find the sketch paper so I subbed poster board which I had to cut down. It was super easy to prepare and assemble and I think it took maybe 10 minutes once I located my Incredibly Tacky Tape and Fiskars Fingertip knife. The other adjustment I made was to put some little “tabs” on the bottom side so that the end of the poster board would slip into it and make a deeper well for larger projects. I love it so far, but I think I need to get a piece of poster board that is not shiny… back to WMart tomorrow…. The finished project. Don’t mind the mess everywhere around it… I just shoved stuff out of the way cuz I was excited to “build” something. LOL! I used a piece of the poster board that I had cut off to line up the corner to a proper 90* angle. {cuz ya know, I couldn’t be bothered to open the big messy drawer to find the protractor… lol…} When I tuck the end of the posterboard in the tabs, the curve becomes sharper and there’s more room on the board for objects. Here’s a “close up” of the tabs I adhered to the bottom to hold the poster board in place. I hope you can see it… click on the photo, it might help. I taped just the bottom half of the tab, then stuck it down on the foam board. Here’s the REAL Infinity Board (click REAL) that Gina K’s people totally cased…. Gina K’s people’s option… much cheaper! (Poster board – $1.97, Foam board – $2.58, other materials on hand… Elbow Grease – $0.00) And here we have a couple of examples of photos… I cleaned up my studio a little this morning and put away some of the odds and ends of stuff from projects I’ve been working on. I put away some loose, unmounted stamps and a whole boatload of beads and baubles. There’s a whole ‘nother ScrapONizer full of beads in baggies. These photos of the card were snapped without any decent lighting. I just flipped on my studio lights and snapped a couple of quick photos for clarification. How you set up your shot. Close ups (bad lighting and edited only to add the watermark), but you get the general idea. Please ignore the crease on the left. I creased it accidentally when moving the board last night. UGH. Back to Wmart… Hope that clears it up! These fabulous little ScrapONizer organizers can be purchased at Stamper Storage. If you’d like to purchase multiples (2 or more sets) of the ScrapONizer large Organizer Sets shoot me an email and I will prepare a discount for you! Above photo shows ScrapONizer 2 compartment divider and 8 SnapLock Minis (purchased separately). The above two photos shows loose unmounted stamps stored in a ScrapONizer on two 8.5×11 folders (purchased separately). I’m off to the showers and then to the “big city” of Provo to meet a girlfriend for dinner. (She’s here visiting from the great northwest.) Inky Smiles!
Oh La La! A Summer Candle with Charm

Let’s break up the string of cupcake cards and share this fun little project instead. Last Thursday night we had an Enrichment meeting for church. We had a garden style tea party and celebrated the female leaders in our church history. It was loads of fun. Some of the sisters dressed up in period clothing dating back to the pioneers and most came in modern day clothing, but lots of people wore a “tea party hat”. We had a little “contest” and had two prizes. This is the prize I contributed for “Second place”…. First place won a mini toy tea set. I wanted to use the Cupcake set from Skipping Stones Design again, but didn’t necessarily want to make a cupcake item. I raided my stash for a candle and pulled this strawberry-kiwi scented one out and dolled it up a bit. Here’s the set again: I just love the “Oh La La!” sentiment. It’s girlie and screams frilly! 🙂 I cut a strip of Kiwi paper from CTMH to fit the candle and then punched a border with Martha Stewart’s Lattice Border Punch (cuz it was sitting on the desk and I didn’t like the scallopy one I originally tried) and then stamped the sentiment around the bottom of the Kiwi paper. Gotta add a big fat bow, too! The ribbon is just wrapped around the candle and tied in the front. I glued the paper to itself with my ATG gun and then poked holes in the candle, added a drop of Liquid Glass, and then poked silver brads in the holes to better secure the paper. I think the brads look like cute little buttons… hehe. Tone on tone stamped sentiment. I inked up the sentiment stamp in Kiwi ink and went to town…. benefit of clear blocks and clear stamps – you can stamp in a straight line! I didn’t originally have the charm on the candle but I decided it needed something extra fun…. I was playing around with beads again prior to making the candle and decided it needed a charm. So I loaded some Czech glass beads up on an earring wire and played around. I like how it turned out! And I liked it enough to make a pair of earrings, too! LOL! I’ve gotta get some more of the little pink beads so that I can make a bracelet to match! {This photo shows the closest to the REAL color of the chocolate cards.} I think I’m going to need a bigger jewelry box….
More Cupcakes

Where did the weekend go? It seemed to fly by so fast this time! We were busy doing “outdoors” type stuff this weekend. Brent went and helped Mini C#1 with his Eagle Scout Project on Saturday morning and then Saturday evening we worked on our disaster zone yard. Last week we had some pretty big microbursts in Payson… several trees were blown over and in general it was a big mess. The onions in our garden are all laid over 🙁 and our yard looks like fall has arrived with all the leaves and branches strewn everywhere. We were really lucky in this last couple of windstorms. We didn’t lose any trees and we didn’t lose any shingles from the roof. (Thanks to Brent for HAND nailing every single set of shingles on the roof when we built the house. Not sure if it was worth the “sweat credit” the builder gave us, but we’ve not had any leaks or problems with our roof like many neighbors have.) Anyway, we did some trimming in the front yard… I hit up the trees and Brent trimmed up the bushes along the house so that we no longer look like an overgrown jungle. We also ripped out 3 bushes and LOADS of weeds and other overgrowth. Usually our yard is pretty easy to manage, but this year we’ve neglected it somewhat and it all came due at once. The front yard looks LOADS better and it looks like someone who cares lives here again. We will be working on the back yard Wednesday night after work. YAY! So I was supposed to go in to work today because B has a conference that I’m going to with him tomorrow, but my boss wants me to come in later this week, so I had a little time this morning to post more cards. Here’s the set again: Here are a couple more cupcake cards. Sweet! I love the argyle Cuttle Bug folder! It’s difficult to see in this pic… dark chocolate brown is always hard to photograph… perhaps I need to build a light box! Anyway… it’s an improvement of the first pink prototype card. I embossed the mats with Nestabilities dies and layered up the cupcake with foam dots from American Crafts. The images are stamped with CTMH inks. I used the “shadow” cupcake stamp and then stamped over it with the frosting lines. I used a Quickie Glue pen to trace the cupcake frosting and sprinkled with Martha Stewart Glitter. I am quickly becoming a fan of BIG bows… lol! I think it’s cuz I’ve been haunting Becky Feeken’s blog….. Oh La La! This was a fun card to make. First I punched a border along the bottom with Martha Stewart’s Lattice Border Punch and then I pulled out my Score-Pal and scored a bunch of horizontal lines on the card base. I stamped the cupcake top and wrapper on Basic Grey paper and cut out. The frosting is traced with a Quickie Glue pen and sprinkled with Cupcake glitter from Doodlebug… Topped the cupcake with cherry sprinkles (a pile of glass beads on a glob of Liquid Glass), stamped a sentiment on a white scrap of CS and tied it all up with a gold ribbon from my scrap stash. There’s a couple more cupcakey cards coming up and a “non card” project using this stamp set. Thanks for popping in! Inky Smiles!
A Little Blingy Bling: Jewelry for Grown Ups

When my sister was here, my niece, Squid, and I made a bracelet and necklace set for her (see this post). Afterwards, I think she ran off in pure bliss and then crashed out. (I don’t quite remember the details as I was immersed in grown up beads….) Anyway… Squid and I had made a cool multi colored bracelet and some earrings to go with them for my mom back in May. Mom wore them to a party at my Grandma’s in June and Grandma wanted a “reddish orange” set like the reddish orange beads in Mom’s earrings. So I sat down and played around with the reddish orange beads I had in my stash. (see below) Jewelry making is super duper easy. You just need some basic tools (wire snips, round nose pliers, and a flat nose plier) and basic jewelry findings (tiger wire, clasps, crimp beads, misc findings and beads). You lay the beads all out on a beading board (I am not sure what they are really called) until you get the design you like and then you string it up. I like whimsical and funky. There’s no “real” rhyme or reason… just play around until you get what you like. 🙂 Reddish Orange Set: This is the first set I came up with. I don’t want to give it away, but I guess that’s what makes it so special. LOL! I think I am going to hit the bead store and replicate this set because I have just the perfect shirt for it to go with 🙂 All findings are silver plate except the earring hooks which are real silver to prevent a reaction with the ears. (I can’t wear anything but real gold or silver in my ears so that’s what I had in stock.) Hot Pink Set: I HEART this set! It looks way cool ON. The circle beads are about 3/4” in diameter. I strung the wire through the open beads and then carefully strung another bead on the wire before slipping thru the other side of the open beads. The center pink beads spin around on the wire and are really cool, especially in the earrings. Jewelry is difficult to photograph in the indoors in the evening… that background is one of the decorative {sacred} pillows from my bed. Hope you enjoyed! Inky Smiles & see you soon with some cards and I think I really should do a giveaway asap! 🙂
Bling It, Squid!

When I get to visit with my family I love to do things with my niece, Squid. Squid LOVES jewelry, bling, and pretty things. (Hey, like her favorite auntie!) Anyway… one of the days she was here we made a bracelet and necklace set for her. For a little squirt, she’s pretty good at stringing beads. She even helped me make an adult styled bracelet for my mom back in May when B & I were in Iowa. Here we are having our own adventure “building” a bracelet for Squid the Kid… Because she’s only 3, we used some larger beads and stretchy string. Picking out the beads: “Need middles for the flowers, Erin!” {A very tired} Auntie Erin getting it started: Squid can do it herself! {Auntie Erin helped with getting the flowers and centers on, Squid did the silver hearts and loved it.} “Ta Daaaaaaaa!!!!” The final result and one happy {and very tired} Squid. The necklace was an afterthought. We had some beads leftover and she loved the big pink hearts. 🙂 Such a cheeser… look at those tired eyes… We had too much fun all week! Inky Smiles! Next up, Jewelry for Grown Ups (later TODAY… it’s scheduled)… and then CARDS! (See ya after work!)
Scrap My Scraps Challenge: Card Set #5

Happy Monday! Welcome back to Scrap My Scraps! Here is Card Set #5 This set of cards is pretty awesome! You’re not going to believe it, but nobody saw anybody else’s cards until THIS POST! Check out the similarities in design and themes… LOL! I about fell out of my seat when I saw them all together. Kathi did not know that I had cut out leaves for my card or put a “buckle looking” band across it, either. Also… neither Jeanne nor Alisha knew that the other was going to layer up polkadots…. LOL! This set is super fun! A Rules Refresher: 1. Create one card from each layer stack thingy. 2. Use ALL of the pieces that go to each card. 3. Use any stamps to complete cards. 4. You may add one piece of extra cardstock to the card and any extra embellishments. (More like guidelines, anyway….) The Players: Alisha Trussell Jeanne Tomshack Kathi Carlson We started with a sheetload of paper pieces: My original card: I layered up the papers and stamped and cut out leaves from the remaining two pieces of scraps. There’s a tutorial for the scrunched leaves here. I also did some faux stitching with stamps. Kathi’s Card: Kathi even used the SAME STAMP to make her leaves… LOL! She stamped her image on lighter cardstock so you’re able to see the veins. I love the paper piercing and the random stamped shapes on the background papers that give it interest, texture, and dimension. Alisha’s Card: Alisha and her side bows strike again!I love the added glittery bats! Check out the detail in the polka dot stamping. She must have laid the top layer of polka dots on the base layer of polka dots to get them to line up so perfectly! She added a hint of purple CS to pop the layer off the base. Jeanne’s Card: Jeanne’s signature flowers are back. Jeanne stamped two different sizes of polka dots on her layers of CS and completed the dot them with the addition of buttons on the flower and one of the layer mats, oh and also with the perfect little brads in the centers of the buttons. I LOVE, LOVE, LOVE Jeanne’s little crocheted flowers. I have a little stack of them sitting here by my InkStak waiting for me to use them… They are so precious I don’t want to glue them to anything! 🙂 I hope you enjoyed today’s SMS reveal.. there’s one more coming up! If you’d like to play in an upcoming round of SMS please leave me a note on one of the SMS posts and I will let you know when we’re playing again. Inky Smiles!