Orange Amaretto Biscotti

Because I loved the Lemon Biscotti so much I had to follow up with my favorite flavor, Orange Amaretto… Original post from my virtual Christmas Cookie Exchange in my facebook foodie group can be found here. I drizzled some in an Amaretto flavored glaze and dark chocolate to go to a few neighbors and dipped a few in plain chocolate for Brent and I. They will be so yummy dunked in hot cocoa. The next time I make these I might make an orange glaze and put some candied orange peel in the dough instead of almonds. So, so, so good. .
Summer 2015
It has been a rough summer here at our house. Brent was unemployed for three months (the company who hired him last fall was somewhat not so great) but just started working again a little over two weeks ago. In July Sadie started having some health issues, which we treated and thought were resolved… until a week ago when we ended up in the vet ER and found out she had a broken right humerus. Last Tuesday she had surgery to repair the break which resulted in her acquiring some new jewelry which includes a pin, 6 screws and a bone plate. More details and updates can be found here: Http://Www.gofundme.com/SadieBug I am sorry I have been such a neglectful blogger. Someday I really hope to get back into.it. For now I have been focusing on my health and little family.
This is a test.
I just downloaded the Blogger app… hoping that this will help me want to blog again. Test test test
Baby, It’s Cold Outside… A Scarf Inspired by Frozen
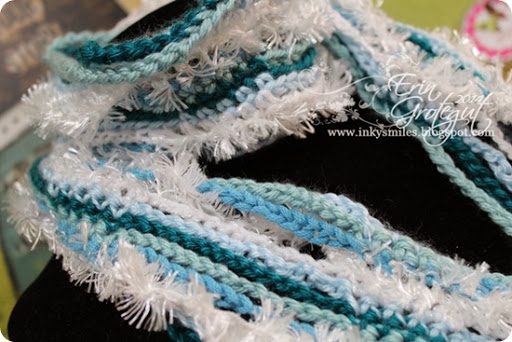
While much of the country is freeezing their bums off covered in a blanket of snow, here in Colorado we have been enjoying a lovely, sunny 57* – 63* most of the past week. (Mind you, we had a visit from the great Polar Vortex just prior to this faux Spring, so it’s been much welcomed, and a tease, because I know what is coming….) Remember this sneak peek? I know I promised I was working on the post for it. Here it is… My niece had her 5th birthday on Saturday. And she just LOVES the movie Frozen, so her birthday theme was “Frozen”… She is a lot like I was a child, bright, independent and creative. She looooves to pretend with her dolls and dress up like her favorite characters. I decided that I wanted to make her a Frozen scarf… Kisha and I had found a fun scarf pattern on Pinterest a while back, but when I looked up the instructions they were in Finnish. Thankfully someone had posted some very basic roughly translated instructions in the comments. I made a big chunky yarn version to start with and LOVED it so I went ahead and made a smaller version. This scarf didn’t have an official name for the pattern, but I am going to call it a “Ladder Scarf”. It looks kind of like a ladder… I used a variety of different types of yarn for this scarf. I love how the fringey white yarn looks like snow. It was a pain to work with, but the finished effect is awesome. Here she is opening her prezzie… So excited! (Forgive the pic quality… images from texts from my sister.) I think it turned out FABULOUS. In fact, I really want to make one for myself with fun frilly yarn like this. (We told my niece it was snowflakes and icicles…. she wasn’t quite sure why all the pieces weren’t completely attached in the spaces… “Mom, tell Auntie Erin she needs to finish it and make all the pieces stick together.” Hehe… ) And later that evening… in her Anna dress…. One happy little 5 year old! Thanks for dropping in! I loved making this little scarf and I am glad my niece loves it. 🙂 For you crocheters – I have written a tutorial and it will post tomorrow morning. Inky Smiles! ~ Erin
Going Bat Stick Crazy Around Here
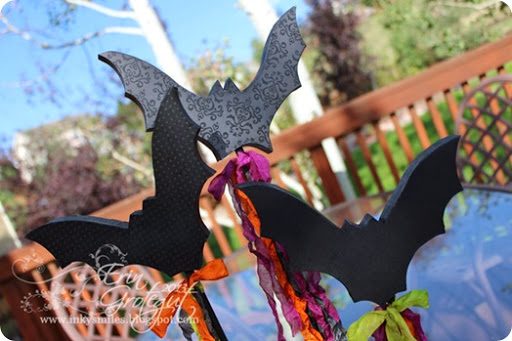
And now for the excuses….. I have not died. Or driven off the face of the earth. (Yes, it looks like we might drive off the face of the earth on this road up to Pike’s Peak… oy) I have just been living a very crazy life here in beautiful Colorado. To catch you up on everything would make for a thick novel so instead I will sum it up. 1) Had a GREAT My Creative Escape retreat here in CO in April. 2) I’ve been working as a Professional Organizer for Peace Together Spaces and loving it! 3) Spent the end of May and most of June traveling around the country (destination east coast) with my Mom. Visited Niagara Falls and some LDS Church history sites along the way, ultimately landing at my grandparent’s home in Massachusetts for a few weeks. 4) Had 25 extra bodies (visitors) in my home from the last weekend of June – July: family, friends, and family and more friends! 5) Had a minor car accident Aug 1. I have 3 vertabrae pressing into my spinal cord and numbness and tingling in my left arm and hand. After multiple dr and chiro visits I have ended up with a spine specialist and am now working on getting better with physical therapy and good drugs. (It hurts to sit at the computer for very long, or really anywhere I have to sit still for very long.) Trying to avoid surgery. 6) Well… life is just life… and I am going bat “stick” crazy around here… and crafting when I feel well enough… This past week was a “good week”. So Anyway… I am normally not a “Halloween” person. I don’t do “ghoulish stuff”, “guts”, “scary”, or “creepy” for Halloween, but I DO enjoy silly, cute, fun stuff… and this year I am actually excited to decorate for fall and Halloween. YAY! When I was in Utah at the end of August for my friend, Tahne’s, birthday and B’s work, and a concert (F.U.N.) I stopped in one of Utah’s plethora of crafty shops… I can’t remember which one it was, but I picked up a fun witch’s boot to decorate and saw the most adorable bats… but I didn’t purchase them… I figured I could make them myself with scraps from B’s woodshop. (Leftover bits of InkStaks and RibbonStaks). So I drew up some bats in Photoshop and printed out the pattern, traced them onto some scraps of pine and zipped them on out our band saw. and dry fitted them with some fun patterned and textured papers… Then I painted up the edges with this fabulous home made glitter paint… To make the paint, mix: Any color acrylic crafty paint Small amount of Valspar Paint Crystals (GLITTER) for paint (Lowes) **A little glitter goes a LONG way… and it will add texture to your paint, esp if you accidentally dump the bag over your paint… 🙂 ** Use a popsicle stick to stir the paint and glitter, not your paint brush. After the paint dried sufficiently enough that I could handle the bats (not a patient crafter here) I wandered out to the wood shop and measured out some dowels sticks… “(bat stick, hahaha.. get it? ok.. well.. ) While they finished drying (I also mod podged on the papers), I whipped up some custom dyed ribbons to finish up the bats and another fun Halloween decor project. Here is my finished Bat Trio. I think they turned out whimsical and fun. Now to decide where to display them in the house! Happy flying, little bats! I’m sorry I’ve been away so long.. leave me a note and let me know if you’re still out there in blog land! Inky Smiles!
Dance In The Rain

I have not been diligent about blogging lately. I’m trying to figure out this house and get things settled in it so that it feels more like a home. We are also gearing up to put lights in the ceiling in my studio, so I’m packing up the goodies I just unpacked to make room for a little mess. Yes, I know, crazy, there’s not much out to put away.. just boxes and my main workspace to cover with plastic. Hopefully the lighting project will go quickly! I wanted to share a couple of cards I made last summer but have not shared here yet. I might have shown them on FB, but I can’t remember and I am too lazy to go scroll through 6 months of posts. hehe. AND, I realize it is Valentine’s day, but I haven’t had much time to think about Valentines’ing… (though I did make some fun googlie eye cards with my Cub Scouts) lol… so these will have to do today. I love water coloring with reinkers… I did that with this first card. Stamps are from Sweet N’ Sassy Stamps, paper is kraft brown from MME and inexpensive watercolor paper from Michael’s. This second card is my favorite in a while. I used Tim Holtz stamps and distress inks layered on with an InkBlok and foam pad. I really love the sunset effect behind the “umbrella dude”. Images are stamped with Memento Tuxedo Black ink and the sentiment is stamped in a Distress Ink (I can’t remember the exact color). I buffed the edges of the card with a Walnut colored Distress Ink to age it up a bit. Metals are embellishments from CTMH, not a lot of “bling” on this card because it went to a guy friend of mine and I didn’t think he’d want sparkle… tee hee. I love the sentiment on this card. Don’t wait for the storms to pass you by. Live your life. Seek joy by dancing in the rain, even if it’s just stomping in some puddles 🙂 Get out there and dance in the rain… or in my case, snow. Inky Smiles! E.
The Derby… Blingsta Style
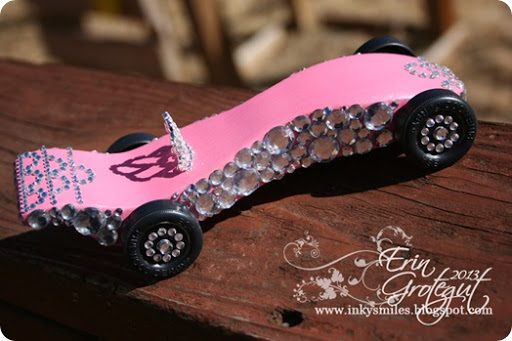
So I have already failed my goal of blogging once per week. I have no excuses. Really. Immediately after we moved here, like the first or second Sunday we were at church, I was asked to be the Bear Cub Den Leader. (Yes I hear you laughing… stop. Really. Not funny. Ok, so it’s hilarious. Laugh all you want.) At first I was all, “What the what? What are you smoking?” And, “I am SO not a little boy person. WHAT ON EARTH DO YOU DO WITH THEM?” And, “Oh heck, I’m in biiiiiiiggg trouble.” So I fought through my denial. And so far I have survived. It’s all good. So this past Saturday was the Pinewood Derby for our ward (aka congregation). The boys asked if I was going to make a car. “Uhm, yes, of course! And I’m going to paint it pink and bling it out.” Their responses: “You can’t have a pink Pinewood Derby car!” followed by, “Are you going to put DIAMONDS on it?” To which I replied, “Oh yes! LOTS of diamonds!!” “Coooooooooool!” But… I procrastinated and procrastinated until the night before the derby… like until 10 pm the night before the derby. Brent was not happy…. but we dug the band saw out of the mess in the shop and I sketched the lines on the block… and cut out the car. And then sanded… and sanded… and sanded… thank goodness for a drum sander or we’d not have made it in time. 🙂 Here’s what I started with once it was all cut out…. I really wanted to taper the sides in more, but we didn’t have time. 🙁 booo! I couldn’t decide on pink or teal… but ultimately I went with, yep, you guess it, PINK. I mixed some plain old acrylic paint by Plaid with some shimmering Create A Shade pink by Close To My Heart to get a pearlescent sheen. Plain ol’ pink was too flat… Once it was nice and dry (note that it was midnight when I was painting.. oy…) I hammered in the wheels. BSA Derby Car wheels are nailed into the little slits with a regular nail… and if you are not careful, or are in a hurry, or it’s 1230 am and you can’t keep your eyes open, you end up with this…. Crap. Crappity Crap. Crap, Crappity… yes, I said Crap on my blog. It could have been worse. I was frustrated…. so I painted some wood glue into the chipped piece and squooooshed it back together and let it dry. It would have to get the last wheel on in the morning…. MEANWHILE…. I pulled out all the bling and went to town… This is what happens at 1 am when you’re trying to bling in a hurry…. I blinged my little heart out while Brent sat down there in the studio with me… He entertained himself with Mythbusters… and of COURSE they were blowing things up. I mean, we needed some manliness happening in the room while I blinged out a pink Pinewood Derby car. 🙂 Check out them wheels…. Sparkley….. I just love how it says “BSA Pinewood Derby” around all that sparkle. *Giggle* When it was all said and done my car weighed in at a whopping 2.5 ounces. Pinewood Derby car max weight is 5 ounces. I was nowhere close, but that’s all good. I wasn’t planning on racing it anyway. I just made it for fun to show the boys that I wanted to have fun with them. 🙂 E6000 glue plus some rhinestones and bling = Heaven. I love this little car… It was so much fun to make! I even included a princess tiara… cuz that’s how I roll…. And I was digging some scalloped, lacey trim…. If I had had some silver paint I would have painted some silver flames up the front of the car, coming from under the hood jewels… We had SO much fun at the derby… ALL EIGHT of my awesome Bear Cubs came and brought their cars. They were SO adorable and made super cool cars (I wanted to snap a pic of their cars, but they were all mixed in with the rest at the check in table. I also am not sharing a photo of my boys because I did not ask permission from their parents to have them on my blog….) One of my boys, Jacob S, took SECOND place out of the entire Pack. WOO HOO! Here are most of the cars… There was even an “adult cars”. Here’s the gang… Left to right: The Bling Machine, The Car from the Closet (Palmers found it hanging out in a closet at their house), The Green Hornet Car, and Coooooool Runnings – the Bobsled. It took a while to get everyone checked in and weights tweaked… some cars had to drill out some excess weight and some, like mine, had to add weight… a LOT of weight. Nearly the entire bottom of my car was covered in little weights… (Thank you Kelly!!) Kelly decided it NEEDED weight in order to even make it down the track. At 2.5 ounces it probably wouldn’t go very far…. after she superglued the weights on it weighed in at 4.90 ounces…. and yes, it made it out of the gate. 🙂 We had a blast watching all the cars race down the blue and gold track. The boys were whooping and hollering to see their cars fly down the track. We all gathered in chairs around the track. AND GO!! I tried to get GOOD pictures of the cars flying down the track… but when a teeeny weeny car is flying down a track, all you get is pretty much this: WHOOOOSH! Or this Those little stinkers just FLEW down the track… Even the adult’s cars flew down the track… I think my car should have been Pink Lightning….even though it consistently placed third. Hey, at least it
Gelatin + Acrylic Paint + Paper = ART!

We’re slowing getting settled in to our new home here in Colorado. I haven’t crafted in quite some time…. in fact, nearly every craft supply or tool I own is still packed away neatly in boxes… BUT, earlier this week end of last week I did dig my desk out from under the chaos of boxes and furniture that is currently occupying my future craft room. We figured out some good configurations for workstations and are deciding on color for the walls. Brent even cut down my desk top with his skill saw, right there IN my studio on the carpet. LOL! What a mess, but hey… progress, right? Thank goodness for vacuums and I am sure that floor is going to see worse than sawdust… 🙂 So anyway…. today (technically last Friday, since I’m a slacker butt and didn’t finish this post when I started it) I got to do some MESSY art with my friend, Erica Michel, who drove down from FoCo {Fort Collins} to play … Here’s Erica and her pooch, Major. He came to play, too. He thinks he’s a lapdog. I love that. Erica introduced me to a new messy but fun technique: Monotype Printing on a gelatin “plate”. Monoprinting? What’s that?? ”Monoprinting is a form of printmaking that has images or lines that can only be made once, unlike most printmaking, where there are multiple originals” ~ From Wikipedia. So there’s a product on the market by Gelli Arts, called a Gelli plate. It’s a rubbery feeling thing that you can paint on and print with, withOUT a second plate or press! Erica ordered one, but was anxious to try out monoprinting on gelatin (hers had not arrived yet), so she did some google’ing and found a recipe for making a homemade (but biodegradable) gelatin plate. You will want to make it the night prior or several hours prior to playing… Here’s the recipe she found on YouTube (Linda Germain): 12 Tablespoons Knox Gelatin 3 cups cold water 3 cups boiling water Directions: Dissolve gelatin in COLD water in a bowl, stir until all gelatin is dissolved. Slowly stir in BOILING water and stir with a whisk. It may or may not be foamy… skim off the foam with a piece of thin cardboard or heavy cardstock. Pour into a large baking sheet or 9×13 pan (it will be very thick in a 9×13). Skim off any bubbles with a piece of paper. Put in the fridge (make sure it is level) and let cool until solid. Flip out onto a non stick mat onto a solid surface. FLIP IT, Flip it good… Here’s a step by step for flipping your mat… you don’t want to just dump it or it will become a big nasty mess…. You will need: your gelatin goo mat, some type of nonstick craft mat (I used my Tupperware baking sheet), and a sheet pan or other hard thing to catch the mat. I used a sheet pan because it nested nicely right inside the pan that I made the gelatin mat in. {Notice the “lake” looking bit on my gelatin mat? Well, that was because I followed the original instructions and put some silly plastic wrap over it in the fridge. This stuff sets up FAST… skip the plastic wrap… Erica did and hers turned out purtier… } Carefully loosen the edges by cutting with a knife, or a paint spatula like me because I was too lazy to walk the 6 steps to the kitchen behind me and get a knife. I can justify my laziness with my klutziness… plastic spatulas are safer for me. 🙂 Lay your non stick mat on top of your gelatin mat. Set your extra pan or hard surface thing on your mat and prepare to flip it… When some gelli comes along, you must flip it! Dump that baby right out… lift the top pan (the one you made the gelatin mat in) up and the gelatin mat SHOULD just slide right out of the pan. You may want to trim up the edges. See the photo above? Top right corner… not good. A crack like that will just spread as you use the mat. Cut if off.. with your plastic spatula… and feel free to play with the excess… Yes, like a 3rd grade boy… you know you want to… Squish it, squish it good… There ya go.. Mat is prepped and you’re ready to get messy. You will need (see top pic cuz I am too lazy to post it here again, haha): a gelatin mat some stencils (any kind – paper, plastic, whatever) texture thangs… (bubble wrap, sponges, leaves, whatever) a brayer or two a spraybottle filled with water some paper towels a nearby garbage can something to cover your workspace (if you care about it getting completely filthy) and some PAINT, LOTS of paint, the cheap acrylic kind works GREAT Let’s PLAY! I’m just going to show a basic, simple monoprint.. I was having too much fun playing (that I forgot to keep taking pics) and my hands were so covered in paint that I did not want to touch my camera… The first thing you want to do is drop a couple of blobs of paint onto your gel mat. Any colors or mixtures will do. Here I’ve globbed some tealy blue and a metallic limey green onto my mat. Then roll it out with your brayer. Don’t smash the paint into the mat… you could damage/rip/shred your gelatin mat and then the fun would be over. Once your paint is sufficiently spread out, you can lay down a stencil, or pounce some texture onto the paint… We used a really cool plastic stencil for this one. Next, lay your paper on the paint… here is where we become our own “press”. This is a cheap sketch book paper.. nothing fancy. It’s thin, but that’s ok, the paint adds thickness as it dries.. Just press
An Inky Update
We are moving in a week!!!!! YIKES!!! Our Utah home went under contract THIS MORNING! Holy moly!! We are having a sale at Stamper Storage!! SaWEET! Here’s some info:
From Couch to 500….
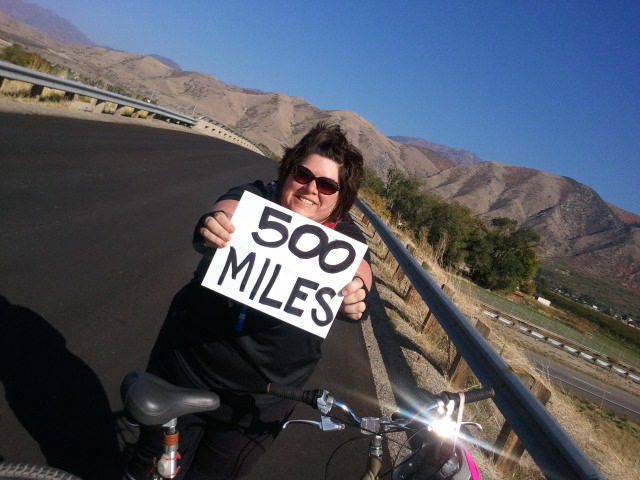
*Warning* LOADS of Photos… This summer I have focused on my health… a big part of why I have partially “abandoned” this blog. In February I was diagnosed with severe sleep apnea and ridiculously (near dead) low levels of oxygen in my blood stream… (The last two years of my life have been a crazy medical mess.) The doctor put me on a CPAP machine and oxygen at night and they have literally CHANGED.MY.LIFE In the first week of May I dusted off my bike and went for a ride with Brent. I just wanted to go around the block. At the time that was an enormous feat for me. So Brent and I rode our bikes… and I got to the top of the street and kept going. And then we rode up to the mouth of Payson Canyon… which was about 3 miles… and IT DIDN’T KILL ME! So we kept going for another 2.5 miles for a total of 5.5 miles on my first real ride… I wasn’t dead and it felt GREAT. And then a few days later some wonderful friends invited me to go riding with them… Here we are on our first group ride. And our second or third-ish group ride. The group always varied… people came when they could. Sometimes we rode with just a couple of us… But we always rode somewhere beautiful. Where I live there is always beauty to be seen on an adventure! We pedaled on paved roads and dirt paths… We had lots of laughs… and a few accidents…. Suzi went over a curb and lost a handlebar…. A highlight of one of our routes was to stop and see the new babies at the Arabian ranch… We braved riding along the busy state highway… An d enjoyed loooooong country roads….. Brent and I even took our bikes on a vacation to see my family in Iowa… We rode over 50 miles that week! 🙂 One of our rides was 15 miles! Iowa has some amazing bike paths on the greenbelts… We even got to stop and see horses on our Iowa rides… (with Mom and Brent on the 15 miler) One day my sis came and visited and we went on a spin around the neighborhood with the kids… and then did a 10 miler. I LOVED biking in Iowa… When we got back to Utah I felt energized and inspired… so B and I had a crazy notion and went on a LOOOOONG ride….. … out in the country…. from one side of the valley to the other… and around a mountain… … UP this big honkin hill… it’s not that steep… but it’s a loooong, loooong uphill road. And all along the canal…. The ride was my longest ride to date… 20.2 miles. It took us 3 hours (with 20 min break when I passed out on the grass at a church in Santaquin) to go the distance. I had the worst case of jelly legs EVER. And back to riding with the girls… here’s me and Natalie at the end of a ride. And me with Tonja and JoAn… the instigators of the riding group 🙂 Sometimes our rides took us past some craaaazy sights… This is a fountain in someone’s front yard on the Salem Canal Road… But mostly we rode surrounded by amazing views and beauty… And one evening Brent and I rode with some friends in Salt Lake… along the Jordan River Parkway trail… gorgeousness! Sometimes, because of crazy schedules, I went riding alone… Good times to think, talk with God, and enjoy the ride… Sometimes I would stop and talk to the “wild life”… like these brand new babies… Somewhere along the line a few of us started swimming at 6 am… (Yes, we were nuts, but it sure started feeling GREAT!) In September my mom came out to help me get started packing up my house to move to Colorado… She came on a few rides with us… In late May I decided to set a goal…. I wanted to ride 500 miles by the end of September. I was averaging 6-10 miles per day and was going great… and then I had a few set backs… I got sick with some awful flu bug. And then I blew out my knee again (it’s a constant occurrence)… and then we had horrid smoke in the valleys for days and days on end… But with the support of some amazing friends and a totally AWESOME husband, I pedaled on. And on…. Until this Sunday… September 30th. Brent and I have been sick with colds… It feels like I have one lung that works… lol… but we got on our bikes and went for the last ride of the goal time frame… We went my favorite route… along the Highline Canal Road and out through the orchards… Brent set his GPS .. I had 6.56 miles left to go to reach my goal. My one good lung was having some serious stress… and I got a pretty good sunburn… and I wanted to get off my bike and lay down in the grass, but it was just gravel or road so we kept on pedaling. And I reached my goal!!! I DID IT! Halfway up the free way over pass the GPS read 6.56 miles. I whooped and hollered and even cried some tears of joy. And I got off the bike right there in the middle of the freeway overpass and pulled out the sign I had made for when I would SOMEDAY hit that 500 miles. When we got home the GPS read 9.21 miles… 2.65 more than my original goal! I’m wearing the pants I started riding in… they were pretty snug when I started and now they are crazy baggy and they are now a reddish black.. faded by riding in the hot Utah sun. That’s ok. They have lived a good life