Wiiiillllmaaaaa!!!!

A few weeks ago I went to the Gem Faire show/exhibit/bead buying heaven with some friends in the Salt Lake area. We had a blast perusing and purchasing fun beads and trinkets. I went with a small budget (since I have tons from the last gem faire that I haven’t touched yet) and didn’t buy tons, but I DID find some fabulous-out-of-this-world-must-have-them red coral CHUNKY beads. I’ve wanted to make a Wilma necklace for a while now but hadn’t found the “just right” beads until this trip. I am in serious love with these red coral beads. They look like carved stones and are very heavy. The beads are a lot deeper red and less “pinky” than they appear. I’ve had a doozy of a time getting color and lighting right lately. 🙁 I strung them onto three strands of tiger wire and capped the ends with an antique silver bead cap and created a chain from silver jump rings. I wanted to do a special clasp since I have very short hair on my neck and didn’t want a lobster or traditional toggle type clasp. I had one extra bead left and wrapped it in bead caps and decided to use it for the “toggle” for the clasp. I LOVE how it turned out and it’s become a conversation started. I’ve been stopped a couple of times in stores when people have asked about the clasp. LOL! Thanks for popping by! Inky Smiles! PS.. I do have some fun paper crafts to share in the near future… I haven’t completely stopped paper crafting… lol!
Why I Won’t….
Dear friends, I generally try to keep religion and politics and other discussions that can cause contention and get tempers riled up off of my blog. I am a “Mormon”, a Latter Day Saint, and I am often asked which #wife I am. Well, I’m wife #1andonly. (Please know that polygamy was discontinued and banned over 100 years ago by the LDS church. Those who practice this are excommunicated.) Over the years I have taken and can continue to take criticism about my choice of religious beliefs but today I feel that there is something that I need to speak out about. It truly bothers me and hurts my heart. I understand if you don’t agree and even if you don’t like my religion, but if I don’t stand up for what I believe in, then really, who am I? There are many things that I do not agree with. There are lifestyles and religions and political beliefs that I can not understand the importance of to some people. HOWEVER, comma, but… I would NEVER mock them or make fun of them. It is their choice how they choose to live. This is one of the beauties of our country. One of our many, many, blessings. Freedom to worship as individuals wish. Freedom of speech and expression are also a couple of our many blessings and rights in this country. But sometimes we go too far. Recently I read about a play on Broadway called “The Book of Mormon”, written by the creators of South Park. I guess just by knowing who wrote it tells you what kind of filth, lies, and indecency is in the production. What I read made me upset. It floors me that some people will poke at one’s religion because they see the differing views as “peculiar” or they just don’t agree. The Book of Mormon Broadway musical mocks all that is sacred to me. I will NOT see it. There was an excellent article in the Washington Post by Michael Otterson entitled “Why I Won’t Be Seeing The Book of Mormon Musical”. I agree wholeheartedly. You can read the article here. My friend, Jaime D., said (on FB), “A very well-stated article. I haven’t even really followed this, but parodies, while funny, really do have a deeper quest, and that is to mock and ridicule things that others hold sacred, and to destroy all the GOOD that is done, in the effort to get a laugh and make a buck.” Says one of Jamie’s FB friends, Beth H., “There seems to be a trend that callousness in the name of “stating one’s opinion” is more valid than respect and good taste…” Very true. Parodies have a deeper quest, to mock and ridicule. I think that’s the problem with today’s world. There’s a constant battering of other people’s beliefs. It is now socially acceptable to mock and ridicule sacred things publicly. If you do choose to see this production think about these things when you, dressed in your haute couture, stand up to applaud. * Are you more couth now that you have attended this type of performance? * Why is it “ok” to attack that which others hold sacred? * If this was attacking/mocking your religious views how would you feel? * Why does it matter what religion one practices when they are not causing harm to others? Why mock those who are following Christ and trying to be a Christ-like people? * Does it give you pleasure in attacking something that is good? Just something to think about and why I will not be seeing this production. Love, Erin
Lime Twist Necklace

So my sister, Elizabeth, called me this weekend and asked me to make a necklace for her sister in law’s wedding… which is in two weeks… yikes! Cara’s (the bride) colors are lime green, teal, and the bridesmaids are wearing black dresses. These are the shoes and the dress Liz gets to wear. They are SOOOOOOO darling! I wish I could wear heels like this without falling over and breaking my ankle.. or leg… or hip… hehe! Liz wanted a lime green necklace to go with the outfit so I went shopping and picked up a ton of beads and sat down to play… I had a lot of fun and ended up making a fun twist style necklace. Here’s what I came up with… I restrung all the seed beads and tube beads on to tiger wire and connected them all to one jump ring to create a “twist”/wrap effect. I reallly love how it shimmers in real life. There are a few mixed in teal seed beads and they are awesome. Today I went back to the store and picked up more beads to make this necklace for myself.. lol! The clasp is my favorite part. I love that you will be able to see the clasp because she has short hair.. not as short as mine, but short. I’ve got to pop this in the mail for here tomorrow am. I hope she loves it! Inky Smiles! PS… sometimes you have to go through a few clasps … ergh..
Woman vs. Mod Podge: A How To
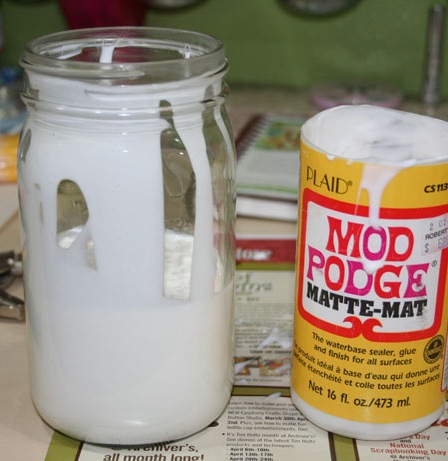
I’m starting an online class today called Soul Restoration (part 1). Many of you are already familiar with the Brave Girls Club and their wonderful community. Some day my goal is to GO TO Brave Girls CAMP, but until then online Soul Restoration will do… I am excited to do a little “soul cleansing” through art. There’s nothing terribly wrong or anything, but thought that this would be a good way to get a jump start on finding the “old pre infertility nightmare crapola” me. And you can’t go wrong with doing something that involves healing through ART 🙂 SO for the next 8 or so weeks I may be MIA from time to time, but don’t worry, I do have some fun artsy things to share with you. {I may not be sharing my art for Soul Restoration due to the personal nature of it. I will, however, share some techniques that I am learning or exploring and creating with and some other fun goodies I’ve been working on.} Some of you may also know that Melody Ross (one of the creative geniuses behind Brave Girls Club) is also the Queen of Mod Podge. HA. Yes, that wonderful white gluey goo that adheres, protects, and encases mixed media art. I want to be a Mod Podge Queen someday. Today I am a Mod Podge Princess & Monster Conqueror I conquered the Mod Podge Glued On Lid monster. And you can, too! Even if you really want to get a jump start on your journal cover but don’t have a pair of strong masculine hands available at the exact moment you feel the desire to permanently adhere something. You, too, can be a Mod Podge Monster conqueror. Here’s How: Step 1: Attempt to pry open the lid with your hands and fail miserably. Say something naughty to the Mod Podge bottle in hopes that breaking its self esteem down will do the trick. Realize that doesn’t work, so bang the lid on your desk hoping to free up the glue that is holding the lid to the bottle. Step 2: Get on facebook and mention your predicament to your 87,896,543,321 friends and hope that someONE, preferably a crafter friend, has a quick n’ easy solution. Get a suggestion from your male non crafty buddy instead. Head out to the workshop {in your wooly socks} for some vise grips or channel lock pliers. Step 3: Realize the mouth is not big enough for the lid. Think of something else… (I’d already started step 4, so the glue was dripping down the side. Shush… just keep reading. :P) Step 4: Decide that you have run out of patience and just want to get your craft on and move forward. Race off to the food storage room for an empty mason jar. Grab your favorite Fiskars Fingertip Craft Knife from your “sharp things” bucket that hangs underneath your beautiful custom pink InkStak and decide it’s time for the Mod Podge to find a new home. Carefully insert craft knife into Mod Podge bottle. (Pause to snap a photo because you don’t really have an extra hand.) The plastic bottle should be easy to cut, smooth, like buttah. Realize that you’ve spilled a glob of glue on your desk and reposition the Mod Podge bottle over the top of the mason jar. Carefully rotate the bottle while cutting… the Mod Podge goo will pour into the bottle as you cut. Step 5: Squeal (or whatever) with happiness because you finally have access to your Mod Podge! Step 6: Pour the rest of the Mod Podge into the jar and use a variety of tools to scrape out as much of this golden glue as you can. Be sure to leave behind the evil crustiness that stuck the lid to the bottle. Realize you’ve made a royal mess of your tools and hope you didn’t get Mod Podge on your camera. Hurry off to a sink to wash your tools. Unscrew your craft knife and toss the blade… you’re probably going to need a new one anyway. Take the craft knife apart and wash with hot water. Step 7: Use a baby wipe or wet rag to wash the mason jar lid. We don’t want a repeat of this method using glass… Top with a lid and call it good. Get excited again to start on your Soul Journal cover. Rejoice! You have conquered the Mod Podge Glued On Lid monster. You are now a Mod Podge Princess & Monster Conqueror. So go glue something! Inky & Gluey Smiles! Disclaimer: No art supplies {with the exception of the Mod Podge Bottle and Craft Knife blade} were harmed during the making of this tutorial. Information is for entertainment purposes only. Should you need to open your Mod Podge bottle with a craft knife, the risk is yours.
Spring Madness.. Signs of Spring
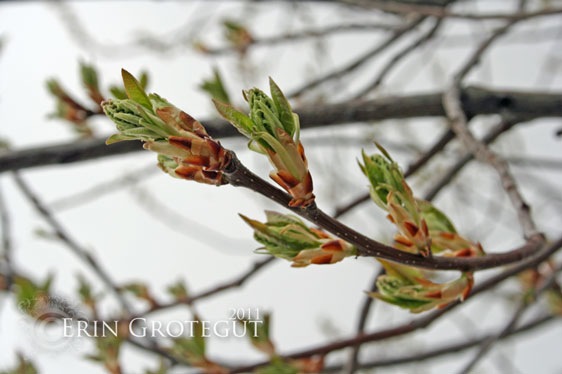
I’ve lived in Utah for almost 17 years now and you would think that by now I would be used to the weather. Nope… every year I am “shocked” at Mama Nature’s “bipolar“ disorder in this wonderful state. One minute it’s beautiful and sunny and we’re workin in the yard and getting sunburned… and the next, well, here, I’ll show you. {I missed the deadline for Wendy Tunison’s photography challenge so I’m sharing my photos for this week’s “Signs of Spring” theme in this post, too.} Yesterday we were doing some yard work… pulling out bushes that were struggling and just not right for the place we planted them 10 years ago. We were also revamping the front flowerbed profile {removing the old sunken concrete curbing and replacing with some fabulous new steel edging} and doing some general yard clean up & spring fertilizing. We didn’t get as much done as we wanted, but we made a nice start. Yesterday I perused our yard, checking out the traditional signs of spring… birds in the yard, Sadie shedding like a wooly mammoth and rolling in the grass, buds on the trees, neighbors out chit chatting after the long cold winter, and the crocuses popping up out of my weed filled tree rings…. And you know it’s spring when the flip flops are donned on grubby, yet newly pedicured toes in a nice sparkley spring pink…. It was nearly 70 degrees… of course I’m wearing flip flops in the yard! Here’s my favorite view of the day… See that man and his cute bum? He’s all mine. I lub him. I can’t help myself. {Oh and, uhm, bye bye Japanese Spreader Yews… the hottie hubby is kickin’ ya to the curb.} We didn’t get as much done as we wanted to because it started to get chilly and windy, rain was imminent, and we both had places we needed to be in the evening. {I went to see “Hop” with a girlfriend and her family and Brent went to the priesthood session of General Conference.} Hold on.. keep reading… Mama Nature DID pull a prank on us… you’ll see…. So this morning I’m laying in my bed and Brent comes in and says to me, “Hey baby, we got 6-8 inches of snow outside”…. I’m thinking, “yah right, we turned the AC on last night for an hour to cool the house back down so we could sleep… no way”…. Yes way. I covered the bed head hair with a hat and went out to measure. Yes, I made the hat. It’s making its debut… in April. Yes, Virginia… 6.75” of fresh, fluffy, beautiful white snow. The crocuses are completely buried again. I love this photo of Sadie.. She came running back from the west side of the yard and promptly sat down in the snow. The look on her face is something like, “Really? are you kidding me? I just found Poo Corner again and now you’ve covered it up AGAIN. Where am I going to ‘go’ now?” She has since changed her mind and has spent some fun time running back and forth tunneling through the snow. Thank you, Mama Nature, but you’re just a couple days too late for April Fools… or waaay early for next year…
Challenge Card – Floating Butterfly
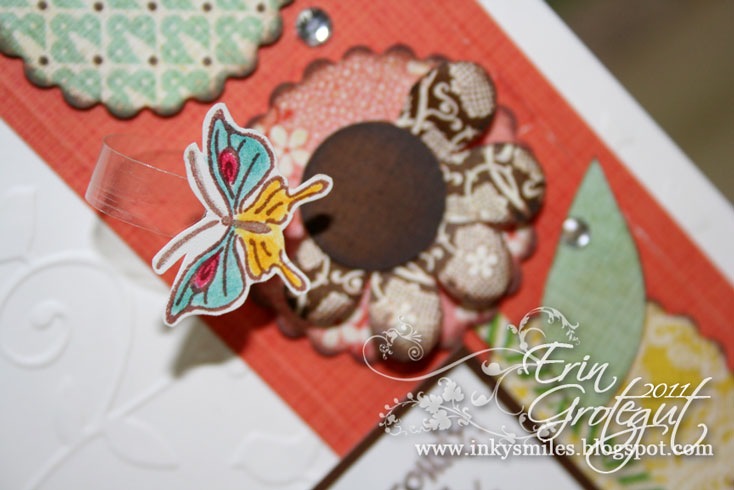
Today (Friday) Kari Seals sent me an email and asked me to help her bounce some ideas around with a sketch that her CTMH unit was doing. It is a crazy fun sketch and of course I wanted to play, too! I immediately had a ton of ideas flying through my brain but had to reign them in a little… Here’s the sketch: So I got on Skype to chit chat with my friend, Michelle Johns, and she bounced some ideas around with me for this card, specifically the butterfly idea. Everything on this card is popped up with American Crafts Foam Tabs. Stamps are CTMH. The butterfly is mounted on a “bent” piece of transparency/acetate sheet. When you move the card it wiggles and bounces… it’s so awesome! Thanks, Michelle! Here’s my card… You can see that the butterfly, gems, bling, leaf, message, mimic the various circles on the sketch. Stamps are CTMH and paper is Basic Grey – I think Nook & Pantry paper pack. The scalloped circles looked naked and out of place on the card so I added my own layer and anchored them with the orange strip of paper. Makes mama much happier 🙂 Thanks for popping in! Inky Smiles!
Charmed, I’m Sure! A C.U. Recap – The Charm Swap
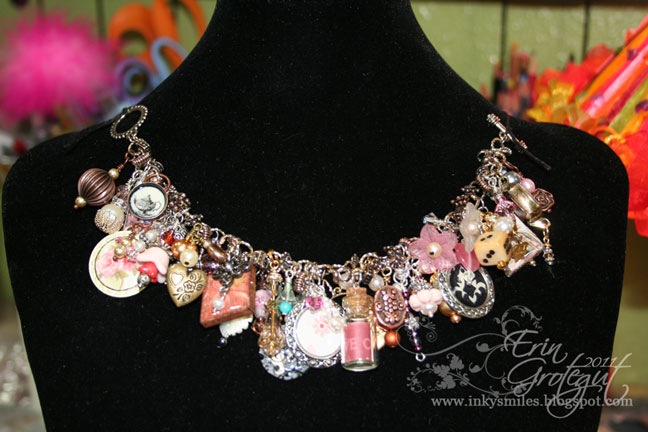
I’m back with some photos of our Charm Swap from this year’s Creative University. This year Tresa asked me to be the “Charm Mistress”/head Charm Fairy and organize and carry out the swap. This year we did TWO separate and completely different charm swaps!! It was a TON of work and a TON of fun! I created a Charm School and our Charm Guidelines and posted them on our old CU students site. Rather than me retype and post pics of the whole shabang how about you just click on over and check it out and then finish reading this blog post? Click HERE to view the Charm Swap goodness. A separate window will open up and you can click on the tabs to read all about it and visit my Charm School! My charm fairies were AMAZING at helping me sort all of the GORGEOUS charms that my Charming Ladies turned in. I was truly amazed at the creativity and love that filled this charm swap. Many of the ladies were beginners but you would never know it from the fabulous charms they contributed. One of our Charming Ladies had to step out of the swap due to a death in her family but another Charming Lady contacted me privately and arranged to create both her own and our friend’s charms for BOTH swaps so that our friend could receive some charms back and a bit of happiness in an otherwise sad time. You see, crafty ladies stick together and help each other out. It’s amazing. I love it. My sweet friend, Michelle, helped carry over the big honkin box of bags of charms to our “secret hide-a-way” where we swapped out the charms. Here she is under the weight of all those crazy charms… and me getting in on the shot.. haha! What a couple of goofballs! Here are my darling charm fairies sorting out the swaps. We did a “round robin” style swap and it worked out GREAT! We had two tables full of Vintage Victorian charms and one and a half tables full of Under the Sea charms. I had originally taken pictures of each individual charm but then I decided I did not want to edit each individual charm so here I’ve grouped them on my grubby Fiskars craft mat (sorry for it’s ugliness) and snapped photos of the charms in groups. I figured this would be faster and easier for me and I’d actually be able to get a post up! Charm Swap #1 – Vintage Victorian Theme Guidelines: “I wandered lonely as a cloud That floats on high o’er vales and hills, When all at once I saw a crowd, A host, of golden daffodils…” ~ Wadsworth Have you ever rummaged through grandma’s jewelry box or jeweled treasures at a flea market? Find joy in the beauty of old, well loved and worn baubles and trinkets, sheet music, lacey metals, flowers, gears, and magical beauty. Colors are soft and muted, pastels, pearls, etc. Party with antique colored, aged and patina’d metals (not bright and shiny) in this charm party. Think OLD! Here are the charms that I received in my bag. I forgot to write names on these pics but I will write who they were from under the pics. {top loose beads-miscellaneous from a couple of ppl, red and black-Bobie G., pink n silver – also Bobie G, the flowers on the card – Michelle J, cupcake card – Melody P, loose charms on the greenish card – Linda S, the green card charms – Kari S} {red square – Nichole L, silver and black – Yvonne H, pendant circle on striped paper – Kandi G, rose circle – Tahne T, bottle charm – Charlene W, teapot pendant – Kim G} {crystal angel –Kathie D, dice and hearts – Marieke H, heart and baubles – Marieke H, porcelain flowers – Wendi H} Here is my main Vintage Victorian Charm. I failed to take a photo of my filler charm. My charm is created from a scrabble tile which I raided from our scrabble game and drilled top to bottom with Brent’s Dremel tool (gotta love raiding the woodshop for craft projects). I made a digital design in PSE and then shrunk it down to fit a scrabble tile and printed it out onto cardstock and covered in mod podged on both sides. I covered the edges of the tiles with crystal effects and then dipped them into Martha Stewart antique silver glitter and let everything dry overnight. The next day I adhered the images to the tiles using crystal effects and then poured resin over them and let them sit for several days. When they were good and cured I finished them up with silver headpins and silver beads which I “antiqued” with a brown Copic marker. And here they are assembled on the charm bracelet that I made. I made the bracelet base out of twisted jump rings and silver baubles filled with swarovski crystalss. I used liver of sulpher to antique the metal base parts. It was stinky but easy peasy and I love the end result. Charm Swap #2 – Under The Sea Theme Guidelines: “The seaweed is always greener in somebody else’s lake..” ~ The Little Mermaid Journey through mystical seas with beads and baubles of blues, greens, purple and silvery tones. Anything mystical shiny and shimmery goes! Mermaids and fishies swim amongst the glittery stones and shells in our underwater charm garden. Party with pearls, shimmery shells, crystals, glass beads, silver (colored) and antique silver metals. Here are the charms that I received in my bag of underwater loveliness. I did remember to write the names of each artist on the cards with the charms. Whew! And here are my Under the Sea charms. My main charm is created from a tiny glass bottle which I filled with sand and a touch of magic glitter and some teeeny tiny seashells and pearls and wrapped with silver
It’s Not Easy To Eat Green: St. Patrick’s Day Dinner

In our almost 12 years of marriage we have never done the “green thing” for St Patrick’s day but this year I felt like it might be fun to do something for it. Originally I thought I’d do the whole Corned Beef Brisket with cabbage, taters, and carrots thing, but then I got to thinking about it… the last time that Brent and I made corned beef brisket neither of us cared for it that much so down the disposal it went.. blech. I made a command decision this afternoon to change the menu plan… I decided to make GREEN Fettucini Alfredo (homemade sauce) with a GREEN salad with GREEN ranch dressing and GREEN garlic bread. For dessert, GREEN frosted (airbrushed by the bakery) cupcakes. It’s fun what you can do with a few drops of green food coloring… tee hee! Oh, I also picked up some Mt Dew for a green beverage, but then remembered it’s more yellowy than green. (We’ve given up soda at our house… it’s a rare treat now.) Brent chuckled when I told him what we were having for dinner, but I think he also appreciated me NOT making corned beef brisket… Here are a few snapshots of our fun meal. It was VERY strange to be eating green alfredo sauce and green ranch dressing. I kept anticipating green frosting with the alfredo sauce, lol! It didn’t taste any different, but it kind of tweaks your brain a little… The garlic bread burned on one half of each piece (due to it rolling on its side and us not paying enough attention) but it still tasted good. We just cut the breads into normal slices once it was cooked and tossed the burned parts.) I printed the cupcake wrappers from the Tip Junkie website because I didn’t have enough time to create my own in MTC and cut them out. Here are some tips when coloring your food green: 1) Soften your butter to near melted before stirring in your food coloring or you will be chasing it around the bowl forever. 2) Add your food coloring to your cooked sauce at the very end. For the recipe we made (about 1 qt) we used roughly 22-23 drops of food coloring. 3) Shake your ranch dressing like mad to prevent streaking. (I use the Tupperware shaker when I make my homemade ranch.) 4) Buy your cupcakes pre-sprayed at the bakery. mmm! Hope you had a terrific St Patty’s day! Inky Smiles! PS… Back soon with charm pics. I’m sooo behind in editing pics, but they are next up!
Enabler Alert! Free Photo Book AND Dollar Days Sale!
Hey friends! I’m still “off” for a few days, working on some spring cleaning projects that are driving me out of my mind but need to be done.. lol… but I got some fun info from my blog “sponsors” that I wanted to share with you! {I’m putting both “ads” in one post so that I don’t flood you with emails.} First off… PICABOO has a CRAZY deal available for new Picaboo X users. Simply set up a new account with them and you can receive a FREE Classic 20 page photo book!! (This is a $30 value.) You just pay shipping. If you have been wanting to try a Picaboo Photobook now is the time to do it! Hurry! This offer expires on March 22nd, 2011. Here’s the FREE BOOK Scoop: Don’t forget! From now until March 22, new customers can receive a FREE 8.5×11 Classic Custom book from Picaboo using code FREECC. This offer is valid for either a hardcover or softcover book but will only work for our Classic Custom style. The cost of one 20-page 8.5×11 Classic Custom photo book (up to $39.99) will be deducted from the order total. If the book contains more than 20 pages, the customer will be charged for the additional pages at a cost of $0.99 per page. Taxes and shipping charges are additional. This coupon is for new Picaboo X customers only. ****************************************************************************** Also, Lettering Delights is having their DOLLAR DAYS sale on all fonts AND SVG files (those awesome little files that you can use with Make The Cut (MTC) and your Cricut machine! You can also use these darling SVG files and fonts with MTC 3.0 beta’s new feature “print and cut”. AAAAAAAAAAAAAAAMAZING little feature! Here’s the DOLLAR DAYS scoop! Dollar Days starts tomorrow, March 15th! All fonts, doodlebats, graphics, clipart, alphabets, and paper packs will only be $1. All SVG’s will be $2. Mini albums will be $3. In addition to the slamming dollar days deals, you can also receive the following amazing deals: 1) Over $40 in FREE PRODUCT with new account sign up. We have now added SVG’s to the new account product. If you already have a an account, you will find the new product available in your library. (image attached) 2) 9 Free Fonts are available to everyone who signs up for the newsletter 3) $5 off if you refer a friend who signs up for the newsletter. You’ll both receive a $5 coupon good on any purchase of $15 or more. 4) Monthly freebies. This month’s freebies are the Modern Miss Alphabet (available through Try Me Now Tool) and the Fancy That Digital Paper Pack. {Shameless self promotion: on a personal note, I’m saving for something fabulous for Brent’s birthday next month… if you sign up as a new user for Picaboo and click through my links to purchase from Lettering Delights I earn money towards this gift. I’m way stoked and hope that I can make it work!} Back soon with another Creative University Charm Swap recap! Be prepared to drool. I am SO happy with how the Charm Swap turned out! Inky Smiles!
Winner of The Bauble Earrings
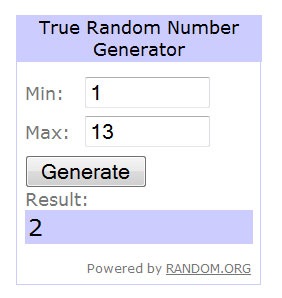
We have a winner! I used Random.org to draw a winner! I took out the double comments and my comment and we had 13 entries in this contest. Random.org selected our winner… drum roll please…. tappppity tap tap tap tap tapppp…. Our winner is #2 – Kandi G!! Shoot me an email with your mailing address, Kandi, and I will pop these little darlings in the mail to ya! Thank you for playing everyone! Inky Smiles! PS.. I’m going to take a couple of days off of the blog and do some cleaning in my studio. It’s quite awful and I’ve got to kill some dust bunnies. Be back soon with some more fun goodies for ya!