UStream Fall Pumpkin Video Tutorial
Hey friends! Sorry I haven’t been around much this week… I didn’t get more owls sewn or even clean my studio up because I worked a couple extra days this week and have been learning the ins and outs of the Ustream broadcasting process. I also went to the dr again for my knee pain and had a lovely “little” cortisone shot in my knee. Let me just tell you… that was a whole new adventure in pain. LOL! It seems to be calming my knee down and I’m able to do a little more again, yay! However, it does look like I will need to schedule a scope surgery on the knee in the next couple of months. (I’m trying to work up the courage to just go get it done.) Anyway.. I did have a successful broadcast last night! It was good to see some of you there in the chat room! 🙂 I didn’t have too many technical difficulties and it seemed to go pretty smoothly. I was nervous as heck but now I think I can handle doing more videos like that. It was actually pretty fun and I only had one of my supplies “jump ship” on me during the broadcast.. one of my leaves decided to FALL (buwahaha) off the desk but thankfully my handy and handsome assistant (Brent, of course) was nearby to retrieve said fallen leaf. I lurve him. Oh and my hair cooperated! WOOT! I’m going to work on the sound and not yelling into the microphone and causing it to go bonk on me. LOL! Don’t have your sound up too loud or it will be a little “scratchy/screetchy” in places. I’ve got can lights/recessed lights in my studio ceiling so they shine right down on the desk (hence the circles you see in the reflection). Gonna work on that, too. I’m going to be doing another broadcast in a couple of weeks, too! Watch the video and see what we’re gonna be making! Here’s the link to my Ustream channel: Inky Smiles Craft Lounge And here’s last night’s video! (I apologize for the commercial in front of it… I wish I could take it off.. but the ads help us have a free broadcast.) http://www.ustream.tv/flash/video/10060084?v3=1 Enjoy! I will be giving one pumpkin away to a random commenter… leave a comment on this post and I will draw a name on Tuesday evening, October 12th. (And I won’t forget cuz I’m putting it on the calendar in my phone.. aka brain… tee hee!) ~Inky Smiles!
Pumpkin clarification & Ustream class/tutorial
I just wanted to clarify… I know that I said they were completely handstitched but they are MOSTLY handstitched.. lol! The pumpkins are sewn by machine to make the round and all the details are added in by hand stitching (instead of gluing). I will show you how it’s done when I do the UStream video next week. The “pattern” for this came from Fiskars online. My Ustream channel will be located here: The Inky Smiles Craft Lounge I am shooting for Thursday, October 7th @ 7:30 pm Mountain Time. (This is 6:30 West Coast, 8:30 Central and 9:30 East Coast) I am going to check it out and try to work out the technical details with Brent and get it together 🙂 ~Inky Smiles!
Tutorial: Toilet Paper Molding Technique
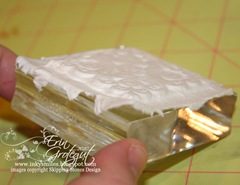
Toilet paper is always fun to talk about on a blog. Some of you may remember blending paper towels and sheets of paper in a blender with some water to make “homemade paper” art projects in the 3rd grade. I remember doing that and having so much fun creating molds and shapes with my paper pulp… but man, it sure was messy! Today I want to share with you a technique that can accomplish the same end result with a lot less pulpy mess. Toilet paper molding or casting is a fun technique that you can use to create interesting textures and designs for your art projects. This technique has been around for a while, but I thought I’d show you in my own words and pictures. Here is a card I created a while back (but have not shared yet) using this technique. Here are the supplies you will need: The scissors are if you need to cut the toilet paper and the tweezers are for those who may have a hard time gripping the paper or for holding it when you use the heat tool. Basic Tools: Toilet paper (quilted is fine.. it will “un”quilt when it is wet) Water Glimmer Mist (Optional for added shimmery-ness, mine is homemade) Deeply etched pattern stamp on a block Heat tool Ok let’s get started! I’m using a square stamp from Skipping Stones Design’s Rustic Tiles stamp set. This stamp is stained with white StazOn ink. Step 1: Tear or cut off 5-8 sheets/squares of toilet paper (TP). I am using 5 because this TP is on the thicker side. If I was using the super thin Scottissue that is only 1 ply, I’d use probably 8+ squares. It really varies on the stamp you’re using. Don’t worry if it’s quilted TP, the quilts will go away when you wet it. Lay the stamp face up on your work surface and cover with the TP. Step 2 Spritz generously with water until the TP is thoroughly soaked. Some people run their TP under a faucet and wet it, but I’m too lazy to go wandering so the water spritzer works… and I don’t have to worry about my TP getting too soaked and tearing, and then dripping as I walk over wood floors back to my desk. (Bling Tip: Depending on which side will be your “up side or visible side” you may wish to spritz with the Glimmer mist first.) Spritz and make an initial “SMOOSH” with your flat hand on the wet TP to start the process of forming the shaped image. You may need to spritz more to get the TP to smooosh down into the design of the stamp. Continue pressing the TP into the stamp image with your fingers. Step 3 Place your flat hand on top of the TP and stamp, then carefully tug and pull to tear away excess TP from the edges. Be very careful because the TP is still very wet and you can stretch out your TP mold still at this point. Step 4 Pull some more TP off the roll and bunch up into a “wad”. Don’t make it a flat ball, you want it all lumpy bumpy… lumpy bumpy is good…it helps press the wet TP down into the grooves of the image. Start at one corner of your stamp and smooosh that wad of TP down into the wet TP on the stamp. Work your way around the stamp removing water from the TP. You may need to adjust your crumpled wad in your hand if it gets too wet. Repeat this step until you get most of the water out of the TP on the stamp. Your TP should look almost dry like this: Here’s what it looks like after I spritzed some homemade glimmer mist on the top of this image. My glimmer mist has alcohol in it so it dries rather quickly. Step 5 Heat up your heat gun. I always like to heat mine up for about 20 –30 seconds before applying the hot air to a project. This way I get hot, hot air. Hold your heat gun about 8 or more inches from your TP covered stamp and heat until dry. I rotate it around and dry all the edges. You will be able to tell if it’s really dry or not just by watching the white get brighter and more solid looking. Carefully flick up a corner of your molded TP piece and carefully peel UP and away from the stamp. If the center “sags” and does not pop up right away, it’s not dry enough. Keep blasting it with the heat gun. Below is an image of the dry sparkly side of this finished piece Here are the images of the reverse side of this TP art. I’ve adjusted the shadowing in the pics so that you can see the details in the TP molds. For the card in this example I used two stamps placed side by side on a larger acrylic block to create a rectangle focal point and backdrop for the silk flower buds on the card. Voila! There you have it, friends… Toilet Paper art for grown ups. 🙂 Inky Smiles & Happy TP’ing!
Tutorial: Popped Metal or Metal Popping
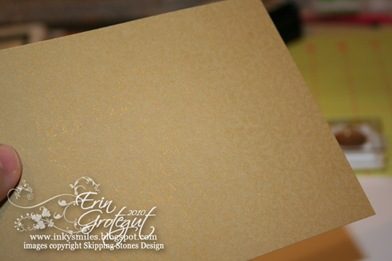
I had so much fun making my last SSD card and figured I should share with you how I did my background for my “masculine” card. I think I will call this technique “Popped Metal” or “Metal Popping”. I was going to try to use a “Chalk Popping” technique on the card but realized I needed to think up something else when I peeked at my chalks and saw that I only had pastel colors… so I pulled open my “messy embellishments” drawer and my eyes were immediately drawn to my metallic pastes. VOILA! IDEA!!! BLING BLING! This is amazingly easy (basically TWO steps) but gives a really cool result… so here we go… You will need: * Versamark Ink Pad * Metallic Rub On Paste (mine came from Gina K Designs) * Detailed stamp ( I’m using Rustic Tiles from Skipping Stones Design) * Sponge * Colored Cardstock & Scrap paper (to protect workspace) Step One: Ink up your image with a clean Versamark pad (you don’t want to use one that is stained with colored ink because it may transfer to your artwork – ick!) Begin stamping your image. I like to start off the page so the design runs off the page. Stagger the images on each row so you don’t have “running seams”. Cover the entire piece of cardstock with the Versamark stamped image. Be careful not to “smudge” the images with your fingers while stamping… what you smudge will show up in Step 2. Here you can see the CS covered in Versamark images: Step 2: Gently rub your sponge in the Metallic Rub On Paste. Don’t glop it on because it will come off too thick on your artwork and make a royal metallic mess. This requires a LIGHT touch, so if you have lead foot fingers like me and just want to SMOOSH that ink in stop now and take a breath. LOL! Start at one corner or end. Using just a teeeeny weeeeeny bit of pressure… just enough to transfer the Metallic Rub On Paste to the paper…. rub the sponge over the Versamarked images in a circular motion. You will start to see the images POP out in metallic splendor. If you have gaps between your images be careful not to rub the paste down in the gaps or you will get a “grid” look. But if that’s the look you’re going for, then hey, go for it 🙂 Continue rubbing the Metallic Rub On Paste on the Versmarked images, “reinking” the sponge as needed, until all the Versamark has been popped out. Finish at opposite end/side of where you started. I love how this looks… you can go back and darken areas for a more distressed look or for shadowing for the images you might be layering up for the final product and ink the edges darker with the Metallic Rub On Paste. Here’s how I used this background piece: Thanks for playing today! Inky Smiles!
Tutorial – Faux Stained Glass & A Bonus

Are you recovered from the Blog Hop yet? I’m not quite sure I am! LOL! I keep going back to various blogs and enjoying the art. I’ve got to work up something for the Sketch coming up on Tuesday still today but in the meantime I have been dying to share this with you…. A lot of people commented on how the butterfly on my card looked like stained glass. Thank you! That’s exactly what I wanted it to look like and so I am glad that it actually came across as I intended. The butterfly on that card was just stamped with StazOn Jet Black ink and then colored in. But, you know how sometimes you get this whizbangger of an idea in your head but can’t always get it out how you’re imagining it? Well, my first several attempts at doing “Faux Stained Glass” did not do my imagination any justice…. {I tried using Liquid Glass and pouring it out over a handn sketched design, then I tried embossing powder on my Silpat mat and nearly melted the mat……} and then this fabulous butterfly stamp from the Healing Wings Set came into my hands and it actually worked how I wanted it to! Today I’d like to show you some real “Faux Stained Glass”. This project is a little different than the butterfly on my card. I was laying in bed thinking about stained glass (cuz I have this new fascination with actual stained glass now) and this is what I came up with. Ok now, gather up your supplies. You are going to need the following: * A Heat Tool * Transparency Paper * Mirror Platinum Embossing Powder (I used CTMH) * Bic Sharpie Markers * Versamark Stamp Pad * An “outline” style stamp with spaces that resemble * stained glass * Sharp scissors * An “Anti static pad” {not shown} {STEP 1} * Lay your transparency paper down on your work surface. I am using a white sheet of paper under mine for filming purposes. Otherwise you can’t see it all that well. *Rub down the sheet section you will be stamping on. Rub all the way to the edge of the transparency sheet. {STEP 2} * Lay your stamp face up and thoroughly ink with Versamark ink. (I lay mine face up because it helps limit the amount of excess ink that may get on your block. Those Versamark pads are awfully squoooshy. {Step 3} * Carefully stamp your image onto the transparency sheet. Be careful not to wiggle or slide the stamp. The transparency is slick and it’s easy to slide. Press down all parts of the stamp to make sure you get a good amount of ink on the transparency. * The photo on the right shows a nice clean Versamark stamped image. It’s very hard to photograph clear paper. LOL! {Step 4} * Pull out a piece of scrap paper and put it under your image. Pour your embossing powder over the stamped image. You might have to pour it over a couple of times for a good thick layer. If some excess powder sticks where you don’t want it you can take a moment to gently scrape it off or brush it away before heating. * The picture on the right shows a nice thick layer of embossing powder on the Versamark image. Ok… now we’re going to melt this bad babeeeee… well, actually we’re only melting the powder. We really don’t want our transparency paper to melt so let’s take a precaution and HEAT UP that heat gun. {Step 5} * Preheat your heat gun for about 15-20 seconds. You’re going to want that air nice and hot so that you don’t have to have the heat on the transparency sheet for any longer than you need to. {Step 6} * Don’t leave your transparency sitting on your work mat. Hold it up in the air to prevent melting or warping of your cute pink Fiskars work mat. See left photo. Ergh. * Taking care to keep your fingers away from the heat, gently wave the heat gun in front of the stamped image on the transparency. Keep the heat moving so that you don’t overheat one spot and melt a hole through the transparency. You will notice the powder turn shimmery and look like molten metal. Looooooverly schtuff that molten metal is! *It’s hard to photograph with both hands being busy… LOL… sorry for the blurrrrrrr…. {Step 7} * Now you can cut out the section of butterfly. Just roughly cut it out, don’t trim closely just yet. * Here you can see the embosses image of the butterfly. Doesn’t it look splendid? Like pure molten metal or flux and solder like real stained glass. I love that the mirrored platinum gives such a nice patina’d effect. Don’t worry, it’s actually platinum, not so greenish. It’s difficult to photograph this at midnight.. LOL! {Step 8} * Now flip that bad babeee over we’re ready to color. You will want to color on the backside. I am sure you could color on the frontside, but who wants to risk coloring that beautiful embossing with Bic Sharpie marker? Not me. Flip it. Just flip it. {Step 9} * Begin by coloring focal points or areas you want to stand out. Then fill in the areas with contrasting colors. You can also blend for a graduated color merging. * See that stray stringy looking thing on the right side of the image? It’s a bit of embossing powder that got heated. It’s not on the stamp… weird.. Not sure how that got there, but I like it. It looks like cracked stained glass. Even more fun! * Keep on coloring until you get the desired effect. Tip: You can go back over some of the colors with a different color if you don’t like how it turned out… be careful what you mix or it may end up looking muddy. *
Windows Live Writer – Basic Tutorial
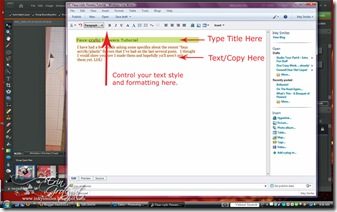
I {heart} Windows Live Writer. It makes my blogging life MO BETTAH. Jeanne Tomshack introduced it to me a while back and I have not used the online blogger interface to blog since. I had so many trouble with Blogger eating my photos and not publishing when it was supposed to, etc…. Blogger was also very cumbersome to compose posts in. Now, don’t get me wrong. I still use Blogger to host my blog and still have to log in to my Blogger dashboard to make the overall layout changes, etc., but I make the actual posts in Windows Live Writer (WLW). I thought I’d show you a very basic photo tutorial on using it. So here we go. WLW is a WYSIWYG program… “what you see is what you get”. There’s no guessing about how your text is going to appear or whether or not your photos are going to line up properly in your post. You can type up posts ahead of time if you’re going on vacation or won’t be near a computer but still want to share on your blog. WLV’s scheduling feature works GREAT! The first thing you need to do is download Windows Live Writer HERE. You will need a Windows Live account (also can be a hotmail user account or MSN account… all the same company). Windows Live Writer is FREE. {Hallelujah!} Once you’ve downloaded WLW it will prompt you to set up your user account info and password for your blog. Don’t worry, it only uses it to access your blog to upload and publish your posts. Here are some photos for using WLW. I printed my screen while publishing a recent post. Click on the photos to view larger. They should open in a separate window. Getting Started Inserting Photos Linking Text Inserting a Photo Album Scheduling a Publish Date {{edited: I just realized I’d abbreviated WLV instead of WLW…. I must have been thinking . Windows Live Vriter…. ooops!!! ROFL! It’s been corrected…}}
Faux-crylic Flowers Tutorial
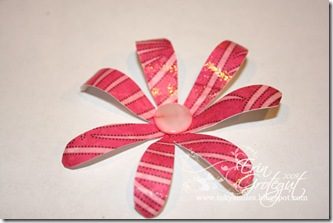
I have had a few emails asking some specifics about the recent “faux acrylic/plastic” flowers that I’ve had on the last several posts. I thought I would show you how I made them and hopefully ya’ll aren’t sick of them yet. LOL! This is a really easy process and you don’t need anything special… I think most crafters have a heat gun and embossing powder… and I KNOW you all have stamps! 🙂 This is also a great project for using up those odds n ends paper scraps or papers you thought you loved but now can’t seem to figure out what to use them on…. Supplies Needed: * Embossing Powder * Versamark Ink * Heat Gun * Scissors *Chunky Floral Image – CTMH Rustic Flowers * Something like a pencil to roll your petals on * Patterned Paper – Basic Grey Step 1: * Load up stamp with versamark ink. Stamp firmly and evenly onto paper. Step 2: * Sprinkle generously with clear embossing powder, tap off excess. Step 3: * Heat with heat gun and melt all powder. Step 4: * Cut out shape around embossed image. Step 5: * Curl edges around a pencil or other small round object. Step 6: * Scrunch the center and press petals forward. ENJOY & EMBELLISH!! Inky Smiles! View Full Album
Tutorial: Faux Designer Paper
Creative Supplies: DCWV Luxury 4×6 paper pad BG Bittersweet 6×6 paper pad Fiskars Lace border punch Nestabilities Ovals CTMH Inks – Grey Flannel & Garden Green CTMH Stamps – Decorative Dainties Designer paper… sometimes you get this whizbang idea and you need it. But usually, if you’re like me, your whizbang ideas come at 1 or 2 am and there’s no open scrapbook stores around. (Sure there’s online, but then you’re waiting 5-7 days for delivery…. shush you there in the peanut gallery!) So anyway… you’ve got this whizbang idea or you’re totally casing someone else’s whizbang idea and you need some Designer Paper. What do you do? You pull out your stamps, some ink, some preprinted-wanna-be-almosta-designer-paper and you make it yourself! I saw a card on Beate John’s blog that I wanted to re-create. I wanted to use this awesome new DCWV Luxury pad that I’d picked up at Jo’s recently. The problem was that I didn’t want to use ALL shiny blingy Luxury paper on the entire card front… it needed some variance in the texture. So here’s what I did: Once I decided on the overall layout, I pulled out my BG Bittersweet 6×6 paper pad and pulled out the light cream sheet that was preprinted in a distressed and grungy manner. I thought it would be super for a background for the FDP. Step 1: Practice stamping with your image to make sure you get the desired effect. I wanted mine to be semi grunge/distressed but mostly stamped. It worked for this stamp to use the piece of foamy stuff that comes with the CTMH stamps under the paper. Step 2: Practice on a piece of scrap paper… Then, random stamp your design on the final paper/cardstock. Don’t worry about it being completely perfect because you’re going to cut up this masterpiece in a couple of minutes anyway… 🙂 Now you have a piece of Faux Designer Paper… Or semi homemade Designer Paper.. you decide. LOL! Step 3: Cut your Random Stamped FDP and create your card & send to a friend or two! Inky Smiles!
Tutorial: Paper Beads Part Two – Adding Bling & Stringing Your Beads.
We covered the making of the actual beads in Part One. The post was getting quite long so I decided to start a Part Two post – Add some bling and string your beads. {Continued from Part One} Adding Bling ** At this point you can also opt to add some bling to your beads. I experimented with adding Perfect Pearls glittery powder, glitter, and Stickles. Here are some photos of my experiments. Perfect Pearls: Worked on blue beads fantastically! Glitter: Sprinkle on after you dip in UTEE. Beautiful addition to red and tan beads. Stickles: Carefully dab onto dry UTEE and then dip in UTEE again. Didn’t work so great because the glue in the Stickles bubbles up and makes a nasty mess. Hints: Don’t heat too close or too long to the bead or it will glob up and the UTEE will flow like lava off your bead. (See above right photo.) And please don’t touch the bead like me until it’s cool or it WILL burn you and make a mess. Taking one for the team… ouch! Stringing Your Beads 1.) Gather up your tools & supplies: Pliers, Tiger Wire, Crimp Beads, Spacer Beads, and Clasps (I used a Toggle Clasp). If you are adding a charm, gather your jump rings and charm, too. 2.) Cut a piece of tiger wire long enough to go around your wrist PLUS at least about 4” extra. I cut a 12” length for an 8” bracelet. Lay out flat on your workspace. 3.) Start by stringing your crimp bead followed by one part of the clasp you’re using. Then fold about 1” or so of the tiger wire over the ring on the clasp and thread it back through the crimp bead. This will secure your clasp to your bracelet. 4.) String the beads. I string a few coordinating “starter” beads on. These help space out the paper beads and give some better maneuverability to the toggle clasp. String all your beads on until you have the desired length & design. End your string of beads with the same # of spacer beads that you used at the beginning. 5.) String on one more crimp bead and the other half of your clasp. Fold over loop on clasp and thread back through crimp bead and all of the spacer beads. Keep pulling the wire until it is snugged down around the loop on the clasp. You may need to use your pliers to gently tug and pull the wire to the correct length. 6.) Snip off the wire so that it ends about half way through the last paper bead. (See above right photo.) This should secure the wire so that it doesn’t pop out and scratch you. Voila! You now have a custom handmade piece of jewelry to add to your collection or to give away! I hope you enjoyed this tutorial & as always, I would LOVE to see what you come up with! BONUS RAK: I’m going to give this bracelet away in the evening on Wednesday, January 14th to a random commenter using a random integer generator. Here’s how you can put your name in hat: * Post a link on your blog back to this bracelet tutorial and leave a comment here letting me know you’ve shared. Comments will be closed at 6:00 PM Wednesday night. I will draw a random name on Wednesday evening. Inky Smiles & Good luck 🙂
Tutorial: Paper Bead Bracelets Part One
This was supposed to be posted on Friday, but our internet was out (AGAIN) and I spent the morning on the phone switching our phone service over in preparation for switching internet service. (We have VOIP phone and wanted to make sure we kept our phone number…) And then we went up north for the Draper Temple open house. (We got a special invitation because Brent is an elected official.) It was so neat, they had a great tour and a little reception at the end with a gift of the “Then Sings My Soul” cd from the MoTab Choir. The very best part of the evening was when we got to shake hands with one of the leaders of my church, Elder Eyring… What a fabuous evening! Anyway… here’s the tutorial! This technique is SUPER easy. My mom said this is a way old paper art…. she has a necklace made from old rolled up newspapers. (It’s super pretty!) I loved the bracelets at PTI, but I did not like the idea of ModPodge on a wearable item. If you’ve ever gotten something wet that was one ModPodge’d you know what I mean… ewww. I also saw these beads made on a YouTube video by Suse Weinburg, but I did not have the UTEE melting pot. Michael’s has it but it’s $34.99 and I didn’t have a coupon when I was there… Anyway… if you have an old Versamark pad, a heat gun and some UTEE and a little creativity, you’re good to go. 🙂 I hope you enjoy making these beads and I would love to see what you come up with! 1.) Gather your supplies. I used the following: s Versamark Pad s Heat Gun s Patterned paper s Spacer beads (glass or metal) s Clasps & crimp beads s Wire Snips/Pliers s Tools for rolling paper (anything long and skinny will work) s Glue pen s Ultra Thick Embossing Powder s Various glitter/shimmery powder s A mat or paper pad to protect your work surface 2.) Cut long, narrow triangular strips of paper and set aside. The # of strips you need depends on how many beads you will need to go around your wrist. Cut extra pieces for those “oops” moments. Where’s Waldo? Can you find the pink strips on that marvelous pink mat? LOL! 3.) Roll wide end of paper onto whatever you’re using to hold the bead. I switched to wooden skewers (WalMart) in the middle of the tutorial. (The embossing tool actually works great to hold the bead while melting the UTEE later….) Use glue if you need to help secure the paper while rolling. When you reach the end of the paper be sure to use the tiniest amount of glue possible to securely stick down the narrow end. If you have extra glue oozing out it will make a mess in step 5. 4.) Roll the bead on your Versamark pad and generously ink up the bead. Make sure all of the paper is completely inked up. Dip into UTEE powder and thoroughly coat. Gently tap off excess. 5.) Heat up your heat gun and hold the bead in the heat. Rotate the bead while the UTEE melts. (This keeps the UTEE from globbing up in a puddle on the bead.) Don’t hold the heat in one place too long or you may also burn the UTEE and it will turn a nasty yellow color. 6.) Let bead cool, then roll in Versamark and dip in UTEE again until you get the desired thickness of coating and desired appearance of your bead. ** Click here: ** Continue to Part Two: Adding Bling & Stringing Your Beads