Watercolor – A New Adventure… or Addiction

Oh goodness.. another post! Can you believe it? I’m trying.. hehe! I started watercolor painting this late spring/summer on a whim. It looked fun so I figured why not.. so I pulled out the cheap-o Artist Loft brand paints from Michael’s that I used to use when I was with CTMH and started coloring stamped images again for cards. (Please bear with me as I re-learn formatting Blogger posts. They seem to have changed the way they do photos since I last regularly blogged…) They worked for about five minutes while I played around and explored watercolor painting. I decided I REALLY enjoyed watercolor painting. I used up that one pad of watercolor paper that I had been hoarding since about 2008, bought some more, and then I realized that I needed something better paint wise… eventually I landed on these Sakura Koi Field Sketch pan paints… and then with decent paints and paper I was HOOKED. I started playing around with landscapes and plants… It has been a fun summer with watercolor. I am totally addicted and have quite successfully avoided things like laundry, dishes, organizing, and sometimes and often, cooking dinner because I was wrapped up in my imagination and water and paint. (That’s not always a bad thing.. just sayin’.) I also brought my compact watercolor paints, paintbrushes, and travel size watercolor pad with us on our cruise to Alaska (posts on that coming) and painted on our balcony on sea days. Watercolor painting is so relaxing. It is so easy to get lost in the the colors… and it is a lot less mess than papercrafting. 😉 I LOVE looking on Pinterest and YouTube for tutorials and inspiration to paint. There is so much out there! This is an image I sketched out based on some stamps I saw online. I recently discovered an amazing company called Let’s Make Art. They offer a subscription service that includes and also have free tutorials on YouTube. I’ve yet to subscribe, although I think I might give Santa an idea for Christmas, but I have been following their free YouTube tutorials have have been freehand sketching their designs and painting along with them. Sara Cray is the owner and she’s so fun to watch and has LOADS of great tips and techniques that she shares as you paint along. I don’t get anything for sharing the love about them… just the hope that you might get a spark for watercoloring and join in the fun. (Always happy to enable fellow creative friends.) I love following along and painting! Here are a couple fun paints just in time for Halloween! I have to admit I have really enjoyed painting spooky pictures! Black watercolor is kind of a pain to work with because it tends to want to go gray (watercolor paint is transparent) and you have to drop a lot of paint in to get a really rich black. Wednesday night the temps here dropped 60* overnight. We had about 3″ of snow on the ground Thursday morning… our first measurable snow for the season so that meant we spent the evening watching Disney’s Snowball Express and enjoying a warm fire. I made my best ever Hearty Chicken and Dumplings and pulled out my paints. Recipe is here in my Facebook foodie group, What’s Cookin’ Good Lookin’? I painted this Floral Truck while we watched the movie and it was so much fun to paint! It’s my favorite color after all… The flowers were also a ton of fun! Have you watercolor painted? Do you like it? I am thoroughly loving it so far! Happy Friday! I am off to snuggle this cute puppy… XO, E
Ladder Scarf Tutorial
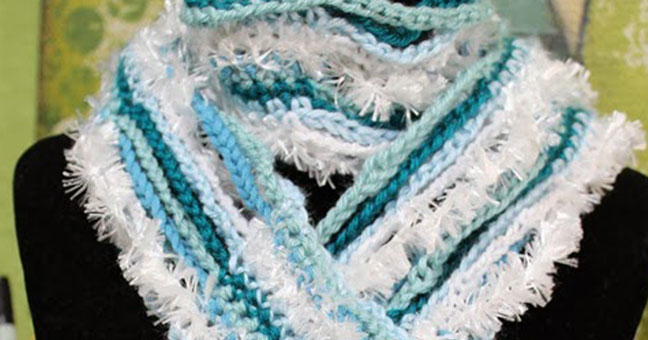
Hello again! This post is a follow up to yesterday’s Frozen Scarf post. I figured with all the photos it would be better to split it into two posts and keep the tutorial separate. This is the scarf I shared yesterday: Today I am going to give you a very basic tutorial to make this scarf. Disclaimer: I have never written a pattern/instructions for crocheted ANYTHING… but this is so ridiculously easy that I don’t think I can mess it up too badly 🙂 I am writing this for a scarf for an adult… shorten as needed per size of the wee one. LADDER SCARF PATTERN/INSTRUCTIONS: This scarf is perfect for using up ends of skeins of yarn and misc scraps of yarn. Mix the colors and textures up as you choose. Hook size used for this project is a size “H/8-5.00 mm” Step One: – Start first color with a long tail, roughly 7” – Chain 315 stitches. – End with a 7” tail. Step Two: – Start second color in the same manner, leave a 7” tail. – Chain 15 – *Count 15 stitches on the first chain and find stitch #16. – Once you have found chain #16 single crochet with your second color (this will be stitch #16 on your second color) for the next FIVE stitches You will have connected your two colors to each other with FIVE single crochets. – Chain 15 more stitches. – Repeat from * until you reach the end. You should have 15 chained stitches at the ends with a 7” tail string. Steps Three – Eleven (Or however wide you want to make it): – Continue this process until you have reached the desired width of scarf. My Frozen scarf was 11 rows wide. Finishing: – Trim your tails to all the same length. I tied knots in the ends to prevent fraying. NOTE: If you want more space between each row of the scarf you can do five double crochets or five half double crochets instead of five single crochets. This will give just a bit more spacing between the rows. Here are the instructions in photo format. (I have only crocheted a short length to illustrate the process.) Find your size H/8 –5.00 mm hook Step One: – Start first color with a long tail, roughly 7” – Chain 315 stitches. – End with a 7” tail. Step Two: – Start second color in the same manner, leave a 7” tail. – Chain 15 – *Count 15 stitches on the first chain and find stitch #16. – Once you have found chain #16 join your colors with a single crochet (this will be stitch #16 on your second color) for the next five stitches You will have connected your two colors to each other with FIVE single crochets. – Chain 15 more stitches. – Repeat from * until you reach the end. You should have 15 chained stitches at the end with a 7” tail string. Steps Three – Eleven (Or however wide you want to make it): – Continue this process until you have reached the desired width of scarf. NOTE: If you want more space between each row of the scarf you can do five double crochets or five half double crochets instead of five single crochets. This will give just a bit more spacing between the rows. {I believe in the original pattern, the artist used double crochet (posts) for her scarf. } AND THAT IS IT! And that’s it… easy peasy, especially once you’ve attached the second row/color. You only have to count the 15 chain stitches and can zip right through the scarf. Here’s a peek at the chunky yarn scarf I made to test the pattern. Chunky yarn crocheting achieves length very quickly with fewer stitches. I think the length on this one is 150-ish stitches and the spacing is 10 chains, 5 single crochet. Thanks for popping in. If you decide to crochet this scarf I would LOVE to see it 🙂 Link up in the comments. (Miss Jeanne, I sure hope to see one or two made for your girls .. hehe..) Inky Smiles! ~Erin
Baby, It’s Cold Outside… A Scarf Inspired by Frozen
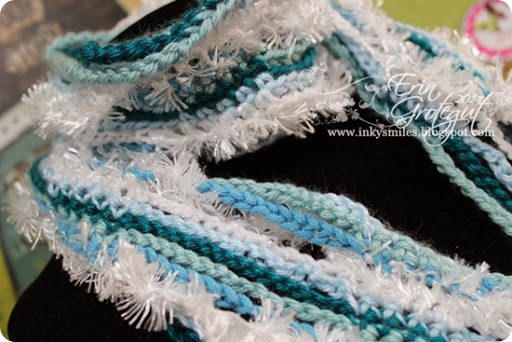
While much of the country is freeezing their bums off covered in a blanket of snow, here in Colorado we have been enjoying a lovely, sunny 57* – 63* most of the past week. (Mind you, we had a visit from the great Polar Vortex just prior to this faux Spring, so it’s been much welcomed, and a tease, because I know what is coming….) Remember this sneak peek? I know I promised I was working on the post for it. Here it is… My niece had her 5th birthday on Saturday. And she just LOVES the movie Frozen, so her birthday theme was “Frozen”… She is a lot like I was a child, bright, independent and creative. She looooves to pretend with her dolls and dress up like her favorite characters. I decided that I wanted to make her a Frozen scarf… Kisha and I had found a fun scarf pattern on Pinterest a while back, but when I looked up the instructions they were in Finnish. Thankfully someone had posted some very basic roughly translated instructions in the comments. I made a big chunky yarn version to start with and LOVED it so I went ahead and made a smaller version. This scarf didn’t have an official name for the pattern, but I am going to call it a “Ladder Scarf”. It looks kind of like a ladder… I used a variety of different types of yarn for this scarf. I love how the fringey white yarn looks like snow. It was a pain to work with, but the finished effect is awesome. Here she is opening her prezzie… So excited! (Forgive the pic quality… images from texts from my sister.) I think it turned out FABULOUS. In fact, I really want to make one for myself with fun frilly yarn like this. (We told my niece it was snowflakes and icicles…. she wasn’t quite sure why all the pieces weren’t completely attached in the spaces… “Mom, tell Auntie Erin she needs to finish it and make all the pieces stick together.” Hehe… ) And later that evening… in her Anna dress…. One happy little 5 year old! Thanks for dropping in! I loved making this little scarf and I am glad my niece loves it. 🙂 For you crocheters – I have written a tutorial and it will post tomorrow morning. Inky Smiles! ~ Erin
Black Magic – A Folksy, Doodly Focal Image Technique

Today I have a fun, folksy, doodly focal point image technique to share with you called Black Magic. I saw this technique at SCS and fell in love with it and decided I just had to teach it at Creative University. It’s easy, fun, and different! I love the folksy look of the white doodles. They remind me of tole painting and folk art. Here’s how you do it. Black Magic – A Folksy, Doodly Focal Image Technique I’ve been having fun with these quickie video tutorials & have one more coming soon! I think I want to do more. Is there a technique you’d love to see me demonstrate? Let me know and I will do my best to put a tutorial together for you. Inky Smiles!
Oxy Magic – An Inky Background Technique

Hi friends! Today I have a fun technique to share with you! This year at Creative University Tresa had the teachers put on a Technique Boutique. Each of us contributed 4 technique make n take style tutorials for the boutique. For my techniques I tried to do something “different” than what you’d see at a traditional “stamping demo party”. I will be sharing alll 4 techniques via video over the next couple of weeks. This is one of my favorites! It’s called Oxy Magic/Foxy Oxy… etc… Here’s how you do it! Enjoy! [youtube https://www.youtube.com/watch?v=zHUwkmDAEG4]
Video Tutorial – Nickel and Dime Style Bling Rings
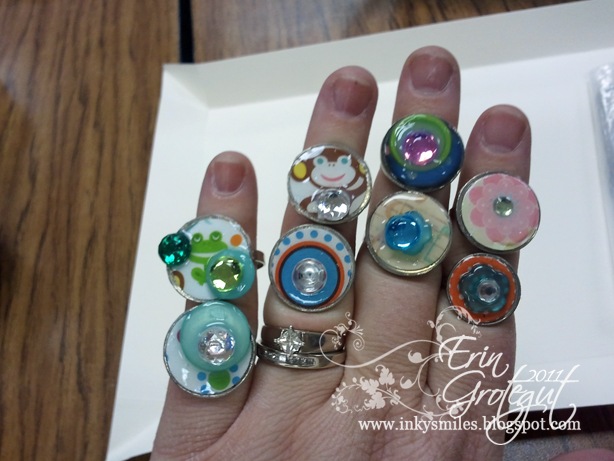
Hey guys! It’s been a LOOONG crazy summer! I know I’ve been MIA entirely too long. We have had so much going on around here and quite frankly, I decided to cut a few things out of my life for a little while and not stress about them. It’s been a nice vacation from the blog, but I think I am ready to get back into some crafty action again! We’re still in the process of remodeling our kitchen. We took a break from the finishing touches while we had family in and out for weeks and weeks and did some traveling for Brent’s job. And then I got sick the last big of Sept on our way home from a trip (some respiratory flu) and was sick until just last week when I finally went to the ol; doctor and became a walking pharmacy. haha.. feeling much better now, though. Oh, and it’s been “that time of year” again…. CANNING SEASON… We did BUSHELS and BUSHELS of grapes and tomatoes, peaches, and 40 lbs of chicken again…. It’s been fun 🙂 And I made a working website for my Creative University Charm Swap Ladies … I’m hosting again this year and it is going to be FABULOUS! There are still a few seats left for Creative University… hop on over and check it out! So anyway… One of the exciting things I am up to is teaching at the Junior High here in town. I am now the 4H Afterschool Club Bling leader. I’m teaching crafts and jewelry to a gaggle of 12-15 year old girls. It’s LOADS of fun and loads of work. The opportunity was something I sort of fell into, or rather it fell into my lap, unexpectedly. A friend recommended me to the coordinator and a couple of emails later I was knee deep in the planning. I’m quite enjoying it, actually! Today we made “Bling Rings” out of Nickels and Dimes, scrap paper, bling, and Glossy Accents. ‘Cuz a girl just can’t get enough bling, right? I threw this little quickie tutorial together tonight to show you how easy they are to make. [youtube https://www.youtube.com/watch?v=-8xhylBtKBw] Here are some photos from today’s 4H Club Bling adventure!
Woman vs. Mod Podge: A How To
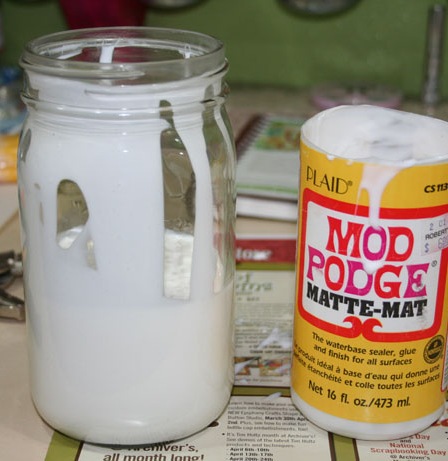
I’m starting an online class today called Soul Restoration (part 1). Many of you are already familiar with the Brave Girls Club and their wonderful community. Some day my goal is to GO TO Brave Girls CAMP, but until then online Soul Restoration will do… I am excited to do a little “soul cleansing” through art. There’s nothing terribly wrong or anything, but thought that this would be a good way to get a jump start on finding the “old pre infertility nightmare crapola” me. And you can’t go wrong with doing something that involves healing through ART 🙂 SO for the next 8 or so weeks I may be MIA from time to time, but don’t worry, I do have some fun artsy things to share with you. {I may not be sharing my art for Soul Restoration due to the personal nature of it. I will, however, share some techniques that I am learning or exploring and creating with and some other fun goodies I’ve been working on.} Some of you may also know that Melody Ross (one of the creative geniuses behind Brave Girls Club) is also the Queen of Mod Podge. HA. Yes, that wonderful white gluey goo that adheres, protects, and encases mixed media art. I want to be a Mod Podge Queen someday. Today I am a Mod Podge Princess & Monster Conqueror I conquered the Mod Podge Glued On Lid monster. And you can, too! Even if you really want to get a jump start on your journal cover but don’t have a pair of strong masculine hands available at the exact moment you feel the desire to permanently adhere something. You, too, can be a Mod Podge Monster conqueror. Here’s How: Step 1: Attempt to pry open the lid with your hands and fail miserably. Say something naughty to the Mod Podge bottle in hopes that breaking its self esteem down will do the trick. Realize that doesn’t work, so bang the lid on your desk hoping to free up the glue that is holding the lid to the bottle. Step 2: Get on facebook and mention your predicament to your 87,896,543,321 friends and hope that someONE, preferably a crafter friend, has a quick n’ easy solution. Get a suggestion from your male non crafty buddy instead. Head out to the workshop {in your wooly socks} for some vise grips or channel lock pliers. Step 3: Realize the mouth is not big enough for the lid. Think of something else… (I’d already started step 4, so the glue was dripping down the side. Shush… just keep reading. :P) Step 4: Decide that you have run out of patience and just want to get your craft on and move forward. Race off to the food storage room for an empty mason jar. Grab your favorite Fiskars Fingertip Craft Knife from your “sharp things” bucket that hangs underneath your beautiful custom pink InkStak and decide it’s time for the Mod Podge to find a new home. Carefully insert craft knife into Mod Podge bottle. (Pause to snap a photo because you don’t really have an extra hand.) The plastic bottle should be easy to cut, smooth, like buttah. Realize that you’ve spilled a glob of glue on your desk and reposition the Mod Podge bottle over the top of the mason jar. Carefully rotate the bottle while cutting… the Mod Podge goo will pour into the bottle as you cut. Step 5: Squeal (or whatever) with happiness because you finally have access to your Mod Podge! Step 6: Pour the rest of the Mod Podge into the jar and use a variety of tools to scrape out as much of this golden glue as you can. Be sure to leave behind the evil crustiness that stuck the lid to the bottle. Realize you’ve made a royal mess of your tools and hope you didn’t get Mod Podge on your camera. Hurry off to a sink to wash your tools. Unscrew your craft knife and toss the blade… you’re probably going to need a new one anyway. Take the craft knife apart and wash with hot water. Step 7: Use a baby wipe or wet rag to wash the mason jar lid. We don’t want a repeat of this method using glass… Top with a lid and call it good. Get excited again to start on your Soul Journal cover. Rejoice! You have conquered the Mod Podge Glued On Lid monster. You are now a Mod Podge Princess & Monster Conqueror. So go glue something! Inky & Gluey Smiles! Disclaimer: No art supplies {with the exception of the Mod Podge Bottle and Craft Knife blade} were harmed during the making of this tutorial. Information is for entertainment purposes only. Should you need to open your Mod Podge bottle with a craft knife, the risk is yours.
Simple Christmas: Brownie Box Slipcover – Tutorial
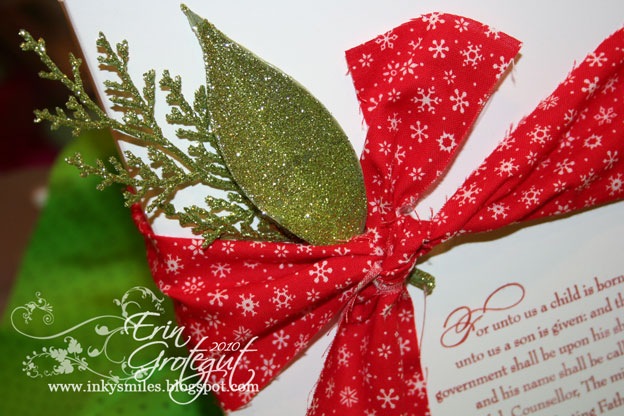
Hello! This morning I had an email from a friend asking me if I had seen a particular template she had been looking for “a slipcovered brownie mix” or something like that… I did a little searching and found nothing but I remembered that some mixes we bought from Lehi Roller Mills last year had “slipcovers” on them. So this morning I set out to create my own template. This is a simple tutorial. I shot from the hip and just snapped photos as I went (on top of the mess I’m currently working on) which explains the messy photos. Here’s what I came up with. Lou Faye, I hope this helps! Slip Covered Brownie Box Gift This slipcover was measured to fit a Betty Crocker Brownie mix. I am sure it will work for other similar size cake and cookie mixes. If not, it is VERY EASY to alter this slipcover… just adjust the score lines. What you will need: Your brownie mix box A scoring tool (I’m using my ScorePal) Cardstock Adhesive Paper Trimmer Decorative Paper, Stamps, Stickers, Ribbons, Embellishments, etc, to decorate your box Step 1 Cut two pieces of cardstock to 8”x7 5/8”. Mark the 8” side with a pencil (a little tick or x will do) so you know which side it is. Turn the cardstock so that the 8” side runs horizontally. Step 2 Measure from the left side of the page, not the score lines. Starting from your left, score at 3/4” and then again at 6 1/2”. Repeat on second piece of cardstock. You may fold your cardstock now or wait until later. {I fold mine now and check the fit by wrapping the pieces around the box.} Tip: Did you know that when you fold a scored paper that the valley you created by pressing down and scoring should be on the OUTSIDE of the fold? This is because you have already “stretched out” the paper. Folding it on the inside of the fold can cause the fold line (on the outside) to tear and look yucky. Step 3 At this step I start to decorate my slip cover. Determine which piece will be your “front” and position it so that the folded edges face AWAY from you. (I had to cut a new piece for this shot because I dropped my stamp on my paper… keepin’ it real here, keepin’ it real!) Decorate your front how you’d like. Here I have stamped a Christmas sentiment from the CTMH stamp set, D1440 “Everlasting Life” in CTMH Cranberry Ink. And then I decided it needed a little bling so I pulled out my Sakura Star Dust glitter pen and highlighted the flourished words with it. Step 4 Lay out your cover pieces like this.. Apply adhesive to the FRONT side of the 3/4” side of the front piece. (clear as mud?) Steps 5 & 6 Step 5 -Join your pieces like this by laying the wide piece of the back cover over the 3/4” piece of the front cover. I forgot to take a pic of it so you’re seeing the next “step”. Step 6 – Apply adhesive to the FRONT of the 3/4” piece of the BACK cover. (clear as mud again? LOL!) Dang, those brownies are making me hungry…. Realize you’ve run out of adhesive when your tape snaps off 1’” from the top of the cardstock… pull out your super sticky red tape cuz you’re too lazy to change the ATG tape and finish applying adhesive. {Told you, keepin’ it real here!} Step 7 Fold the box so that the wide piece of the FRONT attaches to the 3/4” piece of the BACK. Press to adhere. Step 8 With both hands, begin sliding the slipcover over the box. My slipcover fit very snugly on the box and took both hands to gently work the cover down the box. I might increase the score lines by about 1/16” inch next time. Step 9 Now it’s time to embellish a little. Look to your left at your mess of ribbons {which you took out of your RibbonStack and put in a giant basket to tote with you somewhere and never made it back in your RibbonStack} and pull out something festive. I decided to go simple and just tie a ribbon around the box. Not bad, but it could use a little more bling… Let’s try adding a fabric strip and some fru fru glitter foliage. MUCH BETTER! Or print a cute little tag like this on some cardstock and layer it up on the front of the box. You can download a full sheet of labels HERE. Please note these are for PERSONAL use only. Do not redistribute. There’s all kinds of ways you could dress up your slipcover! Tie a spoon or whisk to the ribbon and put it all in a bowl, tie on some berries or twigs for an earthy look, or attach a handmade ornament. The possibilities are endless! Let me know if you create a slipcover box! I would love to see what you come up with! Inky Smiles!
Birds of a Feather: A Tutorial
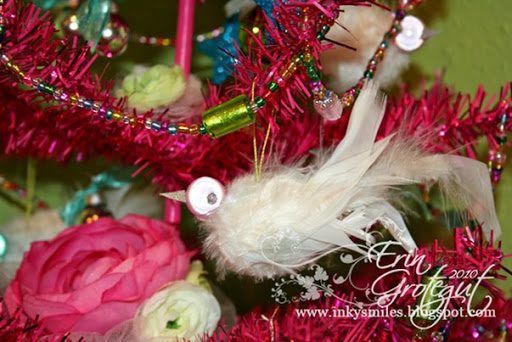
Hey friends! Back with the promised shabby chic feather birdie tutorial just for you! I hope you all had a marvelous Thanksgiving and are recovering from the crazy Black Friday sales! Brent and I skipped them this year and slept in in our nice cozy bed. 🙂 When I made the Christmas tree for my studio I wanted something fluffy and white for it to fill in some gaps and thought feather birdies would be perfect but I wasn’t able to find any in the stores so I figured I could make some. These feather birdies are SO EASY and fun to make. Here’s your supply list: Glue Gun & Glue Sticks String (I used beading string) Pearlescent beads (10 mm and 2 mm) A Feather Boa (you know you have one in your closet) Scissors, Piercing tool or other pokey thingy Styrofoam balls (about 2.5” diameter) Something to press feathers down so you don’t burn your fingers (I used a bone folder) Craft Mat to protect your work surface Sparkly paper {Yes, I forgot to include the sparkly paper for the beaks so it’s photoshopped in. :P} Step One: Strip off a whole bunch of feathers from the feather boa and make a pile to the side of you. Step Two: Spread hot glue in sections on the styrofoam ball, careful not to burn your fingers in the process. Then carefully add feathers so that the styrofoam is completely covered. Keep covering it until you have a big fuzzy ball of loooove like this: Step Three: Using very sharp scissors, begin trimming down the feather fluff… kind of like giving a fuzzy pet a haircut. Don’t cut too much off, just enough to “smooth” and tame the frizz. Step Four: Time to build a tail for your birdie…. Snip off some nice “full” feathers from your feather boa and set them aside. Begin gluing the feathers on one “end” to form a tail. You might need to work in some extra fluff feathers to give it some body and trim up as needed. Step Five: Glue on one of your 10 mm beads to make a head. Step Six: Snip off some beads from the garland that was too wimpy for your tree and dip in some hot glue using a tweezer or your fingers if you’re not a klutz like me and then adhere to either side of your head to create eyes. tep Seven: Cut a small triangle from your sparkly paper, score from one point to the longest side with a paper piercer or other tool, fold in half (trim if necessary) and dip in hot glue. Adhere to front of bird head to create a beak. Voila! Your ball o’ feathers is starting to look like a birdie! How TWEET! Step Eight: Cut a small piece of string to desired hanging length and tie the ends in a knot like this Step Nine: Using your paper piercer or other pokey tool, poke the knot down through the feathers and into the styrofoam on the top of the bird. Be careful not to put it too close to the tail or your birdies will be nose diving from your tree. And there you have it! A loverly shabby chic feather birdie for your tree, wreath, or other happy place in your home! Now realize you and everything around you is covered in feathers, which, according to your husband ranks right up there with you and everything around you being covered in glitter…. I nky Smiles & Happy Birdie Making! PS.. If you make some birdies please link up and share what you’ve created! (I m trying to figure out the Mr Linky thing and add it to the blog posts… )
The Urn Vase Thingy Gets a Makeover
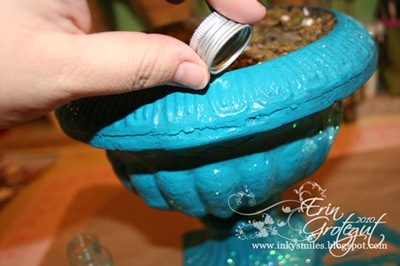
So I have been working on a little project and needed a base for it. When Stacey was here we wandered the aisles of WalMart one afternoon and found some fabulous deals on fall clearance items. In fact, the store workers were marking them down as we were approaching the aisles. AWESOME! I found a couple of these fabulous (yet ugly in their current state) urn/vases filled with scraggly sad looking fall foliage. I picked this one up for $5.00. I will figure out something to do with the fall foliage next year. 🙂 And while Stacey was working on her gatrillion owl bodies I gave this little guy a makeover. It’s a cheapish, plastic, should have been resin thingy… Not too ugly but sorta ugly.. but ok, the foliage is really ugly arranged like that. But look past the foliage… as Rafiki says, “Look beyond what you see….” It’s got good “bones”… I bet it would look really pretty painted a cool shade of turquoisey blue… Hrmmm… So of course I had to rip out all that badly arranged foliage… and the nasty Spanish moss stuff that was glued in there with some sort of nuclear war resistant glue… I got most of it…really… and some of the styrofoam, too. It’s all good. It will get covered up. 🙂 So I pulled out the paint and went to town… I did not take photos cuz I did not want my camera anywhere near that much wet paint. (I’m a messy painter.) I painted it with a flat paint by Behr and let it partially dry. Once it was mostly dry, but still wet and gloopy in places I started to randomly dump some Doodlebug fine glitter on it. Don’t be shy.. it LIKES glitter, unlike my sweet husband… blue glitter everywhere! Delightful! Once you’ve gotten your urn vase thingy covered in glitter just how you’d like it, step back and brush the glitter off your face, chest, legs, and out of your hair, and maybe vacuum the dog before the husband catches you glittering again. Then I took it outside in the garage and hit it with some spray laquer… well, I don’t think I thought that out well enough because when it dried it looked like this: Looks like the laquer ate through some of the gaps in pain and changed the color of the plastic underneath the paint. Not exactly how I wanted it to turn out, but I figured it would still work. So I stuck my tongue out at it and wandered upstairs to enjoy dinner and some of these DELICIOUS little treats that Stacey taught me to make. Oh and she made her famous SALSA, too! How lucky were we??? Did I mention we had a blast? Tee hee… Ok, I will be posting the pic of what the Urn Vase Thingy became tomorrow or Wednesday and then a fun little crafty tutorial after Thanksgiving. Inky Smiles!