Tutorial: Popped Metal or Metal Popping
I had so much fun making my last SSD card and figured I should share with you how I did my background for my “masculine” card.
I think I will call this technique “Popped Metal” or “Metal Popping”. I was going to try to use a “Chalk Popping” technique on the card but realized I needed to think up something else when I peeked at my chalks and saw that I only had pastel colors… so I pulled open my “messy embellishments” drawer and my eyes were immediately drawn to my metallic pastes. VOILA! IDEA!!! BLING BLING!
This is amazingly easy (basically TWO steps) but gives a really cool result… so here we go…
You will need:
* Versamark Ink Pad
* Metallic Rub On Paste (mine came from Gina K Designs)
* Detailed stamp ( I’m using Rustic Tiles from Skipping Stones Design)
* Sponge
* Colored Cardstock & Scrap paper (to protect workspace)

Step One:
Ink up your image with a clean Versamark pad (you don’t want to use one that is stained with colored ink because it may transfer to your artwork – ick!)
Begin stamping your image. I like to start off the page so the design runs off the page. Stagger the images on each row so you don’t have “running seams”.

Cover the entire piece of cardstock with the Versamark stamped image. Be careful not to “smudge” the images with your fingers while stamping… what you smudge will show up in Step 2.
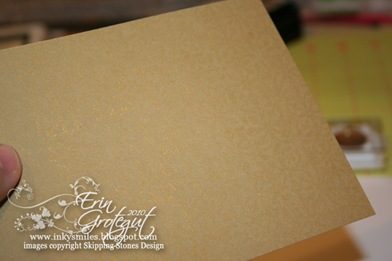
Here you can see the CS covered in Versamark images:

Step 2:
Gently rub your sponge in the Metallic Rub On Paste. Don’t glop it on because it will come off too thick on your artwork and make a royal metallic mess.
This requires a LIGHT touch, so if you have lead foot fingers like me and just want to SMOOSH that ink in stop now and take a breath. LOL!
Start at one corner or end. Using just a teeeeny weeeeeny bit of pressure… just enough to transfer the Metallic Rub On Paste to the paper…. rub the sponge over the Versamarked images in a circular motion. You will start to see the images POP out in metallic splendor.

If you have gaps between your images be careful not to rub the paste down in the gaps or you will get a “grid” look. But if that’s the look you’re going for, then hey, go for it 🙂
Continue rubbing the Metallic Rub On Paste on the Versmarked images, “reinking” the sponge as needed, until all the Versamark has been popped out.

Finish at opposite end/side of where you started.

I love how this looks… you can go back and darken areas for a more distressed look or for shadowing for the images you might be layering up for the final product and ink the edges darker with the Metallic Rub On Paste.
Here’s how I used this background piece:


Thanks for playing today! Inky Smiles!
3 thoughts on “Tutorial: Popped Metal or Metal Popping”
Great tutorial, Erin! Thanks! It looks like fun, and the results are stunning. I wonder if the metallic rub-on paste-like stuff that comes in a tube would work. I “think” I might have some of those. Wouldn't hurt to check it out and give it a whirl.
WOO HOO Great Tutorial. I'm gonna have to give it a whirl.
Wow, Erin! Thanks for sharing this! What an easy-ish way to add a lot of oomph to a card! Loved your tutorial!