Tutorial: Toilet Paper Molding Technique
Toilet paper is always fun to talk about on a blog. Some of you may remember blending paper towels and sheets of paper in a blender with some water to make “homemade paper” art projects in the 3rd grade. I remember doing that and having so much fun creating molds and shapes with my paper pulp… but man, it sure was messy!
Today I want to share with you a technique that can accomplish the same end result with a lot less pulpy mess. Toilet paper molding or casting is a fun technique that you can use to create interesting textures and designs for your art projects. This technique has been around for a while, but I thought I’d show you in my own words and pictures.
Here is a card I created a while back (but have not shared yet) using this technique.

Here are the supplies you will need:

The scissors are if you need to cut the toilet paper and the tweezers are for those who may have a hard time gripping the paper or for holding it when you use the heat tool.
Basic Tools:
Toilet paper (quilted is fine.. it will “un”quilt when it is wet)
Water
Glimmer Mist (Optional for added shimmery-ness, mine is homemade)
Deeply etched pattern stamp on a block
Heat tool
Ok let’s get started!

I’m using a square stamp from Skipping Stones Design’s Rustic Tiles stamp set. This stamp is stained with white StazOn ink.
Step 1:
Tear or cut off 5-8 sheets/squares of toilet paper (TP). I am using 5 because this TP is on the thicker side. If I was using the super thin Scottissue that is only 1 ply, I’d use probably 8+ squares. It really varies on the stamp you’re using. Don’t worry if it’s quilted TP, the quilts will go away when you wet it.
Lay the stamp face up on your work surface and cover with the TP.


Step 2
Spritz generously with water until the TP is thoroughly soaked. Some people run their TP under a faucet and wet it, but I’m too lazy to go wandering so the water spritzer works… and I don’t have to worry about my TP getting too soaked and tearing, and then dripping as I walk over wood floors back to my desk.
(Bling Tip: Depending on which side will be your “up side or visible side” you may wish to spritz with the Glimmer mist first.)
Spritz and make an initial “SMOOSH” with your flat hand on the wet TP to start the process of forming the shaped image. You may need to spritz more to get the TP to smooosh down into the design of the stamp.


Continue pressing the TP into the stamp image with your fingers.


Step 3
Place your flat hand on top of the TP and stamp, then carefully tug and pull to tear away excess TP from the edges. Be very careful because the TP is still very wet and you can stretch out your TP mold still at this point.


Step 4
Pull some more TP off the roll and bunch up into a “wad”. Don’t make it a flat ball, you want it all lumpy bumpy… lumpy bumpy is good…it helps press the wet TP down into the grooves of the image.
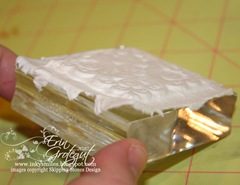
Start at one corner of your stamp and smooosh that wad of TP down into the wet TP on the stamp. Work your way around the stamp removing water from the TP. You may need to adjust your crumpled wad in your hand if it gets too wet.


Repeat this step until you get most of the water out of the TP on the stamp. Your TP should look almost dry like this:


Here’s what it looks like after I spritzed some homemade glimmer mist on the top of this image. My glimmer mist has alcohol in it so it dries rather quickly.
Step 5
Heat up your heat gun. I always like to heat mine up for about 20 –30 seconds before applying the hot air to a project. This way I get hot, hot air. Hold your heat gun about 8 or more inches from your TP covered stamp and heat until dry. I rotate it around and dry all the edges.


You will be able to tell if it’s really dry or not just by watching the white get brighter and more solid looking. Carefully flick up a corner of your molded TP piece and carefully peel UP and away from the stamp. If the center “sags” and does not pop up right away, it’s not dry enough. Keep blasting it with the heat gun.
Below is an image of the dry sparkly side of this finished piece

Here are the images of the reverse side of this TP art. I’ve adjusted the shadowing in the pics so that you can see the details in the TP molds.


For the card in this example I used two stamps placed side by side on a larger acrylic block to create a rectangle focal point and backdrop for the silk flower buds on the card.

Voila! There you have it, friends… Toilet Paper art for grown ups. 🙂
Inky Smiles & Happy TP’ing!
10 thoughts on “Tutorial: Toilet Paper Molding Technique”
WOW…great tutorial. I've used this technique before but never though of using it like this or with the glimmer mist. Bravo!
Way cool and looks like a lot of fun! thanks!
Your tutorial is first class! You did a great job. I used this technique to make snowflakes for Christmas cards one year. No one would believe they were made from Charmin.
Your card is gorgeous. TFS.
Hey, that's a cool one! Haven't seen a tute like that before. I'll have to keep that one in mind. Awesome & TFS.
LOVE LOVE LOVE your tutorial. This TP project idea is top notch. Erin your the best. Thanks
LOVE LOVE LOVE your tutorial. This TP project idea is top notch. Erin your the best. Thanks
Excellent tutorial, Erin! I really like the idea of using glimmer mist, too.
Your card is gorgeous!
Extremely well done! Thanks for sharing!
That is a great idea and so cool looking! Thanks for sharing.. Might have to try this before the kids get up this morning! Have a great day!
Great tutorial. It's been awhile since I've done this. I used to have the whole paper making kit with the screen etc…. it sat on the shelf in my garage for 5 + years and I finally sold it last year in a garage sale. The TP technique is way easier.
Great post! I'd forgotten all about this technique… Your pics and explanations are very clear – thanks! Oh – and your card is very pretty, too!