I’m Now a “Stamp Tramp”!
A while back I mentioned that Heather Timmins from Skipping Stones Design asked me to be on her Design Team. Well, now it’s official. I am a “Stamp Tramp” (that’s what Heather is calling her DT members.) for Skipping Stones Design! My fellow Stamp Tramps are: Amanda Gauer-SewellAngela Thomas So what exactly is a Stamp Tramp? Glad you asked… here’s the information from the SSD website. Don’t worry, it’s nothing naughty. Remember, while I am a little spunky and crazy at times, this is a G rated blog I run here.. 🙂 *Stamp Tramp: N :1a: a saucy girl who will do just about anything for stamps. 1b: one, who was born to stamp, but forced to work. *Top Ten Signs You Might be a Stamp Tramp: 1. You are actually reading this top ten list. 2. Your husband lets you have all the stamps you can hide. 3. When people talk stamps, you don’t think postage. 4. Your fingers have ink on them right now. 5. You consider stamplifting “a crime of passion”. 6. You spill a little wine* on your cardstock and call it an “OFE” (Opportunity For Embellishment).7. You leave your MIB (Man In Brown) little sticky notes like “Please hide the box under the bushes.” 8. You like getting dirty. (Think Ink) 9. You’ve mastered your stamp kissing technique. 10. You wash your hands “before” going to the bathroom ‘cause there are some places even Stamp Tramps don’t want glitter.(* or Crystal Light since I don’t drink or whatever your preferred beverage is.) Do you have what it takes to be a Stamp Tramp? Heather is looking for more fun and spunky stampers to join her teamand a DT call will be going out soon on Splitcoast Stampers. She is also looking for a couple of sketch guest designers. SOOOOOOOOO, if you’re interested and have some Stamp Tramp spunk simply visit the Stamp Tramp page and shoot her an email. Come join us on this adventure and let’s STAMP! Inky Smiles!
A Little More Jewelry
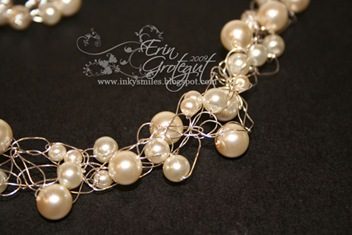
It seems that I’ve got the jewelry bug. I’m smitten with making handmade jewelry and trinkets. Over the past week or so I have whipped up a few more necklaces and a bracelet and some charms (which I’m still working on tweaking a little). Here are some photos of what I’ve been making. Red & Gold – a gift for my grandmother (who doesn’t have a computer, so it’s safe to post) for Christmas. I used FOUR strands of beads to braid together for this set. Grandma likes chunkier necklaces and the four strands really made a huge difference. I also wrapped the ends a little differently, using crimp beads to finish the ends off. I think it looks more professional. Smokey – for my mom (who doesn’t ever read my blog cuz she’s too lazy and I email her things anyway… <— her words) for Christmas. I also need to make a matching bracelet and some earrings but I ran out of silver wire. Pearly Pearls on Silver: For yours truly because I looooove the pearls and silver wire. I love how the silver wire has a brassy hue to it and coordinates nicely with the pearls. I wore this to the symphony last Saturday night (Bravo Broadway) and to the Charity Ball we attended on Friday night. The pearls are my favorite of the bunch, but I also think I might make a red set for me. I have a TON of red beads left. I purchased all of the supplies for these projects at various stores, Michaels, Roberts, and WalMart (red beads). Handmade jewelry can be super cheap to make when you use coupons from each store. I love it! Well, I’m off to pack. We’re headed to see my parents for Thanksgiving. I hope to have some fun photos to blog when I get back. ~ Inky Smiles! PS… don’t forget to link back on the Leftovers post for your chance to win something fun!
Leftovers
We’re coming up on one of the holidays that seems to have the BEST leftovers… stuffing, turkey (or HAM in my case), mashed potatoes, rolls, and PIE… Often in papercrafting and scrapbooking we have TONS of leftovers. Remember that Christmas album that you only used 75% of the entire kit to make? Or that super cool Basic Grey pad that you used most of and have bits and pieces left, but the paper is so darn cute and you just love it and can’t throw it away… and Erin doesn’t currently have a Scrap My Scraps project going on…. Welll, my dear blog reading friends…. you must see this clip from Studio 5 (Salt Lake City)… http://pandora.bonnint.net/video/embed-1.php?id=8705209 I am SOOOOO making some of those flowers!!!! Fa-byoooooo-lush, dahling! Thank you Sue Neal for inspiring me and helping refuel my mojo! So here’s a challenge: Pull out your scraps and make a project!! It can be a card/set of cards/scrapbook page/altered object/ And since it’s really starting to feel like Christmas….. Reward: Post it on your blog and then LINK BACK HERE in the comments section. I will put all of the names in a hat and randomly draw a name on MONDAY, NOVEMBER 30th. You have just under two weeks to come up with something fun! I have some fun ideas for a prize… and Maya Road is coming to mind….Hrmmmm…..whatever could it be? ~ Inky Smiles!
It’s Beginning to Feel A Lot Like Christmas
This year the “holiday” season has really snuck up on me and caught me off guard. I am soo not ready! Last night Brent and I went to the Payson Charity Ball/Holiday Ball – it’s a ball that gives Christmas to families in our area who would normally not have a Christmas. The decorations were absolutely fabulous and festive and really got the wheels turning in my mind to get ready for Christmas! Brent and I danced our feet off and had a blast! This morning I woke up to a light blanket of snow on the ground at our house… It was only about a half inch or so, but still.. it was white and covered everything. We were supposed to put Christmas lights up on the house, but that didn’t happen because of the snow and the looming black clouds… Brent and I ran some errands and did some grocery shopping up north of our town today. I checked out some cool Christmas decorations at Rod Works and some fun Christmas schtuff at WalMart and was really starting to get ready to want to have Christmas up and going at our house. When we got home this afternoon we had about 2 – 2.5 inches on the driveway and lawn. Ay yi yi! Anyway… remember I said in my last post that I met someone cool at the necklace class? Well…. I was sitting there crocheting my never ending string of wire and picking up beads in the stitches and I told Brent’s aunt that I was totally bummed that I had missed Sue Neal’s (if you’re a Papercrafts reader you will recognize her name and fabulous artwork ‘cuz she’s all over the place in there) card class the month before. WELL…. Tammy informed me that Sue is a REGULAR teacher for the Roberts stores and that she had another class coming up. Made a mental note to check out the class bulletin boards and continued crocheting. About ten minutes later guess who walked into the classroom? Yup, you guessed it, Sue Neal. HOW COOL IS THAT? So we got to chatting and she showed us the poster for her next papercrafting class: Guess where I will be on December 1st from 6-8 pm? LOL! I am soooo super excited! If any of you in the area want to go, shoot me an email and let me know and we can make it a girls night out! 🙂 ~Inky Smiles!
Crocheted Jewelry

In my efforts to get back into crafting again (now that I am feeling better and HUMAN) I have decided to take a few classes here and there as I find interesting ones at the local craft stores. Last night I went to Roberts craft for a fun jewelry class. We learned to make necklaces by crocheting wire and interweaving beads. It was so much fun! And… it was relatively easy. If you can crochet a single stitch chain from here to eternity you can crochet a necklace. 🙂 My husband’s aunt and cousin were there with me and it was loads of fun seeing how different everyone’s necklaces turned out. Tammy (aunt) did a necklace for one of her coworkers using a mix of smokey beads. It turned out gorgeous and I picked up the bead collection this evening to make one for someone for Christmas. Raette used a variety of “sea themed” beads and made a really fun big and chunky necklace. She works at a place called “Pirate Island” so it is perfect for her! I chose a variety of shades and shapes of blue beads, silver findings, Swarovski crystals and silver 26 gauge wire. I don’t like how the 26 guage wire was a little difficult to work with, but loved the 26 gauge sterling silver wire that Tammy used, so I picked some of that up tonight, too. Here’s my necklace: I am down in my guest bathroom trying to snap a photo of the necklace while it’s on my neck. Not an easy task. Brent is still at work (it’s 7:30pm) and not around to help… and I’m too lazy to find my tripod. (Please ignore the fact that I have no eyes on… I think I rubbed them off during my INSANE day today at work. LOL!) Zoomed in on a better mirror picture. That one bead on the right is a pain in the bootay. I had to twist the wire to get it to lay back properly after this photo. The full necklace. I extended the chain so that it would fit better on my and lay where I wanted it to lay on my neck. A close up of the bead and wire work. This morning before I went to work I made a quick little ring to go with the necklace. I need to redo it because I twisted a couple of the end wires too much and they snapped at work and kept stabbing me in the finger while I typed. OUCH! The basic idea of the necklace is making 3 strands of beaded, crocheted wire and then braiding them together. If you can * braid hair * crochet a single chain from here to eternity * choose 45-50 misc beads (I worked in extra beads) You can create one of these! SO get to it! Last night I Googled “crocheted necklaces” and found a GREAT video showing exactly how to make these. So, rather than re-do a whole tutorial, here’s a video courtesy of Auntie’s Beads for you: <img src="https://www.mycreativeescape.com/wp-content/uploads/video69906493e0cb5B35D.jpg?imgmax=800" style="border-style: none;" galleryimg="no" onload="var downlevelDiv = document.getElementById('d867f509-7445-4de7-a9c1-dd985b797522'); downlevelDiv.innerHTML = " http://www.youtube.com/v/QZMh1YqX8GE&hl=en_US&fs=1&&hl=en“;” alt=”” /> Inky Smiles! PS… and I met someone SUPER COOL at the Robert’s store during my class…
Happy Veteran’s Day!
(My dad, Daniel Stieler, Army, Vietnam, living) Today I am grateful for ALL those who have served and still serve in the various military branches of our GREAT country, especially my grandfather (Marines) and my father (Army). Without the service of these amazing veterans we would not have the wonderful freedoms that we have today. God bless America & Happy Veteran’s Day!
Never Leave You Hanging…
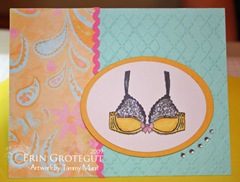
Today I have spent hours sorting out photos on my computer so that I can get ready to back up my entire computer to my EHD and then do some serious digital scrapbooking. As I was sorting out photos I realized that I posted this sneak peak ages ago: But I never got around to sharing the full card. Well, the full card went to my girlfriend, Judy, for her birthday a week or so ago. Here’s the full card: The inside reads: “Bras are like friends, the good ones never leave you hanging.” (Supplies used on my card are from various manufacturers: Rhinestones from Kaisercraft, CTMH Inks & paper, Archivers Paper, misc ribbon, MS Border Punch, Cuttlebug Swiss Dots Embossing Folder, Quickutz Labels 1 die, Stampin’ Up colored pencils & OMS, and stamps from Skipping Stones Design.) I love this Funny Bras Volume 1 set from Skipping Stones Design. It’s absolutely cheeky and fabulous! AND… she has a second bra set available for purchase, too! Here’s another fun card that my friend, Tammy, made one night while we were making cards at my place. (Supplies are all CTMH from my CTMH days, except for the Bazzill pink ric rack.) So hurry over and pick up your bra set from Skipping Stones Design! You know you’re going to love it! Inky Smiles! BONUS since you kept reading this far: SALE Now through Sat Night Nov.14th Only: Buy 3 Pick One FREE Here’s how it works… Buy any three stamp sets and pay for them. When you pay there will be an option to leave a note… In that section name the 4th stamp set that you would like for free, and it will be included in your order! Go to www.skippingstonesdesign.com to place your order!
Happy Halloween
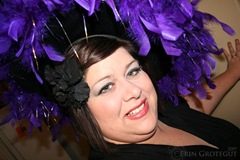
Happy Halloween, friends! It’s been a looong day, today we were up bright and early to do a final blitz of fliers/flyers (can’t decide on the spelling, but I really ought to look it up, lol) on our good city. Several friends met us here at the house for hot chocolate/wassail/oj/milk at the house early this am and then we all set out to hang the last of the fliers/flyers. I had a carful of young ones and we hit about 500 houses. I think we finished around 2:30 pm, just in time for me to drop kids off at home to get ready for Halloween festivities and to run some errands for our evening festivities. I’m not usually a big Halloween person, but this year I wanted to at least dress up a little… so while I was running errands at the great W I found some fabulous falsies (eyelashes) and since I have always been a little fascinated by fabulous eyelashes I thought I’d try them out. The costume started out as me being the chunky version of Elizabeth Taylor, but then I remembered I had a great witches hat in one of our Halloween/Fall decor Rubbermaid bins and sent B off to fetch it for me. WOOT! And then I remembered I had this awesome new black frilly skirt that would be cool and I had some fun patterned nylons in the back of the sock drawer… so a “wicked” witch I became. Brent, of course, was a politician tonight. A few days ago I picked up some 99c eye shadows over at Sally Beauty Supply and wanted to play around with them. (I’ve never really worn “smokey/sultry” eye shadow before and this was loads of fun. The hair flower is courtesy of Icing. I am looooooving hair bling lately! Here are a few snap shots: We had loads of kids come by this year and ran out of candy right before this photo was taken. I headed over to a girlfriend’s house to drop off a birthday treat and then we headed out to another friend’s for a really late dinner. Hope you all had a fabulous Halloween! Inky Smiles! Erin PS.. please ignore the unpainted trim on the pantry door… we hung it up and I started to paint it when we realized that the profile was not an exact match.. it was just enough “off” that it looked strange. Gonna pry it off and cut a new piece to match this month. 🙂
Up To No Good… Or something
Ok so I thought I would share a little bit of what I have been up to the last several weeks, besides working and not crafting. I do have to admit that I did TRY to craft earlier this week but failed at miserably at what I was trying to do (making faux stained glass) so I piled up the pieces on my desk and then tossed them and went back to Facebooking and helping out Brent. Many of you know that Brent has been on the city council for our town for the last 4 years. Well, this year he decided to run again for re-election. For the past several weeks he has been going out door to door campaigning and meeting people of the town again. He has taken off every Friday from work and is gone most evenings until after dark. I’ve been helping where I can. I have helped make fliers, posters, logos for bags of candy, lots of phone calls, etc. It’s crazy. On Labor Day we had a parade in our town and Brent and I and several supporters walked (I drove the jeep) in the parade. We had kids and adults that threw candy and waved and passed out flyers and Brent walked the parade route and handed out flyers and talked to folks along the way. The parade was loads of fun and we had a big bbq afterwards for all those who helped out. There were so many helpers, it was amazing! Our good friend, Tom, rode at the back of our parade entry on his shiny new motorcycle with the flag flying off the back. It was super cool! During the parade the girls/kids in the jeep with me would yell out “I scream, you scream, we all scream for BRENT!” and “Make noise for BRENT!” and “WE LOVE BRENT”. It was quite hilarious and cute. We tossed thousands (120 lbs = 18,720 candies) of Tootsie Rolls to the crowds and the kids would yell, “Make noise for Tootsie Rolls, make noise for BRENT!” (Below photo taken after the parade on the way home.) My sweetheart… ready to walk the parade route. Isn’t he cute? I sure think so 🙂 A few nights ago we had some friends over to staple and rubber band the last 1800 flyers to be passed out this last week of campaigning. Take this plus this and you get this even little Josie had to get in on the action… (Sadie hid out under the table for the most part.) There’s nothing like friends with a built in sweatshop teenagers who have nothing better to do on a Monday night while mom studies for her Pharmacy Tech exam…. Seriously, we appreciate the help! Rubberbanding 1800 fliers flew by very quickly with so many hands helping out! We’re in the home stretch… it’s all over on Tuesday, win or lose, hopefully win. Brent loves working for the people of Payson and doing something good. I hope he can continue doing so. And if I never see another rubber band again I will die a happy camper… Inky Smiles!Erin
A New To Me Craft… Stained Glass
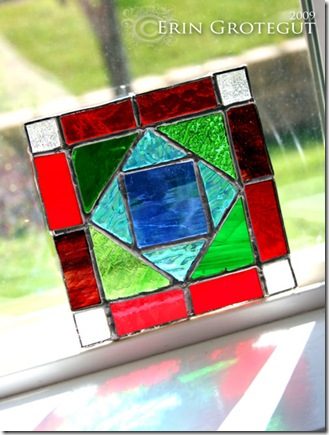
Before Brent left to go out campaigning (door to door visiting) this morning he told me “You HAVE to put some crafty stuff back up on your blog again. People don’t want to read about how busy you are again.” LOL! Ok, darling, dear…. While we were in Massachusetts we bounced around from house to house (on the 2nd part of our trip) so we’d be able to see and visit with more family members. One of our nights (the last night) was spent at my cousin Nichole’s house. I never knew Nichole was so crafty and artistic until last year when we received a wedding invitation from her for her wedding in beautiful Jamaica. This is the box that showed up in my mailbox… intriguing!!!! And then I opened it up! Wowza! What a FABULOUS way to invite people to your wedding! There is even REAL sand and little tiny shells inside the bottle. (I have it here in my studio because it’s a cool little gem to look at.) I wish we would have been able to go to the wedding! So anyway, back to the new to me crafting.… on our last night there we (we being my youngest brother, Jake, his wife Jacoby, and myself) got a wild hair and decided that we wanted to try our hands at Stained Glass making. Now, Niki and her mom both do stained glass as a hobby. My aunt Sue should probably do it to sell because she does a FANTASTIC job. Her artwork is simply GORGEOUS. (She gave me a fabulous piece that she made of a crane in a marsh, but my mom had to take it home in their truck because it was too big to haul home safely on an airplane. I can’t wait to go home in Nov and pick it up. I will share pics then!) I have been fascinated with stained glass for as long as I can remember. I can remember standing in churches and museums and castles in Europe (I lived in Germany from ‘86-‘94) and staring in awe and amazement at the phenomenal stained glass windows and artwork. It was about 10 pm when we all decided to try our hand at stained glass, and it took a while to pick out suitable patterns to create as beginners. Jacoby made the cutest little frog family that she free hand drew and created her own pattern for and Jake made an Iowa State emblem. Making stained glass is a lot easier than I thought it would be but on the other hand it is a lot more time consuming and than I thought it would be, too. Here are the basic steps: 1) Choose a pattern. The more small pieces it has, the bigger pain in the butt it is and the longer it takes. We altered my pattern and combined smaller pieces into larger pieces. (Thank you Nichole for steering me clear of the intricate details that I love. LOL!) 2) Enlarge your pattern, number your pieces, and cut out with special stained glass scissors that have a little channel to allow space in the pattern for the soldering stuff. 3) Choose you glass colors and textures. Holy moly! She had TONS to choose from… so many choices. Worse than making cards and choosing the color scheme because not only were there varieties of color, there were varieties of textures, too! Ay yi yi! 4) Trace your pattern pieces onto the glass with a sharpie marker and number. 5) Cut out your glass pieces with a special glass cutting tool, then use another special tool to snap the score line in the glass. (This part kept freaking me out because I was afraid I’d break the glass wrong.) 6) Lay out your pieces and double check and see how you like your colors/textures, etc. Re cut anything you don’t like. 7) Grind your pieces down to the traced line on a grinding machine. Make sure you take the “smooth glossy edge” off the edges of the glass. This was the most tedious part of the whole night. This is where you realize that you only want a few pieces of glass instead of a crazy intricate design…. 8) Wash each piece with hot soapy water and check the edges to make sure there are no smooth surfaces. Make sure to rinse off all the soap residue. 9) Wrap each edge with a special copper tape. This gives the flux and the solder something to stick to. 10) Paint each edge with liquid flux and then use a solder in iron to go around each edge and heat up the flux and put a bit of solder on the edges. This is the step where Erin burns her fat little fingers. OUCH! 11) Lay out your pieces on a clean, cork board thingy covered table and line up for fit using a square (if you need to make your art square). 12) Using your soldering iron and a roll of solder, create your “lead” lines and sauder the whole darn thing together. This part is fun, but it was near midnight when mine was getting finished up so we sorta rushed a little and the lines aren’t as pretty as I would like… I think I can clean them up a bit with a soldering iron here at home 🙂 When you’re happy with your lines and are finished, wash up your stained glass artwork with soap and water, then polish with regular car wax and use a very fine steel wool to polish up the solder lines and VOILA! You have made your first stained glass! Mine has a lot of imperfections and some pieces got cut funny, but for Stained Glass at Midnight for my first time I think it turned out kind of neat. All that is left to do is for me to sauder two little hangers on it and then hang it in my