Bling, Jiggle, Bling, Bling
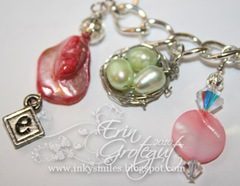
I have been buried under piles of beads and jump rings for the last couple of days. I have found a new PASSION! Jewelry making has always intrigued me and I have dabbled in it here and there… Back in November I took a class on crocheted necklaces…made a zillion of those and then signed up for Tresa Black’s Creative University next month… and guess what? They do a CHARM SWAP… and guess what else? Silly me signed up for it, buwahahaha! I have been having so much fun making charms and baubles and bling, jiggle, bling, blings…. Wanna see? For the charm swap we were instructed to make two types of charms, one creative (using papercrafting schtuff and ideas) and one filler type charm (using bling and jewels and other fun goodies), 15 of each for a total of 30. Here’s my filler charm: The filler charm was made with a variety of beads and a Swarovski crystal. And here is my creative charm: I created the creative charm by designing a birdie in Photoshop Elements. I used a basic bird body template for the outside shape and then went to town creating my clipping masks and adding in textured and patterned papers and embellishments. I printed the birdie onto white “Shrinky Dink” paper and then cut out all the bodies and front side wings, threw in the oven and let them melt! {The original birdie art had legs, but I lopped them off because they added unnecessary bulk and distracted from the bird.} I glued the wings and a rhinestone on and laquered these babies up with some Sally Hansen “Hard as Nails” nail polish. The Crystal Effects and Liquid Nails altered the color of the printer ink too much. Other than the “high” from the nail polish it wasn’t so bad. 🙂 Click on the birdie for a view of the details. Lopping off some birdie legs and trimming out the birdies. Shrinky Dink paper is a pain to cut out, basically it’s plastic and if you snip too hard you snap the plastic… lost a few beaks and back wings that way. *sniff* Here are some other charms I was working on including a pair that turned into earrings. And then I needed a bracelet because the plain old chain I was trying to make into a bracelet just didn’t do what I wanted it to do…. but that’s a post for tomorrow because I have to go work on laundry (dang real world interrupting my crafting time) and think about dinner… 🙂 ~Inky Smiles
Stained Glass Butterfly on the Finished Project
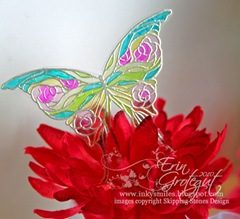
Ahhhh I totally got buried in projects (not all crafty) last week and forgot to post this. I was cleaning up my camera card this morning and found these photos. Oooops! Please forgive me! As promised in this post, I am posting what I did with my stained glass butterfly. I love making cute, altered goodies for my studio and for other people. When I was sitting at my desk creating this little guy, there was a plain and boring jar of tiny glass beads staring at me from the back of my desk…. which gave me an idea. So I pulled out some American Crafts foam tabs and a couple of flowers from my little flower tin and started messin’ around. I used a couple of drops of Liquid Glass (aka Diamond Glaze, Crystal Laquer, etc) to adhere the butterfly to the petals of the flower. Here’s what I came up with. I think it jazzes up the jar, don’t you? I just put it on the top of my InkStak and it looks lovely up there all sparkly and colorful! Oooh la la! ~Inky Smiles!
Tutorial – Faux Stained Glass & A Bonus

Are you recovered from the Blog Hop yet? I’m not quite sure I am! LOL! I keep going back to various blogs and enjoying the art. I’ve got to work up something for the Sketch coming up on Tuesday still today but in the meantime I have been dying to share this with you…. A lot of people commented on how the butterfly on my card looked like stained glass. Thank you! That’s exactly what I wanted it to look like and so I am glad that it actually came across as I intended. The butterfly on that card was just stamped with StazOn Jet Black ink and then colored in. But, you know how sometimes you get this whizbangger of an idea in your head but can’t always get it out how you’re imagining it? Well, my first several attempts at doing “Faux Stained Glass” did not do my imagination any justice…. {I tried using Liquid Glass and pouring it out over a handn sketched design, then I tried embossing powder on my Silpat mat and nearly melted the mat……} and then this fabulous butterfly stamp from the Healing Wings Set came into my hands and it actually worked how I wanted it to! Today I’d like to show you some real “Faux Stained Glass”. This project is a little different than the butterfly on my card. I was laying in bed thinking about stained glass (cuz I have this new fascination with actual stained glass now) and this is what I came up with. Ok now, gather up your supplies. You are going to need the following: * A Heat Tool * Transparency Paper * Mirror Platinum Embossing Powder (I used CTMH) * Bic Sharpie Markers * Versamark Stamp Pad * An “outline” style stamp with spaces that resemble * stained glass * Sharp scissors * An “Anti static pad” {not shown} {STEP 1} * Lay your transparency paper down on your work surface. I am using a white sheet of paper under mine for filming purposes. Otherwise you can’t see it all that well. *Rub down the sheet section you will be stamping on. Rub all the way to the edge of the transparency sheet. {STEP 2} * Lay your stamp face up and thoroughly ink with Versamark ink. (I lay mine face up because it helps limit the amount of excess ink that may get on your block. Those Versamark pads are awfully squoooshy. {Step 3} * Carefully stamp your image onto the transparency sheet. Be careful not to wiggle or slide the stamp. The transparency is slick and it’s easy to slide. Press down all parts of the stamp to make sure you get a good amount of ink on the transparency. * The photo on the right shows a nice clean Versamark stamped image. It’s very hard to photograph clear paper. LOL! {Step 4} * Pull out a piece of scrap paper and put it under your image. Pour your embossing powder over the stamped image. You might have to pour it over a couple of times for a good thick layer. If some excess powder sticks where you don’t want it you can take a moment to gently scrape it off or brush it away before heating. * The picture on the right shows a nice thick layer of embossing powder on the Versamark image. Ok… now we’re going to melt this bad babeeeee… well, actually we’re only melting the powder. We really don’t want our transparency paper to melt so let’s take a precaution and HEAT UP that heat gun. {Step 5} * Preheat your heat gun for about 15-20 seconds. You’re going to want that air nice and hot so that you don’t have to have the heat on the transparency sheet for any longer than you need to. {Step 6} * Don’t leave your transparency sitting on your work mat. Hold it up in the air to prevent melting or warping of your cute pink Fiskars work mat. See left photo. Ergh. * Taking care to keep your fingers away from the heat, gently wave the heat gun in front of the stamped image on the transparency. Keep the heat moving so that you don’t overheat one spot and melt a hole through the transparency. You will notice the powder turn shimmery and look like molten metal. Looooooverly schtuff that molten metal is! *It’s hard to photograph with both hands being busy… LOL… sorry for the blurrrrrrr…. {Step 7} * Now you can cut out the section of butterfly. Just roughly cut it out, don’t trim closely just yet. * Here you can see the embosses image of the butterfly. Doesn’t it look splendid? Like pure molten metal or flux and solder like real stained glass. I love that the mirrored platinum gives such a nice patina’d effect. Don’t worry, it’s actually platinum, not so greenish. It’s difficult to photograph this at midnight.. LOL! {Step 8} * Now flip that bad babeee over we’re ready to color. You will want to color on the backside. I am sure you could color on the frontside, but who wants to risk coloring that beautiful embossing with Bic Sharpie marker? Not me. Flip it. Just flip it. {Step 9} * Begin by coloring focal points or areas you want to stand out. Then fill in the areas with contrasting colors. You can also blend for a graduated color merging. * See that stray stringy looking thing on the right side of the image? It’s a bit of embossing powder that got heated. It’s not on the stamp… weird.. Not sure how that got there, but I like it. It looks like cracked stained glass. Even more fun! * Keep on coloring until you get the desired effect. Tip: You can go back over some of the colors with a different color if you don’t like how it turned out… be careful what you mix or it may end up looking muddy. *
ANNOUNCEMENT – Erin’s Sketch Contest Winner

Thank you girls for playing along with us with the sketches on my Cupcake Cutie giveaway! The following girls played along with cards and posted their links in the comments: 1) Amaryllis B (she did a card & a layout) 2) Stacey F. 3) Sammye Jo (twice!!) 4) Jeff*Nichole*Hudson (which is Nichole) 5) Amanda D. I decided the easiest way to choose was to number them and then use the random number generator again. The Prize is And our lovely winner of these delicious goodies is…… #3 – Sammye Jo!!! Congratulations Sammye Jo! Please send me an email by clicking on the word email with your information and I will get these out to you. I’ve left a comment on your blog as well. Please contact me by Jan 23rd or I will pick a new winner. ~Inky Smiles!
ANNOUNCEMENT – Skipping Stones Design Blog Hop Winner
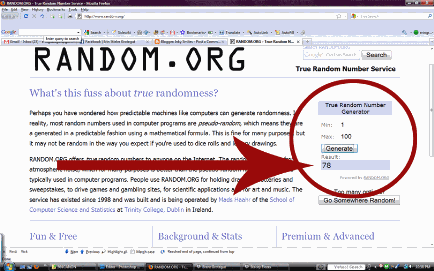
First of all I want give you all a big fat THANK YOU for participating in our blog hop! What an amazing turn out and how fun it was to see all the beautiful art along the way. I had a blast hopping along and finding new blogs to read and follow! I also want to say THANK YOU to Heather of Skipping Stones Design who invited each of us to participate and gave us all these fabulous stamps to give to YOU! We dialed up a random integer generator on Random.org and Brent counted out the names for me. The winner of these fabulous, and likely SOLD OUT again, Bra stamps IS…. drum roll please…… da da da daaaaaaaaaaa…. NUMBER 78 Kay – thank you for playing along! Please email me by clicking the word email and I will get these stamps in the mail to you. I’ve left a comment at your blog as well. If I don’t hear from you by Jan 22 I will draw a new winner 🙂 ~Inky Smiles & Happy Crafting this weekend!
BLOG HOP COMING! Read about it here!
Skipping Stones Design is GEARING UP for their first BLOG HOP and BELIEVE ME you are NOT going to want to miss this! Along the way, the Skipping Stones Design Team (aka the Stamp Tramps) will have blog candy for you to enter. As an added bonus, there will also be 4 stamp sets (new stamp sets not yet released) will be hidden along the hop, but we’re not telling you where so be sure to leave some love as you hop!!! Make sure you leave comments on EVERY post so you have a chance to win!! The winners will be announced on Friday January 8th at Skipping Stones Design. See YOU Tuesday! PS… deadline for entering my Cupcake Cutie stamp giveaway is tomorrow at midnight… which I guess is Tueday @ midnight. LOL!
Best Friends – Digi LO

We are snowed in here in Utah today. I still feel a little under the weather and ooogy, but I am going to try to make it up to work today after the weather stops dumping slippery stuff on the highway. I’ve been listening to the news today and there are literally hundreds of accidents up and down I-15. ARgh. I decided to make some good use of my time and tried a project that isn’t really working out so great and also played around with my digi supplies and created a digi layout. I love this photo of me and my sweet Sadie. My friend, Lisa, took this photo of me and my girl up Payson Canyon at Camp Maple Dell (scout camp) this fall. I also love this photo… Look at that tongue lopping out. Isn’t she the cutest thing? It looks like she’s grinning and smiling. I just love her. She’s like velvet. Excuse me while I go get my puppy fix and snuggle her for a minute. Here’s the layout I created this morning. I think I might rework it a little and do more tweaking. I was mostly just playing around this morning with this. Love, love, love all the colors but I am not sure I like how cluttered it feels. Oh and I need to work on doing corners with the pinking sheared paper behind the photo. (That was not a template original.. just me playing around and learning a new skill.) The base layout is a template. For the life of me I can not remember who it is from or where it is on my computer. I know Jeanne will know cuz it was on her site that I first saw the template. Originally there was a butterfly to the top left of the photo area. I deleted it on my layout. I added all the papers and textures to the clipping masks on the template and added a big bracket at the back of the pile of goodies under the photo. Digi Credits: I am not sure where the big bright orange distressed background paper or the brown bag paper came from. I am such a terrible credit giver with digi scrapping. Honestly, it’s kind of a pain to keep track of everything and keep a running list going as I am always changing my mind as I go along, too. Here’s the paper pack (Vintage Dreams by Lori Barnhurst and Michelle Coleman of Little Dreamer Designs) I used for most of the papers and the embellishments I used to create centers for the small flowers. ~Inky Smiles!
Skipping Stones Design SSD05 – Earth Has No Sorrow
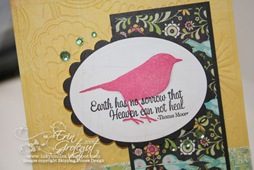
I’m sorry that I’m posting this a bit late. I like to have my posts scheduled to go at least the day prior to when they’re due. I’ve been sick with a nasty bug since last Wednesday. I finally found my voice again and now my stomach is having issues. ARGH. LOL! What craziness, eh? So I did find some time to play over the Christmas holiday and played with some more of my Skipping Stones Design stamps. Heather sent me a set to be used for a tutorial, which I will post here soon, and I liked the little birdie stamp from it. It coordinated nicely with my Basic Grey Urban Prairie paper. Kim Teasdale has been keeping us on our toes with her fabulous sketches this month and sadly this is our last sketch from her. This was a fun sketch for me. Again, it took me out of my box and made me do something a little different, incorporating both vertical AND horizontal lines on the same art piece. For the sentiment I used Healing Wings. I LOVE, LOVE, LOVE this set and can see loads of projects to make with it. Here’s SSD05: And me, with my crazy train brain, rotated it just a bit…. like this: And then something happened and my scissors went crazy and lopped off the ends of the horizontal pieces… and THEN the earth shook cuz I was breaking the rules again and the stars fell from the skies and landed a little closer to the oval and I ended up with this…. It’s overcast and dreary and snowing today and we have really lousy lighting, so I snapped the best pics that I could… please forgive the cruddy lighting. I promise, in real life the scalloped oval does not blend in with the darker vertical strip. Argh! I had LOADS of fun with this card. I ran the yellow background paper thru my Cuttlebug machine and embossed it for texture. All of the paper is Basic Grey’s Urban Prairie, which is pretty much my favorite BG paper of all time! I used CTMH inks to stamp the image and the sentiment and used a COPIC MARKER (*gasp*… I think I’m joining the bandwagon… LURVE, LURVE, LURVE them…) to shadow the little birdie. I really like the effect of the shadowing. Speaking of shadowing… I popped up the oval focal piece up off the card with LOADS of foam tabs from American Crafts. I love their foam tabs because they are thin enough to layer and get the exact effect that you want. The big vertical dark dp was elevated slightly off the yellow bg because of the embossing, so I wanted to make sure that my oval piece layed out nicely. I loaded it up with foam tabs on the back, 2 layers on the right side, and 3 layers on the left side. ~ Inky Smiles! PS. Don’t forget about the blog candy giveaway… it’s coming up soon.. just make sure to link back to the original post so we can see your creations! Supplies: Stamps – SSD’s Healing Wings, Garden Stamp Kiss Set Inks – CTMH Hollyhock & Black Papers – Basic Grey Urban Prairie Miscellaneous – ribbon, adhesive, Kaisercraft Rhinestones, Nestabilities scalloped oval and classic oval dies, Cuttlebug & embossing folder (name escapes me).
Skipping Stones Design Sketch SSD04: Fishing You…

I’ve been a busy girl this past week. I have a lot of schtuff to upload to share, but the days are getting away from me with all this Christmas prep going on. Can u say CRAZY days? This weekend I played around with my Skipping Stones Design stamps again and created this fun little card with the Tropical Birthday stamp set. I really like this set! I tried a few different things with the images, but ultimately I decided on using the fishies. Here’s this week’s sketch SSD04: Once I started playing with designs I decided that the current position was not working for me, so I flipped the sketch and made it look like this: And then I decided to elongate the card to a full sized 4.25 x 5.5” card. Really, the sketches are “just guidelines anyway” meant for you to use as a jumping off point in your creative adventure to creating your masterpiece, right? Here’s the Tropical Birthday stamp set again: And here’s my card: I have wanted to do a “gel” card for a long time now, but not being a fan of “messy/gloppy” card projects I’ve avoided doing it. However, those little crafty angels that sit on your shoulders were sitting on mine having a heated discussion about whether or not I should do a “messy/gloppy” project. Ultimately the little red angel won and I set out to do my gel card. I rooted under the sink for Brent’s bottle of Dep Sport Endurance Styling Gel – Marathon Hold and went to work. I squirted some of the gel in a little cellophane baggie that I taped up really well with clear packing tape. In the meantime Mr Mess and Ms Glop came to visit because I failed to realize that the baggie I used had a couple of tiny holes on one of the edges, as if the edge hadn’t sealed properly. Yes, the Dep Sport Endurance Styling Gel – Marathon Hold was now all over the section of the workspace in front of me. So for the duration of the project I got to enjoy the wonderful scent of Dep Sport Endurance Styling Gel – Marathon Hold…. gaaagggg. I think if I do this again I will use aloe vera gel or something else… lol! Gloppy Mess behind us… moving on…. I used a circle Nestabilities die to cut through each layer of the card and embossed the top green layer for added texture/interest. The fishies are actually stamped on the white card base. I traced a circle on the white card base and then random stamped the fishies in Ocean ink from CTMH. Originally I tried coloring them with a clear glitter pen, but they just looked kind of muddy. Each layer of the card is stacked up and carefully lined up the holes so that you can’t see the other layers beneath. I love the bubbles in the Messy Gloppy layer. They’re fun to squoosh. The card looked kind of nekkid once I had the focal point and sentiment adhered to the card so I pulled out my ribbon scrap jar and fished (haha, pardon the pun) out that fun raffia-like ribbon that I used on the last card I made with the Tropical Birthday set. I tied the ribbon around the edge and moved the sentiment up over the top to neatly tie everything together. Skipping Stones is having another sale today! Perfect timing for the holidays… Today you can get 25% off your order PLUS free shipping again. WAHOO! Just head on over to Skipping Stones Design and start shopping. Be sure to enter 25off to get your discount! Stay tuned for some upcoming blog candy… oh, like say, maybe tomorrow… OR later TODAY… cuz I just typed it up and it’s a ready to post!!! *grin* Fishing you… a Merry Christmas! Inky Smiles! Supplies: Stamps – Skipping Stones Design’s Tropical Birthday Inks – Ocean (CTMH) Papers – Cosmo Cricket, Gina K Miscellaneous – Dep Sport Endurance Styling Gel – Marathon Hold (Schwarzkoph & Henckel), Misc ribbon, adhesive, Nestabilities Classic Circles,
Skipping Stones Design Sketch SSD03 – Stained Glass Butterfly

I was working on a lot of projects this weekend. I can share two of them with you after Thursday when the recipient gets them. (She reads this blog from time to time so I don’t dare share yet.) Today I actually wrote our Christmas letter and printed it out and created a digital Christmas photo card to go with them. I created one last year, too, but never mailed it.. lol… I thought about reusing it and then remembered I think I posted it here on the blog. LOL! Anyway…. One of my projects was the weekly sketch for Skipping Stones Design’s Tuesday sketches. I just received a bundle of stamps from Heather in the mail and was delighted that the Healing Wings set was in the package. I think this is a lovely set with some beautiful sentiments. I especially love the “stained glass” style butterfly. Here’s the set: Here’s today’s sketch SSD03 from Skipping Stones Design: This sketch threw me for a loop. I looked at it and thought, “what on earth am I going to do with that floating triangle?”. LOL! So I played around with the sketch and then turned the paper I had printed it out on… voila! The light bulb went on and I went to town crafting. And here’s my card: I love the sentiment, “Gratitude unlocks the fullness of life” and wanted to highlight it on the card but not have it be the main focal point. (It’s too tiny anyway.) I stamped it on some white cs and inked the edges to take off the sharpness of the white edges. I pulled out Bernie (the Bernina… been trying to think of a nickname for her…) stitched the two rectangular patterned paper pieces to my card base with a basic zig zag stitch for some fun texture. Almost every card needs some added bling and sparkle so I added some gems from Kaisercraft to the “floating triangle”. I think it looks less floating and more anchored now. The sentiment is popped up on the triangle which is popped up off the card and the focal piece with the butterfly using American Craft foam squares. Here’s a photo where you can see all the fun little popped up layers. Here’s a close up of the butterfly. I stamped with Timber Brown Stazon ink and then colored it in with watercolor pencil , blended with OMS and then covered with Liquid Glass for sparkle and to make the colors more rich and vibrant. I stamped the image on a piece of cream cs for some fun shadow detail and then cut a teeeeeny little strip of pop up foam square and mounted the butterfly over the image on the cream cs and bent up the wings a little. I think it looks like a butterfly that has landed for just a second… 🙂 Inky Smiles! Erin Supplies: Stamps – Skipping Stones Design Healing Wings Inks – Stazon Timber Brown Paper – Basic Grey, Archivers Miscellaneous – Kaisercraft rhinestones, CTMH Liquid Glass, watercolor pencils, Odorless Mineral Spirits, thread & sewing machine.