Birds of a Feather: A Tutorial
Hey friends! Back with the promised shabby chic feather birdie tutorial just for you! I hope you all had a marvelous Thanksgiving and are recovering from the crazy Black Friday sales! Brent and I skipped them this year and slept in in our nice cozy bed. 🙂
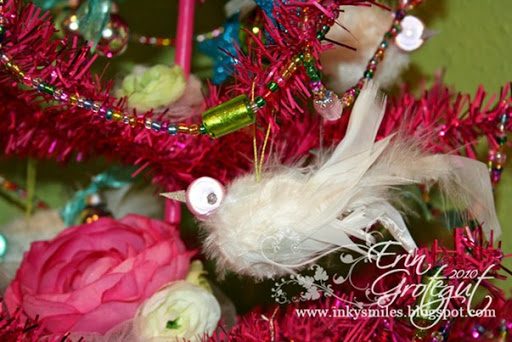
When I made the Christmas tree for my studio I wanted something fluffy and white for it to fill in some gaps and thought feather birdies would be perfect but I wasn’t able to find any in the stores so I figured I could make some. These feather birdies are SO EASY and fun to make.
Here’s your supply list:
Glue Gun & Glue Sticks
String (I used beading string)
Pearlescent beads (10 mm and 2 mm)
A Feather Boa (you know you have one in your closet)
Scissors, Piercing tool or other pokey thingy
Styrofoam balls (about 2.5” diameter)
Something to press feathers down so you don’t burn your fingers (I used a bone folder)
Craft Mat to protect your work surface
Sparkly paper

Step One:
Strip off a whole bunch of feathers from the feather boa and make a pile to the side of you.

Step Two:
Spread hot glue in sections on the styrofoam ball, careful not to burn your fingers in the process. Then carefully add feathers so that the styrofoam is completely covered.


Step Three:
Using very sharp scissors, begin trimming down the feather fluff… kind of like giving a fuzzy pet a haircut. Don’t cut too much off, just enough to “smooth” and tame the frizz.

Step Four:
Time to build a tail for your birdie…. Snip off some nice “full” feathers from your feather boa and set them aside. Begin gluing the feathers on one “end” to form a tail. You might need to work in some extra fluff feathers to give it some body and trim up as needed.


Step Five:
Glue on one of your 10 mm beads to make a head.

Step Six:
Snip off some beads from the garland that was too wimpy for your tree and dip in some hot glue using a tweezer or your fingers if you’re not a klutz like me and then adhere to either side of your head to create eyes.


tep Seven:
Cut a small triangle from your sparkly paper, score from one point to the longest side with a paper piercer or other tool, fold in half (trim if necessary) and dip in hot glue. Adhere to front of bird head to create a beak.


Voila! Your ball o’ feathers is starting to look like a birdie! How TWEET!

Step Eight:
Cut a small piece of string to desired hanging length and tie the ends in a knot like this

Step Nine:
Using your paper piercer or other pokey tool, poke the knot down through the feathers and into the styrofoam on the top of the bird. Be careful not to put it too close to the tail or your birdies will be nose diving from your tree.

And there you have it! A loverly shabby chic feather birdie for your tree, wreath, or other happy place in your home!

Now realize you and everything around you is covered in feathers, which, according to your husband ranks right up there with you and everything around you being covered in glitter….


I
nky Smiles & Happy Birdie Making!
PS.. If you make some birdies please link up and share what you’ve created! (I m trying to figure out the Mr Linky thing and add it to the blog posts… )
![]()
4 thoughts on “Birds of a Feather: A Tutorial”
Great idea to make a bird of your own. She looks dahhling!
Cute -new you used that boa LOL;)
Ooh! That turned out fabulous! Happy cleaning up feathers!
Thanks for linking up to Making It With Allie! I can't wait to see what you have for next week!
AllieMakes.Blogspot.com
so cute! but much to small for me. My hands and eyes would not cooperate!
thanks for linking up.