Picaboo Book Giveaway HERE on the blog!
Hey friends! Check this out! Picaboo is giving ONE of my blog readers a FREE book! Just in time for Christmas, too! How SUPER COOL is that? This is not a standard promotion, this is a book just for YOU, dear winner, whoever you will be!! I will choose a winner and Picaboo will email you with the coupon code to win YOUR FREE BOOK! Here are the details for what you will win. The coupon will be good for THREE different types of books! YOU CHOOSE! This coupon is good for one 20 page Classic photo book in any style. It does not cover additional pages over 20 or applicable shipping costs. The coupon will expire on 12/30/10. Classic Custom hardcover books add a “wow” factor and a professional touch to your book with a completely customized cover that really makes an impact. Create a one-of-a-kind cover featuring the layout, background, images, and text of your choice on the front cover, back cover and spine. Our Classic Leather books have a rich, smooth finish and formal, timeless design that speaks to their lasting quality. These covers are easier to care for than the Classic Linen, which can show fingerprints and other markings more easily. Our Croc-embossed leather books feature our classic design and durable bonded leather with a stylish embossed finish. Less formal and more “fun”, croc-embossed leather can jazz up any photo book. (No – it’s not real crocodile skin! The croc design is embossed on our standard Classic bonded leather). Our Classic Linen books feature a traditional photo book design with a die cut window on the front cover, allowing your image and caption from the first page to show through the cover when the book is closed. Not a digital scrapper? It’s ok! You don’t have to be! Picaboo has a wonderful, what you see is what you get, interface for memory makers (that’s you) from beginners to experts. Creating photo books with Picaboo is easy and fun. Photo books can be fully customized by dragging-and-dropping photos and captions anywhere on your pages, and our software allows you creative control so you can make each special page look just the way you want it to. Photo books make AWESOME Christmas presents and are very fast and easy to do! No more printing and cutting photos and oodles of papers and embellishments. Need a gift in a hurry? Did you forget someone on your list? A favorite aunt, a mother in law? Then this gift is for you! ****************************************************************************** Here’s what you need to do to enter this giveaway: 1) Leave a comment on this post and tell me what your favorite Christmas memory is. 2) Post about this giveaway on your blog and link back to me, if you don’t have a blog, tell a friend or two. 3) Cross your fingers! Winner will be drawn by random.org on Friday evening by 9 pm MST.
Giveaway TODAY! (Well, technically Wed Dec 8th, 2010)
Hey friends! How would you like to win a FREE book from Picaboo? This is not their “get a free book now” from Picaboo like a recent promo they had… it’s a FREE 20 page Classic photo book, valued at up to $39.99. You will be able to choose any ONE of these books: I will be posting later today ( Wednesday, December 8th) here on the blog. Come back in a bit for the details on how YOU could win this book. Inky Smiles! Erin
Crocheted Necklaces – Jewelry Class Results

I had a jewelry making class at my home on Friday night. We had 3 girls get sick, but the 6 who made it and, aside from some wire gone wild, had a BLAST! We did crocheted necklaces and laughed into the wee hours of the night. Here are the girls and their necklaces. Everyone did long necklaces this time. Totally fun! (There are only 5 who finished because Sierra’s wire was literally hopelessly tangled and she has to start over with new wire.) Note to self: Only use wire on a spool. The looped wires are a nightmare! Marilyn Her necklace was wild ‘n chunky, but really not that heavy. She finished quickly so I whipped up a pair of earrings to go with her necklace. LOVE the organic feel to this set! Amanda Amanda also used copper wire and earth toned beads. Krista Krista went with a classic black and white theme. Kaisa Kaisa added some fun focal beads and worked the smaller beads in. Ginny Ginny used earth tones and created a necklace with a vintage feel to it. Erin I will show you mine in the next couple of days. I created a full set of goodies to go with my necklace. 🙂 So proud of my girls! They were awesome and this jewelry class was loads of fun! I will do more on a regular basis after Christmas so if you and your girlfriends would like to learn something fun and fabulous let me know and we can set up a class. Inky Smiles!
Shabby Christmas Gifts
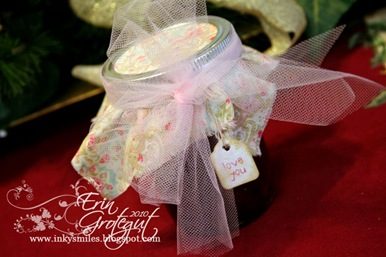
On Wednesday I had brunch with a friend of mine who flew in to town to meet her first grandbaby and see her son and daughter in law. Thankfully we were able to find some time to meet up for brunch at Mimi’s Cafe. I hadn’t seen Aura Lee in nearly 20 years. I can’t remember how long it’s actually been. She was one of my Young Women leaders (female youth group @ church) when we lived in Berlin, Germany. She befriended me and really touched my heart. When I was called to work in the Young Women organization as an adult I knew that I wanted to be a leader to my girls like she was to me. We had such a nice visit (a couple of hours, but not long enough) and talked about a lot of things. I learned that she also loves to be crafty and that she runs a small (but crazy growing) business called Time Preserved where she writes and publishes people’s life stories. She spends countless hours interviewing the individual and their family members and collects and edits photos for the book. She brought along a book to show me and it was so awesome! So I thought it would be fun to bring her a tasty treat and something small that she could take home to her family via airplane. Remember all that CANNING I’ve been doing? Some of it is going away as gifties… like this one: Take a simple jar of homemade deliciousness such as Cranberry Apple Preserves and add a little fabric square to the top (don’t forget to lightly fray the edges), then carefully twist the ring on and tie a little raffia or better yet, some pink tulle around the ring. I had to help my tulle stick by using a couple of small pieces of that fabulous terrificly tacky tape or whatever the red stuff is called (I always toss the package so I forget…) Then realize it needs a cute tag, so grab a jewelry tag and ink it up with some Tim Holtz distress ink (those awesome little squares) and stamp Love You on it in a soft pink. Now package it up cuz you don’t really wanting to be toting a jar around the restaurant…. so rummage through your gift wrap closet (which doubles as the Christmas and Holiday decor closet and is under the stairs so it’s really not a closet/room) and find a cute little brown bag. Jazz it up with some more pink tulle and a strip of matching fabric from the jar top. And snuggle that cute little jar of deliciousness into a bundle of tissue paper and then tuck it into the bag and scoot off to meet your friend and enjoy breakfast! Love You, Aura Lee!! Inky Smiles!
Birds of a Feather: A Tutorial
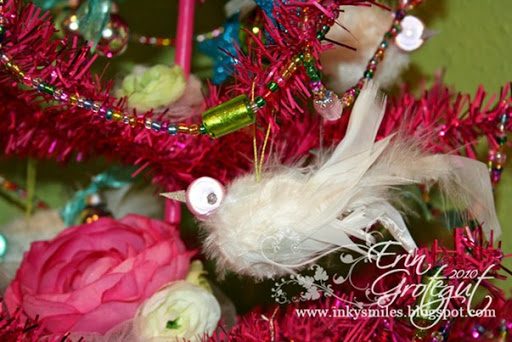
Hey friends! Back with the promised shabby chic feather birdie tutorial just for you! I hope you all had a marvelous Thanksgiving and are recovering from the crazy Black Friday sales! Brent and I skipped them this year and slept in in our nice cozy bed. 🙂 When I made the Christmas tree for my studio I wanted something fluffy and white for it to fill in some gaps and thought feather birdies would be perfect but I wasn’t able to find any in the stores so I figured I could make some. These feather birdies are SO EASY and fun to make. Here’s your supply list: Glue Gun & Glue Sticks String (I used beading string) Pearlescent beads (10 mm and 2 mm) A Feather Boa (you know you have one in your closet) Scissors, Piercing tool or other pokey thingy Styrofoam balls (about 2.5” diameter) Something to press feathers down so you don’t burn your fingers (I used a bone folder) Craft Mat to protect your work surface Sparkly paper {Yes, I forgot to include the sparkly paper for the beaks so it’s photoshopped in. :P} Step One: Strip off a whole bunch of feathers from the feather boa and make a pile to the side of you. Step Two: Spread hot glue in sections on the styrofoam ball, careful not to burn your fingers in the process. Then carefully add feathers so that the styrofoam is completely covered. Keep covering it until you have a big fuzzy ball of loooove like this: Step Three: Using very sharp scissors, begin trimming down the feather fluff… kind of like giving a fuzzy pet a haircut. Don’t cut too much off, just enough to “smooth” and tame the frizz. Step Four: Time to build a tail for your birdie…. Snip off some nice “full” feathers from your feather boa and set them aside. Begin gluing the feathers on one “end” to form a tail. You might need to work in some extra fluff feathers to give it some body and trim up as needed. Step Five: Glue on one of your 10 mm beads to make a head. Step Six: Snip off some beads from the garland that was too wimpy for your tree and dip in some hot glue using a tweezer or your fingers if you’re not a klutz like me and then adhere to either side of your head to create eyes. tep Seven: Cut a small triangle from your sparkly paper, score from one point to the longest side with a paper piercer or other tool, fold in half (trim if necessary) and dip in hot glue. Adhere to front of bird head to create a beak. Voila! Your ball o’ feathers is starting to look like a birdie! How TWEET! Step Eight: Cut a small piece of string to desired hanging length and tie the ends in a knot like this Step Nine: Using your paper piercer or other pokey tool, poke the knot down through the feathers and into the styrofoam on the top of the bird. Be careful not to put it too close to the tail or your birdies will be nose diving from your tree. And there you have it! A loverly shabby chic feather birdie for your tree, wreath, or other happy place in your home! Now realize you and everything around you is covered in feathers, which, according to your husband ranks right up there with you and everything around you being covered in glitter…. I nky Smiles & Happy Birdie Making! PS.. If you make some birdies please link up and share what you’ve created! (I m trying to figure out the Mr Linky thing and add it to the blog posts… )
It’s Beginning To Look A Lot Like Christmas….
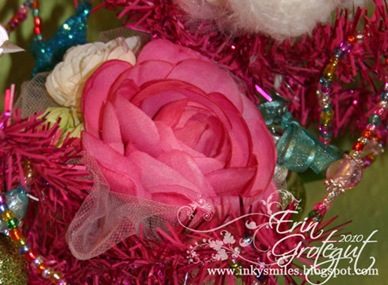
It’s beginning to look a lot like Christmas around here! We got our first real teeny bit of sticking snow this past weekend and while parts of Utah more north than us got hit hard last night we got only maybe 3”more… YAY! I guess it is FINALLY time to put away the flip flops and capris and pull out the warm fuzzy slippers and polar bear jammies. I am SO excited for Christmas this year. I have no clue what I am giving Brent yet, but I have other family members taken care of. WOOT! On Saturday we put the outside lights on the house and hung the giant wreath on the peak of the house. I have already packed away my fall decor and set up our new huge Nativity set on the hutch in the front room and we’re going to be putting up our inside Christmas decor on Wednesday. I’ve been dreaming of a mini Christmas tree in my studio for a while now… well, ever since I saw this fabulous PINK “feather” tree at our new Hobby Lobby in Orem (25 or so miles north of me). I didn’t buy it right away because I figured it would go on sale (and I don’t pay full retail for much of anything)… well a few weeks later it still wasn’t on sale so I printed a 40% off coupon and went in to buy it. Thankfully some of the ornaments WERE on sale so I was able to pick some of those up, too. The tree came stuck in a boring little hot pink wooden square… but I changed that when the ugly Urn Vase Thingy got a makeover. I pulled the hot pink wooden square off the tree and then plunked that tree into its new home and hot glued some silver metal garland from Ikea in the base of the tree to cover the leftover Spanish moss that was stuck on. Glue, Wrap, Press (use something other than fingers to avoid burns, don’t ask me how I know this… ) The clear garland that picked up for the tree just looked too tiny and disappeared into the tree when I put it on it at home so while Stacey was doing this I opened up my box of jewelry making goodies and started making some custom beaded garland. I figured 10’ of hand beaded garland would have been plenty for such a small tree. HA HA HA Try 18ish feet for a 30” tree. LOL! Good thing I had a lot of seed beads and plenty of time on my hands the next evening. I added to this garland and about doubled the length, I just wished I’d spaced the big beads a little closer together. Once I got the right length of beaded garland I started putting the ornaments from Ikea and Hobby Lobby on. It was missing something so the next evening I went to Roberts Crafts and picked up some supplies to make some feather birdies (which I will have a tutorial on HERE after Thanksgiving – it’s all typed up and ready to go)… I topped the tree off with a “gemmed star” from Hobby Lobby. Then it was still missing something so I popped some flowers off of the stash of silk flowers I keep here in the studio for just such occasions, grouped them in threes, and backed them with gathered pink tulle. I am loving how my little studio tree turned out! It was worth the hot glue blisters, squint eye from stringing seed beads, and a contact high from spray lacquer…. The creative process making this simple little tree was loads of fun and adds a cheerful Christmas spirit to my studio. I hope you all have a marvelously happy Thanksgiving and I will see you back here later this weekend with a tutorial on making shabby chic feather birdies! Inky Smiles & Happy Thanksgiving! PS… The wire form that previously occupied this little corner has found a new home for the holidays… Linking to:
The Urn Vase Thingy Gets a Makeover
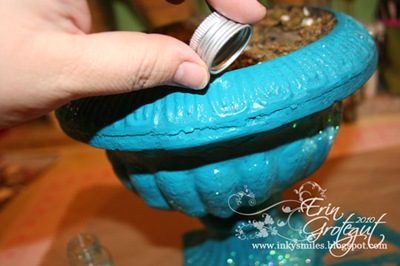
So I have been working on a little project and needed a base for it. When Stacey was here we wandered the aisles of WalMart one afternoon and found some fabulous deals on fall clearance items. In fact, the store workers were marking them down as we were approaching the aisles. AWESOME! I found a couple of these fabulous (yet ugly in their current state) urn/vases filled with scraggly sad looking fall foliage. I picked this one up for $5.00. I will figure out something to do with the fall foliage next year. 🙂 And while Stacey was working on her gatrillion owl bodies I gave this little guy a makeover. It’s a cheapish, plastic, should have been resin thingy… Not too ugly but sorta ugly.. but ok, the foliage is really ugly arranged like that. But look past the foliage… as Rafiki says, “Look beyond what you see….” It’s got good “bones”… I bet it would look really pretty painted a cool shade of turquoisey blue… Hrmmm… So of course I had to rip out all that badly arranged foliage… and the nasty Spanish moss stuff that was glued in there with some sort of nuclear war resistant glue… I got most of it…really… and some of the styrofoam, too. It’s all good. It will get covered up. 🙂 So I pulled out the paint and went to town… I did not take photos cuz I did not want my camera anywhere near that much wet paint. (I’m a messy painter.) I painted it with a flat paint by Behr and let it partially dry. Once it was mostly dry, but still wet and gloopy in places I started to randomly dump some Doodlebug fine glitter on it. Don’t be shy.. it LIKES glitter, unlike my sweet husband… blue glitter everywhere! Delightful! Once you’ve gotten your urn vase thingy covered in glitter just how you’d like it, step back and brush the glitter off your face, chest, legs, and out of your hair, and maybe vacuum the dog before the husband catches you glittering again. Then I took it outside in the garage and hit it with some spray laquer… well, I don’t think I thought that out well enough because when it dried it looked like this: Looks like the laquer ate through some of the gaps in pain and changed the color of the plastic underneath the paint. Not exactly how I wanted it to turn out, but I figured it would still work. So I stuck my tongue out at it and wandered upstairs to enjoy dinner and some of these DELICIOUS little treats that Stacey taught me to make. Oh and she made her famous SALSA, too! How lucky were we??? Did I mention we had a blast? Tee hee… Ok, I will be posting the pic of what the Urn Vase Thingy became tomorrow or Wednesday and then a fun little crafty tutorial after Thanksgiving. Inky Smiles!
I Think I’m Back {again}… lol.. & a Canning Recap!

I’ve been a crazy busy girl around here the past couple of weeks. Stacey Flores came to visit for a week had sooo mcuh fun! (I have some fun pics and maybe a video or two to share, too.) I worked like crazy last week and had a lot of other things going on, too. Basically my sporadic posting on this blog boils down to one thing, my health. For the last couple of years I have had really bad health. It finally came down to severe iron deficiency anemia (which went undiagnosed for a long, long time) and some issues with my heart that were due to the IDA. It has been a rough, rough road and I had to wear my “game face” way too long. HOWEVER, comma, but, my health seems to be finally getting better and I am feeling the excitement and finally have the ENERGY to do the things I’ve wanted to do for a long time now. Without getting into too many details, today marks 4 months since I had a minor procedure that basically prevented further major surgery and pretty much “saved my life”. I just feel like doing all the projects around the house and in my home that I haven’t been able to do for the past couple of years. I have just felt this zest for life and doing things over the past several months and have not wanted to spend as much time on the computer. I HAVE been crafting here and there and making jewelry but have not cared about photographing it and sitting at the computer long enough to blog about it because I’ve been too busy DOing things. LOL! Anyway… for those of you who hang with me on Facebook you have seen me posting about the goings on. Facebook seems to be so much easier lately because I can have the laptop on in the kitchen or front room and stop and post tidbits as I walk past the computer throughout the day. This year we’ve been focusing a lot in our home on getting our food storage/emergency together and have canned and bottled foods like crazy people over this summer. I’ve been doing some major couponing and getting LOADS of stuff we use for free. (I ONLY use coupons on items we actually use.) We have also been so blessed with being gifted a lot of free fresh goodies (cucumbers, grapes and apples) and found some incredible sales on meats and other goodies. These are goodies we will eat throughout the next year and a half and then start all over! I am EXTREMELY grateful that my husband will do this with me. At first I think he did it just to Here’s a list of what’s been keeping me/us busy: 59 Quarts of Apple Pie Filling (many for gifts) 17 Quarts of Applesauce 7 Quarts of Apple Slices in light syrup 6 Pints of Apple Butter 13 Quarts Peaches (Red Haven Peaches) 44 Quarts of Tomatoes (crushed) 20 Quarts of Dill Pickles (1/2 were gross, so they got tossed 8 wks later) 9 Pints of Chili Sauce (like a tomato relish, B’s Great Grandma’s recipe) 11 Half Pints of Roasted Red Pepper Spread 7 Half Pints of Ketchup 11 Half Pints of Dill Pickle Relish 14 Quarts of Concord Grape Juice Concentrate 11 Small Jelly Jars (1/2 of a half pint) of Grape Jelly 13 Quarts Chicken Noodle Soup (minus noodles) 20 Pints of Chicken (in chunks) 6 Quarts of Chicken Broth 19 Pints of Beef (in chunks) 6 Pints of Beef Stock 8 Pints of Cranberry Apple Preserves (with orange pieces, too) 6 Half Pints of Cranberry Apple Relish (w/pecans and brown sugar) And currently simmering in a big pot on my stove: Cranberry Apple Butter (1 big batch) to go in half pint jars I think that’s everything. I think we’re done canning. Except for some more apple butter… But I think we’re done canning. I hope. Here are a few snapshots of our 2010 adventures…. You can click to browse through the album (it will open in a new page) or or you can glance over the small thumbnails below. 🙂 View Full Album
Howdy
Hey folks! Not totally dead here and I did not fall off the face of the earth. Been busy canning and had my good friend, Stacey, here visiting for a week. I will try to pop on with some pics of crafty goodness again VERY SOON! Just whittling down some projects and duties that can’t be postponed this time of year at work, too. Inky Smiles and Hugs!Erin
The Crazy Lady Returns
Hello friends! I’ve been absent for a while from the blog. We’ve been crazy busy around here (that seems to be my life, doesn’t it?) again… Last Thursday I did a video at the Inky Smiles Craft Lounge and then it was crazy day after crazy day and I didn’t have a chance to post the pics of the book or anything else crafty fun. Friday I had a bunch of errands to run and ppl to meet and 54 lbs of purpley grape goodness to pick from a generous neighbor’s fence line of grape vines… which we steamed and bottled that evening until 2:30 Sat am. Saturday morning I got my hair cut and colored and then we ran family errands and did some major grocery shopping and started canning 30 lbs of chicken which lasted well into the 2 am hours Sun morning. Sunday we slept in until 11 am and then finished canning the chicken, chicken soup, chicken broth and beef chunks. Monday I worked all day and had things going on in the evening. Tuesday I worked all day and had MORE things going on in the evening. Wednesday I went shopping at Ikea with my friend, Valerie, did lunch and then hit the Rings n Things road show in Salt Lake City and tried to start getting the kitchen cleaned up. Today I slept in a little and then ran errands and thought about cleaning my kitchen. It’s still dirty. Tonight I get to go take photos of some young friends who are headed on a group date for a fall dance at the high school. And tonight I hope to get the mummy makeover book posted and shared here on the blog. ~Inky Smiles!