Tutorial: Paper Beads Part Two – Adding Bling & Stringing Your Beads.

We covered the making of the actual beads in Part One. The post was getting quite long so I decided to start a Part Two post – Add some bling and string your beads.
{Continued from Part One}
Adding Bling
** At this point you can also opt to add some bling to your beads. I experimented with adding Perfect Pearls glittery powder, glitter, and Stickles.
Here are some photos of my experiments.
Perfect Pearls: Worked on blue beads fantastically!


Glitter: Sprinkle on after you dip in UTEE. Beautiful addition to red and tan beads.

Stickles: Carefully dab onto dry UTEE and then dip in UTEE again. Didn’t work so great because the glue in the Stickles bubbles up and makes a nasty mess.

Hints: Don’t heat too close or too long to the bead or it will glob up and the UTEE will flow like lava off your bead. (See above right photo.) And please don’t touch the bead like me until it’s cool or it WILL burn you and make a mess. Taking one for the team… ouch!
Stringing Your Beads

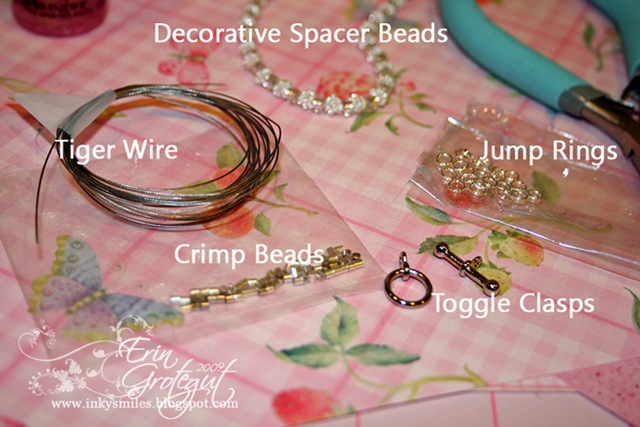
1.) Gather up your tools & supplies:
Pliers, Tiger Wire, Crimp Beads, Spacer Beads, and Clasps (I used a Toggle Clasp). If you are adding a charm, gather your jump rings and charm, too.
2.) Cut a piece of tiger wire long enough to go around your wrist PLUS at least about 4” extra. I cut a 12” length for an 8” bracelet. Lay out flat on your workspace.
3.) Start by stringing your crimp bead followed by one part of the clasp you’re using. Then fold about 1” or so of the tiger wire over the ring on the clasp and thread it back through the crimp bead. This will secure your clasp to your bracelet.


4.) String the beads. I string a few coordinating “starter” beads on. These help space out the paper beads and give some better maneuverability to the toggle clasp. String all your beads on until you have the desired length & design. End your string of beads with the same # of spacer beads that you used at the beginning.

5.) String on one more crimp bead and the other half of your clasp. Fold over loop on clasp and thread back through crimp bead and all of the spacer beads. Keep pulling the wire until it is snugged down around the loop on the clasp. You may need to use your pliers to gently tug and pull the wire to the correct length.


6.) Snip off the wire so that it ends about half way through the last paper bead. (See above right photo.) This should secure the wire so that it doesn’t pop out and scratch you.
Voila! You now have a custom handmade piece of jewelry to add to your collection or to give away!
I hope you enjoyed this tutorial & as always, I would LOVE to see what you come up with!
BONUS RAK:
I’m going to give this bracelet away in the evening on Wednesday, January 14th to a random commenter using a random integer generator. Here’s how you can put your name in hat:
* Post a link on your blog back to this bracelet tutorial and leave a comment here letting me know you’ve shared. Comments will be closed at 6:00 PM Wednesday night.
I will draw a random name on Wednesday evening.
Inky Smiles & Good luck 🙂
22 thoughts on “Tutorial: Paper Beads Part Two – Adding Bling & Stringing Your Beads.”
Love your bracelet. thank you for doing this tutorial.
Love your bracelet. thank you for doing this tutorial.
I love this idea. I have only tried that embossing powder stuff once (using someone else’s stuff) and it was so fun. I’ve been wanting to get some of my own supplies and now I might have to so I can try to do this! I posted a link on my blog! 🙂
Here is a link to my blog where I left a link to youre paper bead bracelet tutorial. http://www.joanshanks.blogspot.com.thanks for givingt a chance to win.Love the bracelet. Joan Fiskateer #808
You do beautiful work. I always wanted to try to make paper beads myself. Unfortunately I do not have a blog to link you to.
You do beautiful work. I always wanted to try to make paper beads myself. Unfortunately I do not have a blog to link you to.
Wow, beautiful bracelet, and great idea, I just posted on my blog about this bracelet.
Hey Erin –There is a new little link under my “Tutorials” heading. 🙂 Thanks for the chance to win such a great piece! I love your blog – very cute!Katherine
I love how you did this. If I knew how to link to this site I would. I must try to do this. Michelle
Love it – I’ve seen the bracelet before – but your tutorial is greatShirley
A wonderful and easy way to makes beads. I wnt to try it. Pat M
Erin, you did a wonderful job on the tutorial. I left a link to your tut on my new blog http://keepsakeswithheart.blogspot.com/ …. my old blog “inked art” is no more!
Wow I think this is a spectacular Tutorial. Makes me really wish I paper scrapped more so I would have all the tools to make this one. It looks like so much fun. I have to say I was leary at first “Paper” bead bracelet Huh?? But it is a great idea. I posted a link to it here on my own blog as well: http://dixiedoespspdezines.blogspot.com/I also asked that if anyone trys it out if they will share the photos with me. I really want to see somemore completed projects. Thanks for such a great share.
What a great tutorial. I like the hints on what to use and not to use for bling, too. Thanks so much.Cathy Ystampin4fun at ameritech dot net
Wow! What a fabulous tutorial. I made these kind of beads when I was a teenager. I’m going to go get a few supplies and make some! Great idea using the UTEE!!! I’ll be posting about it on my bog … soon!
This looks so easy – I can’t wait to give them a try. Don’t have all the items to make the bracelet but I can get a stash of beads going anyway 🙂
Thank you for this tutorial. I had seen this craft before but could make no sense of the instructions. You have made it seem quite easy.
This is so pretty! I wish I had more time in the day to try stuff like this.
Love the bracelet, so pretty. Neat tutorialpunkyann@iserv.net
Wow Erin! I’m super impressed as always. I made a new blog today and put a link to your tutorial. Check it out! http://www.staceylyndesigns.blogspot.com
So pretty! I’ve wanted to try this project — thanks for the great tutorial!
Your tutorial is an awesome inspiration! Many thanks for sharing. I would like to feature your designs at http://www.handmade-jewelry-club.com/
Contact me here if you have a concern.
Jane
http://diylessons.org/