Scrap My Scraps Challenge: Card Set #4
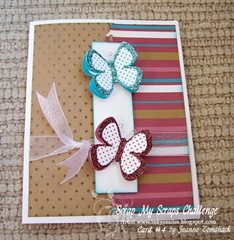
I’m here sitting at the computer having finished Card Set #3 and thought I’d better get a couple of posts scheduled since I have some energy and the next few days are going to be busy ones. My friend, Lisa, and I are throwing a baby shower for our friend, Kim, who is having surprise baby #3… the youngest is 8. Anyway… Kim is super generous and gave away all of her old baby stuff… so we figured we’d better help her get all stocked up again. I’ve got lots of cleaning to do and some yard work to take care of. Thankfully my hottie hubby is helping with the big stuff. 🙂 Yay for hottie hubbies! Here’s card set #4. The “RULES” were simple: 1. Create one card from each layer stack thingy. 2. Use ALL of the pieces that go to each card. 3. Use any stamps to complete cards. 4. You may add one piece of extra cardstock to the card and any extra embellishments. (More like guidelines, anyway….) The Players: Alisha Trussell Jeanne Tomshack Kathi Carlson The Original Layer Stack Thingy: I really love the colors in this pack. They are bright and bold and fun. My Original Card: …aka el boringo card…. I could have spruced up that sentiment a bit or given it some weight to anchor it mo bettah on the card…. Jeanne’s Card: One of Jeanne’s signature items is butterflies. You can find them in her digi art, card making, and even her clothes! I love how she popped up their wings in layers and glittered the edges and bodies. The dots on their wings match the embossed dots on the kraft colored cs on the card base. Kathi’s Card: I love the little bird on a branch image that Kathi has stamped and colored on this card. She matched the colors of the striped paper perfectly! She also faux stitched the edges of the white focal piece cs and the edge of the kraft cs. Alisha’s Card: A little gift anyone? Alisha’s card reminds me of a gift, all wrapped up and neatly tied with a bow. The sentiment is random stamped in the patterned paper and cute little flowers adorn the “tag”. That’s CTMH white ink on the kraft cs… I thought it was Stazon… it pops so nicely! There are two more sets coming your way! Stay tuned 🙂 Inky Smiles & enjoy your Father’s Day weekend!
Scrap My Scraps Challenge: Card Set #3
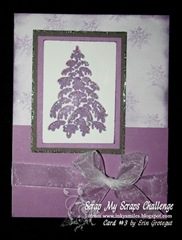
Sorry for the delay. I have not been feeling well and have finally been able to haul myself to the computer to actually get some posting done. I worked all day Tuesday and wore myself out and then had Curves and an echocardiogram on Wednesday. (The echo is a whole ‘nother story… so far no bad news.… will post more as I get the details from my dr.) Anyway.. back to our regularly scheduled program…. The poor girls really had their work cut out for them with “yesterday’s” hideous scraps. Yes, there’s a “fall-ish” theme to the cards and pieces… the workshop I originally did was in October or November and the girls wanted “season appropriate”… lol! None of the players saw the original cards before playing. In fact, I had to hunt them down in my stash to snap pics of them to post here! The “RULES” were simple: 1. Create one card from each layer stack thingy. 2. Use ALL of the pieces that go to each card. 3. Use any stamps to complete cards. 4. You may add one piece of extra cardstock to the card and any extra embellishments. (More like guidelines, anyway….) The Players: Alisha Trussell Jeanne Tomshack Kathi Carlson The Layer Stack Thingy: Today’s card pieces are soooooomuchmobettah! I am really digging the variety of themes and designs that the players came up with for this set. Their creativity and imaginations are amazing! My original card: Alisha’s Card: Click on the card to view it larger… you can see the teeeny ice pieces/beads that Alisha glued on the stamped image. WOW! She inked up the raised embosses purple layer to pop out the design. I love the whimsical bow tied off to the side, too. Jeanne’s Card: Jeanne had her crochet needle out again! That flower is AWESOME… and check out the detail (click on the pic) on the card base itself… she embossed an argyle pattern inside an embossed frame. I love the embellishments nestled inside each other, too! Kathi’s Card: Kathi used stamps to add texture and dimension to the plain cardstock and stamped and colored a lovely image for the focal point. I love the 2nd generation stamping of the leaves and the focal point nestled into the little side bow. I think it’s awesome that everyone layered up their mats the same AND that they all just knew that that irridescent (sp?) ribbon went on this card! These are probably my favorite group of cards out of the 6 sets! More coming up! Inky Smiles!
Scrap My Scraps Challenge: Card 2

First of all… I have to tell you something that might shock you. Please sit down. I can not be responsible for injuries. I went to the mall today….. specifically to look for a brown skirt. My friend had one on at Sunday and it was quite loverly. Of course, I had to copy her… went to the store…. they had it one size too small and no more in my size. UGH. Then I headed back to my car…. and walked past Archiver’s. And I kept on walking. I looked at the loverly rows of shelving and neatly arranged displays as I huffed and puffed my iron deficient body down the mall pathway….. but I did not even go IN…. You may breathe now. And get up off the floor. So now that you’re sitting there in pure amazement and my insanity we shall move on to card set #2…. Remember the rules? The “RULES” were simple: 1. Create one card from each layer stack thingy. 2. Use ALL of the pieces that go to each card. 3. Use any stamps to complete cards. 4. You may add one piece of extra cardstock to the card and any extra embellishments. (More like guidelines, anyway….) And the players: Alisha Trussell Jeanne Tomshack Kathi Carlson Here are the pieces for Card Set #2. The two pieces on the right are actually a garnet color. I don’t know what happened to them… strange… Here is my original card: I sandpapered the bajeebers out of the white core cs and layered up the pieces! Jeanne’s Card: Hrmmm… am I noticing a trend with Jean and her offset pieces? She added a touch of whimsy with her crocheted flower with a button center and Cuttlebug embossed the small strip of paper. Kathi’s Card: I love the silk leaf “swag” under the sentiment, tied neatly with a bow. Kathi also embossed a “wainscoting” panel for the base. Love it! Alisha had to leave town and was not able to finish this card… I do have all the rest of hers to share in the next few posts! Enjoy these fabulous takes on some simple scraps! Back tomorrow with Card Set #3! Inky Smiles!
A New Challenge: Scrap My Scraps
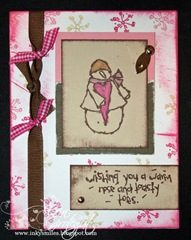
A while back when I was cleaning out my closet I came across a bunch of packets of card “guts” from a workshop that I did many moons ago (I think it was at least 3 years ago) when I was a consultant for CTMH. It was a 6 card workshop for a bunch of “beginner” (aka virgin crafters) card makers and I had figured that the easiest way to do the card night was to pre cut all the pieces and layer them in a packet to use the night of the card class. A few people did not show up and I had a bunch of leftover packets. What to do with odds and ends pieces? Rather than empty them out and put them into my scraps piles I decided it would be super fun to ask a few friends to help me do something with them. Welcome to my first Scrap My Scraps Challenge! Each player in this challenge was given 1 complete packet of card guts, complete with a little baggie of the bits of embellishments we used for the cards. The “RULES” were simple: 1. Create one card from each layer stack thingy. 2. Use ALL of the pieces that go to each card. 3. Use any stamps to complete cards. 4. You may add one piece of extra cardstock to the card and any extra embellishments. (More like guidelines, anyway….) The players in this round (yes, I think I will do this again…) are: Alisha Trussell Jeanne Tomshack Kathi Carlson These poor girls started with some really crappy pieces of scraps…. the cards that I made for my class were very, very basic and simple. The girls did AWESOME! You can see their styles and personalities in each of their cards. The goal of this challenge was to see what each person did with their scraps. Everyone started with the same basic pieces – no sketch. I just wanted people to have fun and create just for the sake of creating. I think the goal was accomplished! Thank you to each of you for playing! So, without further adieu/adoo/whatever/blah blah blah… Here’s set #1: We started with: My original card: The Players: Jeanne Check out her paper piecing and cool ruffley ribbon flower! I love the layering of the individual pieces of cs, too! Alisha LOOOVE the random stamping and cool side tie knots and button nosed flowers! Kathi LOVE the white polka dots, so cool, stamped over the random stamped card pieces and a cheerful hello to greet the recipient! Isn’t it fun to see all the different takes?? Photoshop is giving me heck today with editing photos… I’ve got half of card #2 edited, but I’ve got to hit the sack and head up to work early tomorrow morning and then go find a brown skirt somewhere… hopefully Dress Barn will save my hiney… lol! Stay tuned! More cards posted tomorrow (Monday) night! Inky Smiles!
Studio Tour: Part 6 – Fun Details
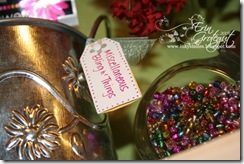
I’ve had some questions about some details in the Studio Tour (and the sneak peek collage from a while back)… Here are some more fun pics to show the details… Mom made the kitchen witch for me when I was in high school. Mom put incredible detail into this little lady… all the lace trim, the slippers and even the wart on her nose. She has lived in my hope chest/moving box since then… I finally pulled her out and found a new home for her in my studio as my “Scrap Hag”. Hopefully she will chase away the “Mojo Thieves” and general “Anti-Crafty Monsters” that live in the utility closet… This is my canister that holds silk flowers that I snip off and use on cards and projects. The beaded lady hanging from it is my Crazy Lady. I made her at a cute little shop in Historic Valley Junction, Iowa. When I am having a bad day or feeling blah, I look at her and grin… besides, she’s ALWAYS having a bad hair day! 🙂 The little magnet is a round mirror that says “Look to the Glory of God”. It helps ground me in times of “puffed up-ness”. I love this photo of Brent and I. It is the first photo that we ever had taken together… It was taken at UVU’s “girls choice” Spring Dance (aka Valentine’s Dance). We’d been dating a couple of weeks… Maybe 2? Anyway, it was also the night of our first kiss. *grin* Look how skinny we were, too!!! I’d love to get back to that size! This is a fun little E that I made from a wooden letter from Robert’s (Provo) Craft. I covered it with pearlescent pink cardstock and then blinged it out by outlining it with rhinestones and then adhering silver glitter balls to the edges with Liquid Glass. Note to self… don’t use those silver glass ball things next time… they have real silver in them and are now tarnishing. 🙁 The cupcake was made by Linda Cummings. Just a fun photo of the paintbrush bucket… and detail of the tag label of misc blingy things. 🙂 I filled the “sharp things” bucket with white beans. This helps keep my scissors and sharp things from clanging around and nicking each other. It’s also quieter when putting things away in the bucket. 🙂 The candles are apple/cinnamon scented. I love burning them while I’m in my space… They add a comforting sense of ambiance and smell delightful 🙂 I store my colorful ribbon scraps in a big crystal candy jar from Poland. I love how you can see the colorful ribbon scraps through the jars… like little bits of candy. The little candy jar holds my Tiger Wire and stretch wire and misc jewelry making findings in little baggies. Mom gave me the crystal …. we bought it at a Polish Market on the border of Germany and Poland when we were living in Berlin (1989-1994). These are one of my many sets of Matryoschka dolls that I collected from various markets while living in Germany. I have a large variety of sets including a set of Jesus and his Desciples, the Russian presidents, and tons of traditional dolls. (One of my favorites is the Turnip family… It “tells” teh story of a family pulling together to pull a giant turnip from the ground for their dinner. ) They were so cheap in Germany!! I believe this set was purchased at a black market in Berlin (formerly East Berlin) 1990. Hehe! These pretty ladies add a fun bit of color and design to my space and remind me of some very happy and fun times in my old stomping grounds. Inky Smiles!
What’s For Dinner?
In my effort to get better at eating healthier I’ve decided to hunker down and be more diligent in creating healthy meals from scratch. I have a huge recipe book where I’ve been collecting our favorite recipes in and have menu plans that I print out and use to plan meals and make grocery shopping lists but have been really lackadaisical in using lately… Hopefully by sharing my goals I will be more diligent in working on accomplishing them. So with that said… here’s our meal plan for this week. Note: These are dinners only because we don’t have children, so lunches and breakfasts are either leftovers or FFY (fend for yourself). Sadie’s easy… a bowl of food every day and fresh water with a treat here and there… and she’s a happy girl. 🙂 Monday: Tacos Tuesday: Garlic Chicken Pitas Wednesday: Mongolian Beef w/Steamed Rice Thursday: Fried Rice w/Japanese Onion Soup Friday: Grilled Teriyaki Chicken w/Grilled Veggies Saturday: Date Night (dinner out) Sunday: Hawaiian Haysnaks (aka Haystacks) I had the wild thought of snapping photos from time to time and creating some digi page recipe pages for my cookbook binder… perhaps I will try to do that! Snapped some photos of our delish tacos and Brent’s kick butt Pico de Gallo tonight! 🙂 Inky Appetit! (hehe)
Happy News
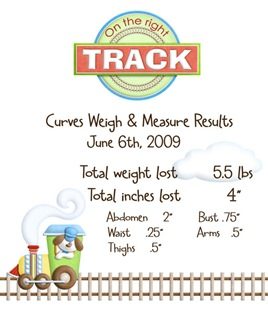
Reporting in…. So I started Curves in April. I went on vacation in May for a little over a week and missed several (5)workouts. I haven’t eaten as good as I should have, but not nearly as bad as I used to. I’ve been trying to be at Curves at least 3 days a week. And it’s paying off! Here are the results so far: Doing the HAPPY DANCE! 5.5 lbs is not “a lot”… but 4” IS! Especially the 2 full inches off my abdomen! I was so giddy this morning that I worked out even harder, came home and had OATMEAL for breakfast. LOL! Slow and steady on the lbs as I build muscle… slower weight loss is better, less likely to come back. I’m so happy to see some results cuz I really don’t like to sweat. LOL! Digi credits: Kay Miller – “Right On Track” Kit
Windows Live Writer – Basic Tutorial
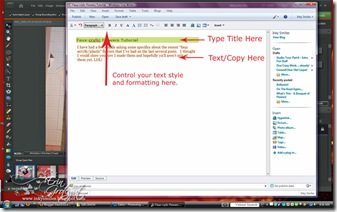
I {heart} Windows Live Writer. It makes my blogging life MO BETTAH. Jeanne Tomshack introduced it to me a while back and I have not used the online blogger interface to blog since. I had so many trouble with Blogger eating my photos and not publishing when it was supposed to, etc…. Blogger was also very cumbersome to compose posts in. Now, don’t get me wrong. I still use Blogger to host my blog and still have to log in to my Blogger dashboard to make the overall layout changes, etc., but I make the actual posts in Windows Live Writer (WLW). I thought I’d show you a very basic photo tutorial on using it. So here we go. WLW is a WYSIWYG program… “what you see is what you get”. There’s no guessing about how your text is going to appear or whether or not your photos are going to line up properly in your post. You can type up posts ahead of time if you’re going on vacation or won’t be near a computer but still want to share on your blog. WLV’s scheduling feature works GREAT! The first thing you need to do is download Windows Live Writer HERE. You will need a Windows Live account (also can be a hotmail user account or MSN account… all the same company). Windows Live Writer is FREE. {Hallelujah!} Once you’ve downloaded WLW it will prompt you to set up your user account info and password for your blog. Don’t worry, it only uses it to access your blog to upload and publish your posts. Here are some photos for using WLW. I printed my screen while publishing a recent post. Click on the photos to view larger. They should open in a separate window. Getting Started Inserting Photos Linking Text Inserting a Photo Album Scheduling a Publish Date {{edited: I just realized I’d abbreviated WLV instead of WLW…. I must have been thinking . Windows Live Vriter…. ooops!!! ROFL! It’s been corrected…}}
Faux-crylic Flowers Tutorial
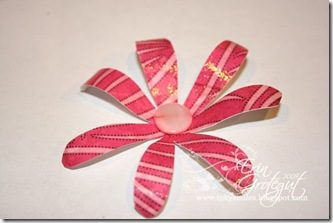
I have had a few emails asking some specifics about the recent “faux acrylic/plastic” flowers that I’ve had on the last several posts. I thought I would show you how I made them and hopefully ya’ll aren’t sick of them yet. LOL! This is a really easy process and you don’t need anything special… I think most crafters have a heat gun and embossing powder… and I KNOW you all have stamps! 🙂 This is also a great project for using up those odds n ends paper scraps or papers you thought you loved but now can’t seem to figure out what to use them on…. Supplies Needed: * Embossing Powder * Versamark Ink * Heat Gun * Scissors *Chunky Floral Image – CTMH Rustic Flowers * Something like a pencil to roll your petals on * Patterned Paper – Basic Grey Step 1: * Load up stamp with versamark ink. Stamp firmly and evenly onto paper. Step 2: * Sprinkle generously with clear embossing powder, tap off excess. Step 3: * Heat with heat gun and melt all powder. Step 4: * Cut out shape around embossed image. Step 5: * Curl edges around a pencil or other small round object. Step 6: * Scrunch the center and press petals forward. ENJOY & EMBELLISH!! Inky Smiles! View Full Album
Thoughts for Thursday: Music – Symphony & Schmidt
Music has always touched my soul. I played trumpet & baritone junior high through high school and trumpet in college. There’s something about playing in a concert band that just gets you right in your heart. I don’t know if it’s the feeling of being a small part of something so big and beautiful, the exhilarating feeling of playing powerful music, or the lack of oxygen in your brain because you’ve blown all your air into your instrument. I guess it doesn’t matter what it really is as long as the music touches your soul and makes you feel amazing. Symphony: Remember when Brent and I went to the symphony back in January? We went to “see” Vivaldi’s “The Four Seasons”. While we were there the Symphony Guild was having a raffle ($5 per ticket) for a really cool cruise vacation. B and I thought we’d try and bought one ticket. A few weeks ago we got a phone call from the Symphony Guild lady. No, we did not win the cruise vacation (darn), but we DID win a pair of Season Tickets to the Utah Symphony – 18 performances!!!! WAHOOOO! We’ve been perusing the schedule and trying to decide which performances we’d like to attend. We have reserved seats on Saturday nights! How cool is that? Date nights on the Symphony! 🙂 hehe! We’re both a little stoked. I am glad that my sweet, hottie hubby enjoys music as much as I do. (EDITED ) Schmidt: I was perusing some new tunes to add to my playlist in iTunes (to be played on Brent’s iPod classic) this morning (checking out YouTube first) and came across this FABULOUS piece by Jon Schmidt and cellist Steven Sharp Nelson. Jon’s an incredible pianist and Steven… wow… now I want to play the cello! (Seriously.. I’m going to see how much to rent a cello and try it out!) Jon plays classical, modern, and makes his own amazing mixes of classical and modern. I just checked his show calendar and he’s going to be in a town just north of us in July… and tickets are only $10!! I might just have to buy a pair! Close your eyes, lean back in your comfy chair and relax for the next several minutes…. Love Story by Taylor Swift meets Viva la Vida by Cold Play: Did that not LIFT your spirits or what? WOW. Simply AMAZING!! Do you love music? Why or why not? What music inspires you?